Configuring a dBASE
Web Application in IIS6
Overview
In earlier releases of
Internet Information Services, web applications were enabled by creating a specific
Application Mapping in the properties of the parent web site. Internet Information
Services 6, which comes standard with Microsoft Windows Server 2003, has used
some of the same configuration tools coupled with additional security features.
While previous versions
of IIS allowed any applications to run just by creating the appropriate mappings,
IIS6 has introduced the concept of Web Service Extensions (WSE) to define specific
application permissions within the IIS environment. This has created additional
configuration steps to allow dBASE web application to execute properly, as will
be detailed in the instructions to follow.
Sample Web Application
A sample web application
called dbtest has been created for the purpose of this tutorial. This
was generated using the dQuery One Click Web Application Wizard. For
the sake of simplicity, a three column table called test1 was generated
with the following fields:
The web application wizard
creates a series of web pages needed to add rows of data to this table. The
pages and their associated screenshots are as follows:
Page 1: dbtest.htm
- The first
page that displays a link to the data entry page

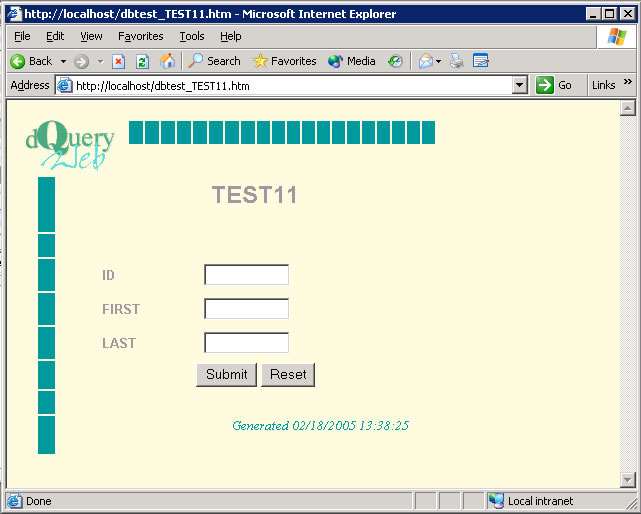
Page 2: dbtest_TEST11.htm
- The data
entry form. The form tag of this HTML page reads:
<form method="post"
action="dbtest.dbw" ENCTYPE="application/x-www-form-urlencoded">
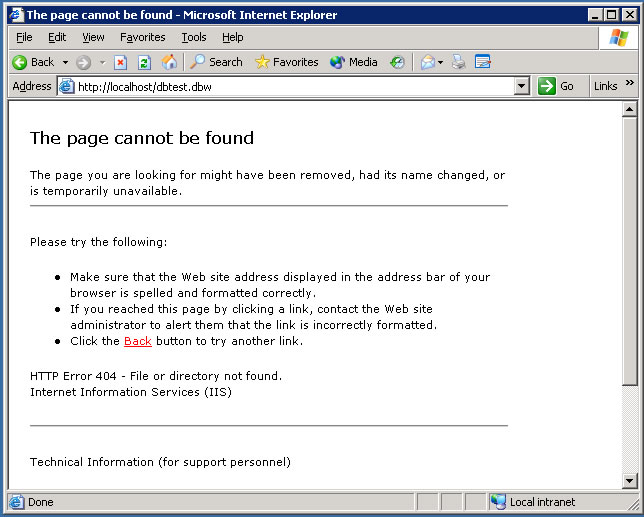
Page 3: dbtest.dbw
- The target script of the data entry form.
Note:
The dQuery Web Application Wizard defaults to an .exe extension
rather than .dbw. It was renamed for the sake of this exercise,
and to avoid any IIS configuration conflicts with other application extensions.
The HTTP Error
404 at the bottom of this page is to be expected. This is what the
default IIS6 settings will always generate with any unknown web applications.
The configuration steps to follow will create the necessary mappings to allow
this and other dBASE scripts to execute properly.
Configuration Steps
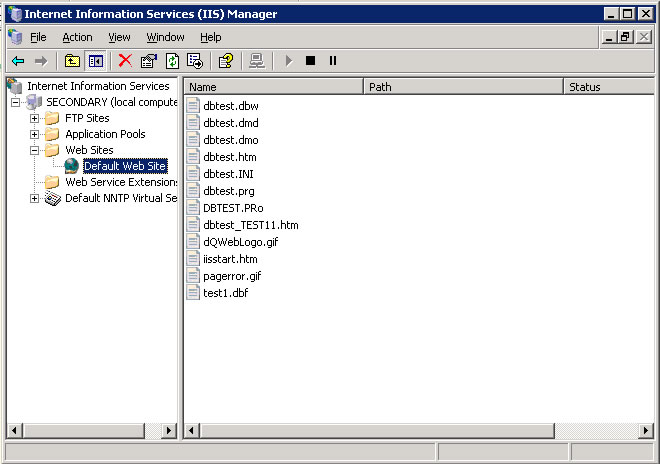
- The first step is to
configure the Application Mapping within the web site properties. Open Internet
Services Manager and navigate to the web site hosting your dBASE web application.
In the example below, this is the Default Web Site:
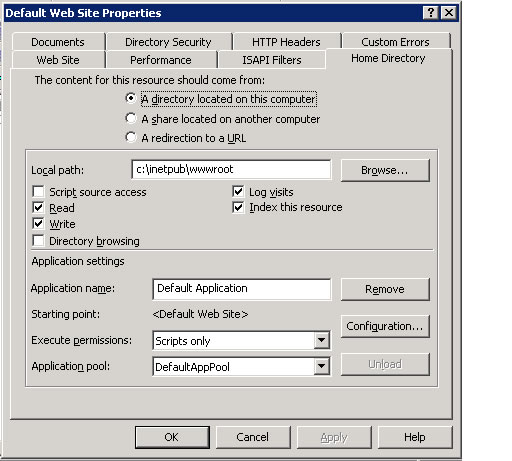
- Right click on the Default Web Site and select Properties. In
the Web Site Properties dialog box, click on the Home Directory tab.
Make sure that both the Read and Write checkboxes
are checked. Under Application Settings, click on the Configuration
button:
- In the Application Configuration dialog box, click on the
Add button to open the Add/Edit Application Extension Mapping
dialog box. Click on the Browse button to navigate to the
PLUSrun.exe file. In this example, the executable is located in the following
path: C:\Program Files\dBASE\PLUS\Runtime\PLUSrun.exe.
After navigating to the executable and selecting it, click OK to return to
Application Mapping box. The path will now be displayed in the Executable
field as follows:
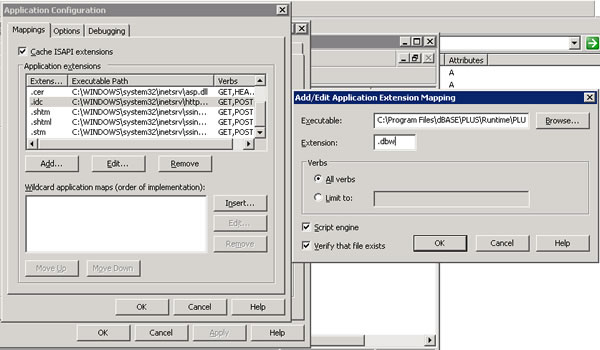
Note: You must modify this text path with quotes,a
space and the %s switch as follows:
"C:\Program Files\dBASE\PLUS\Runtime\PLUSrun.exe" "%s"
Be sure to type it exactly as it appears above, or it will not execute properly.
Subsitute your path to the PLUSrun.exe if necessary.
Finish off this dialog box with the following settings:
Extension: .dbw
All Verbs: selected
Script Engine: checked
Verify that file exists: checked
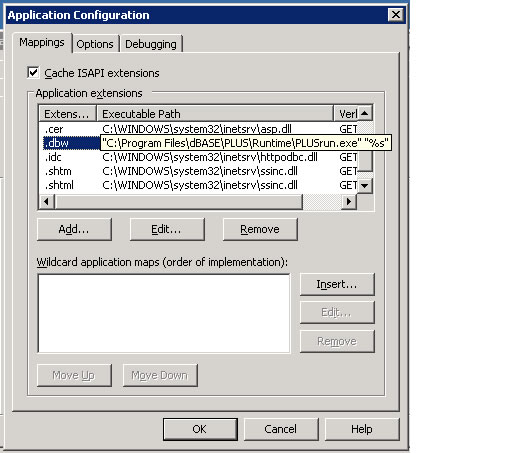
Click OK to return to the Application Configuration
dialog box. It should now look like this:
- Click OK twice to return to the main IIS Manager window.
Click on the Web Service Extensions folder in the left panel
to display the list of Web Service Extensions, as show below:

Notice that all of the Web Service Extensions are prohibited by default. To
test the Application Mapping updates completed in Steps 1-3, try executing
your script from a web browser with All Unknown CGI Extensions
enabled. To enable this extension, right click on it and select Allow.
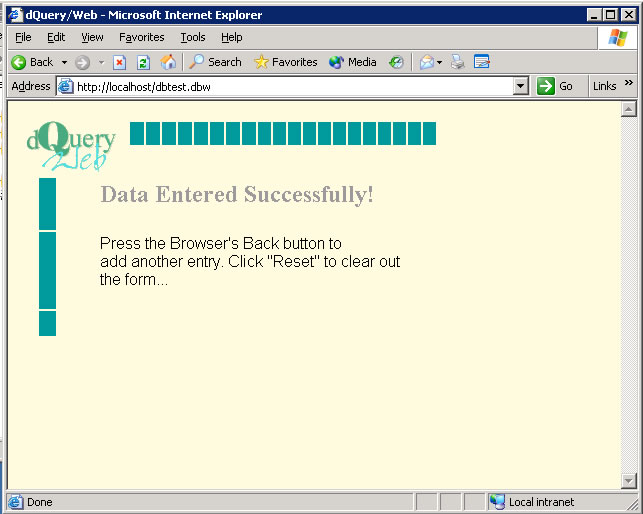
Now we can try the same sample form that we did in the initial test
of the web application. On the data entry page:
http://localhost/dbtest_TEST11.htm
We enter the values 123, Test1 and Test2 for the fields ID, First
and Last, respectively, and it should generate the
following result page:
- We now have a working web application. The only problem is - it's not very
secure. It would be much better to restore the default setting of Prohibit
for the All Unkown CGI Extensions, and allow only
the dBASE runtime module to execute. We will tackle this step next.
Note: The following steps will require you to
modify the IIS Metabase File. It is highly recommended that you backup this
file (and your server) before proceeding with any of these modifications.
Right click on the All Unkown
CGI Extensions and select Prohibit to restore this
setting.
- This is where things get interesting. Back in step 3, recall that
we had to add the path to the runtime module by clicking the browse button
in the Application Extension Mapping dialog box. After adding this file, we
were able to manually add the quotes and the %s by editing
this path directly in the Executable field of the properties
window. The WSE wizard does not allow this level of customization, so we must
add it using the command line tool IISExt.
First, we need to open a command window. Click the Start button and choose
Run. Type CMD and click OK
to bring up the DOS style command window. Navigate to the location of the
system files, which by default should be stored in the following location:
C:\WINDOWS\system32
At this prompt, please type the following command:
iisext /AddFile "C:\Program Files\dBASE\PLUS\Runtime\PLUSrun.exe
%s" 1 PlusRun 1 PlusRun

Now return to the IIS Manager and refresh
the contents of the Web Service Extensions folder. You should now see PlusRun
listed as one of the Web Service Extensions:

Now try right clicking on PlusRun and select Properties.
Take a look at the Required Files tab and run the mouse pointer
over the File Name entry to see the full path to the runtime module. Notice
that it contains the trailing %s switch, but there are no
quotes around it:
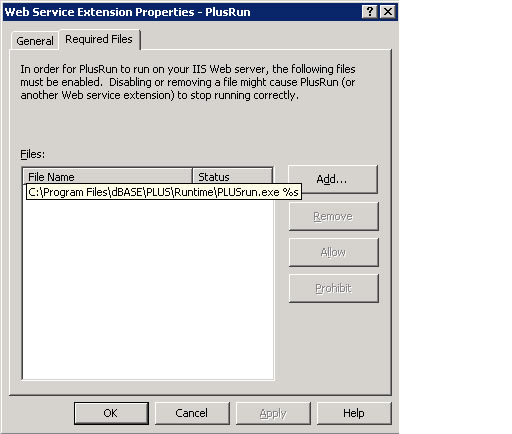
We cannot edit this entry in IIS Manager, so we will have to edit the Metabase
file directly.
- In order to be able to edit the Metabase file, we
will have to shut down IIS temporarily. Open up a command window as you did
in Step 6, and enter the following:
NET STOP /y IISADMIN
You should see a series of messages indicating that the various Internet
Information Services are shutting down. Once this is complete, use a text
editor like Notepad to open the following file:
C:\WINDOWS\system32\inetsrv\MetaBase.xml
Use the search command to locate the string PlusRun. This
should bring up a block entry like the following:
WebSvcExtRestrictionList="0,*.dll
0,*.exe
0,C:\WINDOWS\system32\inetsrv\ssinc.dll,0,SSINC,Server Side Includes
0,C:\WINDOWS\system32\inetsrv\asp.dll,0,ASP,Active Server Pages
0,C:\WINDOWS\system32\inetsrv\httpodbc.dll,0,HTTPODBC,Internet Data Connector
0,C:\WINDOWS\system32\inetsrv\httpext.dll,0,WEBDAV,WebDAV
1,C:\Program Files\dBASE\PLUS\Runtime\PLUSrun.exe
%s,1,PlusRun,PlusRun"
Notice the last line (in red) is the one we added using
the IISext tool in step six. We need to edit this line to
read as follows:
1,C:\Program Files\dBASE\PLUS\Runtime\PLUSrun.exe "%s",1,PlusRun,PlusRun"
The two " entries
will add the quotes needed to allow this executable to run properly within
IIS. Now that the edit has been made, save the file and restart IIS by typing
the following back in the command window:
NET START W3SVC
Jump back into the IIS Manager window and refresh the contents of
the Web Service Extensions folder. Right click on PlusRun,
choose Properties and then the Required Files tab.
You should now see the quotes around the %s as shown below:

- That should do it! If we execute the same dbtest application
that we did earlier, it should generate the same success page as it did in
step four when All Unkown CGI Extensions were enabled. Now
it runs exactly the same, but in a much more secure web environment.