Migrating Applications from Visual
dBASE 5.x to Visual dBASE 7
By Craig DiGiorgi
January 1998
Table of Contents
INTRODUCTION
Migration Overview
CATALOGS AND THE
PROJECT MANAGER
TABLES, DATA,
AND DATATBASE ENGINE ENHANCEMENTS
Borland Database Engine Enhancements
Using data in Visual dBASE 7
MIGRATING FORMS
Migrating Forms: Step-by-step
Overview of changes
Additional Form Designer Features
MIGRATING
REPORTS
Using the Report Classes in Visual dBASE 7
PROGRAMS AND THE
VISUAL DBASE LANGUAGE
CREATING
INSTALLATION PROGRAMS TO DELIVER APPLICATIONS
CO-EXISTING
BETWEEN VISUAL DBASE 5.X AND VISUAL DBASE 7
SUMMARY
This document is designed to get you up and running quickly when moving applications from Visual dBASE 5.x to Visual dBASE 7. For specific information on the new features found in Visual dBASE 7, please refer to the "Technical Overview" white paper.
In the course of this paper, you will find many tips, tricks, and steps required for converting your Visual dBASE 5.x applications to Visual dBASE 7. In addition to the basic steps, this while paper also provides basic information on the new features found in Visual dBASE 7.
dBASE in its seventeen year history has never made such a drastic step forward for software developers who build "business applications" as it has with Visual dBASE 7. Visual dBASE 7 is a true native 32-bit Rapid Application Development environment. With Visual dBASE 7, your innovative designs can enjoy a higher degree of class abstraction and object encapsulation for more robust and extensible applications. This paper helps you migrate existing applications from Visual dBASE 5.x to Visual dBASE 7, and includes some information on how to leverage the power of object oriented development.
Visual dBASE 7 has some very exciting changes that simplifies the design and development of new applications. The Navigator has been redesigned as a horizontal tabbed form with the tabs placed in the order of frequency of use. However, the most important enhancement to the Navigator is the new "Drag and Drop" functionality which allows the dragging and dropping of navigator components into the Project Manager or any of the Design Surfaces.
The graphical Project Manager provides a central repository for all of the components created and used in the development and deployment of your 32-bit applications. Powerful new data classes such as the Query Class, Session Class, and Data Modules make for seamless scalability to virtually any database. Visual dBASE 7 also includes a visual query design tool, Borland’s Visual SQL Builder, for easily creating complex SQL statements, without having to know SQL.
Couple all this with the new Programmable Grid Control, Tabbed Notebook Class, Container Class, Progress Bar Class, Toolbar Class and Integrated native Report Writer, and you have Visual dBASE 7 - "The fastest way to deliver Business Applications".
Migration
Overview
Migration will require Windows 95 or Windows NT 4.0. Since there
are inherent differences between 16-bit and 32-bit development, you should
maintain separate locations for Visual dBASE 5.x and 7 applications.
If you want to upgrade your applications taking advantage of the newest features, you can accomplish this in a relatively painless process, which can be done in stages. Please get familiar and understand the new classes and respective dependencies, in other words, "what effects what" in the big picture. This paper will explain some dependencies and differences.
Included with Visual dBASE 7 are some useful utilities and source code to aid you in the conversion process. In the dBASE utilities directory you will find a Crystal Report Converter and a Visual dBASE 5.x QBE to DMD (data module) Converter.
Migrating an application in
stages
Precursor: Please review all the samples and code, as well as the
source code for the conversion utilities included with Visual dBASE 7 - some of
the .CC files demonstrate real world examples of 32-bit object oriented
applications and tools. Source code for
the Sample Applications, Programs, and conversion utilities is included.
Below is a top down approach to migrating Visual dBASE 5.x applications to Visual dBASE 7: Details and notes for each stage will follow:
Stage One - Convert the Catalog to a Project File,
or create one if necessary.
Stage Two - Table modifications (if any) are made.
Stage Three - Convert .QBE files to Data Modules.
Stage Four - Enhance the Forms
Stage Five- Convert the Crystal Reports reports to the new Report Classes.
Stage Six- Make the necessary changes to tie the application together.
Stage Seven- Create the Installation Program
Catalogs and
the Project Manager
The Project Explorer is where most of the application development and build process will take place in Visual dBASE 7.

Figure I: The Visual dBASE 7 Project
Explorer provides visual management of application files.
The Project Explorer provides visual management of the files in an application. It has multiple views available depending on file type. For example, if the highlight bar is on a form, the Project Explorer presents a tabbed page for source view or form view. The toolbar buttons provide the ability to run the form or open the form in design mode. Project-based compiler directives, such as a global DEBUG switch to include/exclude test code (using #ifdef DEBUG in your programs as detailed in the HELP system), can be set. These and other properties can be set from the Project Properties dialog of the Project Explorer. The Project Explorer also supports compiling, building, and deploying the entire application.
The first step in migrating an application to Visual dBASE 7 is to convert the existing catalog to a Project file. If the current application does not use a catalog, then a Project file can be created from the File | New Project... menu option in Visual dBASE 7. Conversion of the .CAT file is accomplished using the catalog conversion tool CAT2PRJ.PRG, found in the \Visual dBASE\BIN sub-directory of the default installation. The following show the syntax for Catalog Conversion, as executed from a program or Command Window:
CAT2PRJ
([<expC: Catalog file name>] [,<expl: overwrite] )
example: CAT2PRJ
("MyApp.CAT", True)
Two optional parameters can be passed to this statement. The first parameter is the name of the current catalog, and requires quotes around the file name ("MYFILE.CAT"). The second parameter is the overwrite parameter, which is a logical expression and determines whether the program can overwrite an existing Project File (.PRJ) file without prompting and is passed as True or False. Notice that logical expressions can now be passed as literal True and False, in addition to the traditional .t. and .f. syntax. If no parameters are passed to the statement, a dialog box is opened to prompt for the filename to convert. Select the file name from the dialog box and press the Open button to convert the file.
A message box is presented if the catalog name, prompting you for conformation to overwrite an existing Project File (.PRJ file). By default, the Project File (.PRJ) file will have the same name as the catalog (.CAT) file. Upon completion of the conversion, the project will be opened in the new Project Explorer as shown above.
The Project file (filename.prj) can be subsequently opened in either the Source Editor or the Project Explorer views. In the Source editor view, the file generation date is listed first, followed by the Project property settings, and finally the actual file list. In the Project Explorer view, files will be categorized by their respective categories in alphabetical order within the category (for example, forms, reports, or images). Files that are part of the Catalog (.CAT) file, but do not have a corresponding category in the new project file will be placed in the "Other" category. This is the category where you will find .QBE files, which should be converted into Data Modules or SQL statement files. Crystal Reports reports will also appear in the "Other" category tab.
The balance of converting the application (and subsequently any future development) can be done from the Project Explorer window. Creating new objects (forms, reports, etc.) can be initiated by a right mouse click from within the Project Explorer, by using the menu system, or by "dragging and dropping" components from the Navigator into the Project Explorer. New forms and reports will be automatically added to the Project file as long as the project is open.
Tables,
Data, and Database Engine Enhancements
Making use of existing data is the easiest part of the migration
process. Visual dBASE 7 works with your existing tables and indexes, leaving
them in their original format. This makes it easy for Visual dBASE 7
application to work in conjunction with existing Windows 3.1 and DOS
applications.
However, if an index was created on a memory variable or User Defined Function (UDF), that particular index will no longer function. If your dBASE tables do not require compatibility with a previous version of dBASE, Visual dBASE 7 provides a new state of the art table format which takes application development to a new level of power and ease.
Borland
Database Engine Enhancements
With enhancements to the dBASE table structure and a new administration
utility, it is easier than ever to tap into the power of the Borland Database
Engine (BDE).

Figure II: The BDE Administrator
simplifies administration tasks.
The BDE Administrator screen is divided into 2 parts. The left side displays the database drivers and the right side displays the configuration items. Items with a bolded title are not modifiable. Visual dBASE Client Server includes NATIVE drivers for the most popular RDBMS servers, including Oracle, Sybase, MS SQL Server, Informix, IBM DB2, and InterBase. All version of Visual dBASE include native connectivity to dBASE and Paradox, as well as connectivity to Access and FoxPro.
Existing tables from Visual dBASE 5.x will have a table level of 4 or 5 depending on the version of dBASE these tables were created for. The Visual dBASE 7 default level at install time is level 7 (as set in the BDE Administrator). A table level of 7 provides access to new features, including long field names (31 character limit instead of 10) and new field types:
- TimeStamp for storing date and time data in one string.
- Double field type is used for storing double precision numbers.
- Long field type stores whole numbers.
- AutoIncrement field type for creating a unique row identifier – the value will be automatically incremented each time a new row is inserted into a table. This field is Read Only. To change the data in an AutoIncrement field:
- Create a new table structure
- Add the AutoIncrement field and Define it as a Primary Key
- Bring the data into the new file and the AutoIncrement field will self enumerate as the data is being brought into the new file.
In addition to the new field types, there is also support for Null Character fields, Field level and Table level constraints, Distinct/Unique indexes and custom field properties. Referential Integrity (previously set via the INTEGRITY clause of the SET RELATION statement) is now handled at the data engine level in level 7 tables. The rules for Referential Integrity are set in the File | Database Administration Menu. Note: the primary key must be defined in the parent table while in the table designer using the File | Structure | Primary Key menu prior to setting referential integrity.
Another benefit the new table format is support for Custom Field Properties. Custom Field Properties allow you to add any property to any field in a table, some of which will be used automatically by Visual dBASE 7. Your particular field can then be displayed having a unique font or special color and format. Another feature of Custom Field Properties is the ability to make the field act as a lookup key to data in another table. The following steps detail how to use the Custom Field Property "LookupSQL" as a custom field attribute to get state names:
- Create a table (or modify an existing one) so that it has a STATE field defined as character 32. (This will allow for the entire state name to be displayed using the 2 character designation as a lookup) Include any other fields desired.
- Included in the \Sample\mugs\tables directory is a table that has a complete list of state codes and the state name. Copy that table to the same directory as the table created in step 1 for ease of use.
- Select the STATE field on the inspector.
- Press the Right mouse to activate the speed menu.
- Select New Custom Field Property... to activate the dialog box.
- Enter LookupSQL for the Name.
- Enter the SQL statement in the Value EntryField (for this example use "SELECT stateid, state FROM state" without the quotes).
- Select OK to close the dialog box. Notice that there is a new Custom category with a property labeled LOOKUPSQL. This property contains the SQL statement from step 7.
- Save the changes to the table and open it in the Columnar or Form layouts. The State field appears as a combobox with the data from the State table active.
This same process can have innumerable uses like Order lookups, Customer lookups, or just about any other type of lookup imaginable. Need to change the location for lookup data? Simply modify the location in the SQL statement. The field with this type of Custom Attribute set can display the data from the Query on Forms and Reports making lookups effortless.
If you wish to convert existing Level 4 or 5 tables to take advantage of the new Level 7 table features, we suggest that you:
- Use COPY TO… STRUCTURE EXTENDED and CREATE FROM commands.
- Open the new table structure in the table designer and select the features and field types you wish. Save the file.
- Use APPEND FROM to bring in your data to your new table.
Warning: If you modify the structure of an existing level 5
dBASE table with level 7 set as the System Default in BDE, your table will be
automatically updated to the new Level 7 dBASE table type, and won’t be
compatible with previous versions of dBASE.
Indexes and Expression
Indexes
Index files (.MDX) will convert to Visual dBASE 7 format automatically. Here
are some additional things to be cautious of when working with indexes in
general.
- Conversion functions should be used to combine fields with different data types. When converting a date to a character string, use the DTOS() (date to string) function instead of DTOC() (date to character). Many date formats present the day before the month, or the month before the day and year (for example the British date format). This will prevent records being in the wrong order.
- As always Do Not use TRIM() or LTRIM() to remove blanks from strings in Index Keys. Compensate by adding enough spaces to make sure the index key values are all fixed in length. The ‘-‘ operator concatenates strings while rearranging trailing blanks. Varied key lengths may cause corrupted indexes.
- If a function is used in a key expression, keep in mind that the index is ordered according to the function output. When you use search for a particular key, you must search for the key expression as it was generated.
- FOR <condition> limits the records that are included in the index to those meeting the specified condition.
- Access to the Menu Selection, "Manage Indexes", is only available while in the "Table Designer" under the Structure | Manage Indexes… menu selection.
Additional information on these tips can be found in the documentation.
Using
data in Visual dBASE 7
Where Visual dBASE 5.x used QBE (Query by Example) files and DML (Data
Manipulation Language) for data access, Visual dBASE 7 uses DMD (Data Module)
files, SQL files, and the new data classes. While Visual dBASE 7 continues to
support QBE files, we recommend converting your applications to take advantage
of the powerful new object-oriented data access tools provided by Visual dBASE
7.
In using Visual dBASE 7, it is important to use Data Modules and SQL files for the correct purpose. At a high level, Data Modules are used when you need read-write access to multiple linked tables. SQL files are best for use in cases such as reports where complex, read-only access is required. The data classes are the building blocks for Data Modules, and are used with SQL files and for simple table access in forms, reports, and programs.
Visual dBASE 7 Data Objects
The new data classes are the heart of Visual dBASE 7, and are the primary means
of data access. In addition, the new data classes can work in conjunction with
existing DML code, allowing you to migrate at your own pace.
The most dramatic difference between the data objects of Visual dBASE 7 and the DML of Visual dBASE 5.x is that data objects don’t use WorkAreas. Data objects contain a copy of the records of the table, not the actual table data itself. This copy of your records is called a rowset (also known as a result set, data set, or cursor.) Since the rowset is an object in Visual dBASE 7, it does not need WorkAreas to protect it from other rowset’s derived from the same or other tables. Visual dBASE 7 uses OOP encapsulation instead of WorkAreas.
A simplified example of the class hierarchy of Data Access Objects is as follows:
- The top level is Visual dBASE 7 itself.
- This is followed by an optional Session object. A total of 2048 sessions are available.
- Each session contains one or more Database objects. This can be a Standard table or a BDE Database Alias.
- A Query object is used to access tables and views from the Database.
- The Query Object contains a SQL statement that generates a rowset object as the result data set (the rows, or records, of the table, for example).
- The result data set is then available to you by referencing the rowset property of the Query Object.
There is one additional Data Access Object called "StoredProc". This object acts the same as a Query object in the above detailed hierarchy. The difference is that Stored Procedures also have a params array. This can store input, output, or result values. Input values are set before processing the StoredProc.
In most cases, the QUERY class is now the method of data access in Visual dBASE 7. Two of the most interesting properties of a Query class are the ‘SQL’ property and the ‘rowset’ property. The SQL statement is used to describe the data requested from the table. If the SQL statement is successful, then the set of rows returned is called a rowset. This rowset (result data) is then available for navigation, searching, and the addition, modification, and deletion of data.
However, you do not have to know SQL to use the Query class. When a table is dragged from the Navigator onto a form or report, Visual dBASE 7 automatically creates a Query object with the required "select" statement to collect all of the data from the table:
SELECT * from <tablename>
This statement selects all data from all fields and makes it available to the form or report. This statement can be modified to specify additional tables to join, which fields to return, and what sort order to use. More advanced SQL statements can be created visually, without knowing any SQL, by using the Visual SQL Builder (search the VdB Help for ‘SQL Designer’ for information on using the Visual SQL Builder). If you are interested in the syntax of SQL, detailed information is available in the Visual dBASE 7 Language Reference under Local SQL Overview in the Visual dBASE help system. However, create complex queries (SQL Expressions) at this point only if you want read-only access to the data. When linking tables for read/write access, please refer to the data module section.
Note that while each query object returns only one rowset, a form, Data Module, or report can have multiple query objects or Data Modules to access multiple rowsets.
Data Modules
All of the data access objects (Session, Database, Query, and StoredProc) can
be placed in a single Data Module, which is basically a container for data
objects and their relationships. This allows for queries to be created once and
shared across any number of forms and reports. The relationships between the
objects, in addition to object properties and events, can be defined for the
objects in the data module, creating a set of business rules which can be
shared across an entire application. Data Modules are represented by source
code in files with a .DMD extension. In addition, custom data modules (in .CDM
files) can be created and further subclassed so that multiple applications
share the same rules.
When data is being updated across multiple tables, a data module should be used that includes any defined table relationships. In setting up these relationship, the rowset properties masterRowset, masterFields, and indexName of the detail tables Query objects rowset should be used. The Visual dBASE online help includes information and an example of how to set this up – search for the ‘Rowset Class’ help topic, looking at the information under the masterRowset property.
Note that the easiest way to add tables to a Data Module is to drag tables from the Navigator onto the Data Module in the Data Module Designer, automatically creating a Query object for that table. The inspector can them be used to modify the Query object or its rowset.
Converting QBE files to Data Modules
The fastest way to get started with Data Modules is to convert existing QBE
files to data modules. There is a utility provided in the \Visual
dBASE\UTILITIES\UPGRADE directory that converts a Visual dBASE 5.x query QBE to
a Visual dBASE 7 Data Module DMD. The syntax of the command to access this
program is:
QBE2DMD ([<expC: Query file name>] [,<expl: overwrite] )
Two optional parameters are passed in this statement. The first parameter is the name of the .QBE file and requires quotes around the file name (example "DATA.QBE"). The overwrite parameter is a logical expression and determines whether the program can overwrite an existing Data Module file without prompting, and is passed as True or False. If no parameters are passed to the statement, a dialog box is opened to prompt for the filename to convert. Select the file name in the dialog box and press the Open button to process the file.
Note that the QBE2DMD utility won’t work if the Visual dBASE 5.x QBE file includes relations based on expressions. These relations would have to be removed before running the utility, and then manually implemented in the resulting Data Module. There are three ways that this could be done using the created Query objects.
- Create a SQL join (which can be done visually using the Visual SQL Builder, or by hand using SQL statements.)
- Use the masterSource property of the child tables Query object (roughly the equivalent of a dynamic filter in Visual dBASE 5.x.)
- Use the masterRowset, masterFields, and indexName properties of the child tables Query objects rowset (roughly the equivalent of a dynamic "Set Key" in Visual dBASE 5.x.)
Notes:
- Only joins and masterRowset support compound indexes and expression indexes.
- Join permits the use of SQL expressions, some of which are equivalent to Visual dBASE 5.x (such as UPPER().) However, you must be careful designing an SQL join. In many cases, the resulting rowset will be read-only.
- masterRowset provides full support for all Visual dBASE expressions through the creation of a calculated field in the parent Query’s rowset.
Data Modules can also be created visually with the Data Module designer or Wizard.

Figure III: The Data Module Designer simplifies the creation of Data
Modules
Visual SQL Builder
The Visual SQL Builder is a visual tool for easily developing a wide range of
SQL statements, from the simplest case to the quite complex. The Visual SQL
Builder automatically generates powerful and accurate SQL statements that can
be saved as a SQL class, run from within the Command Window, included in your
application, or pasted into the SQL statements of a Query object.
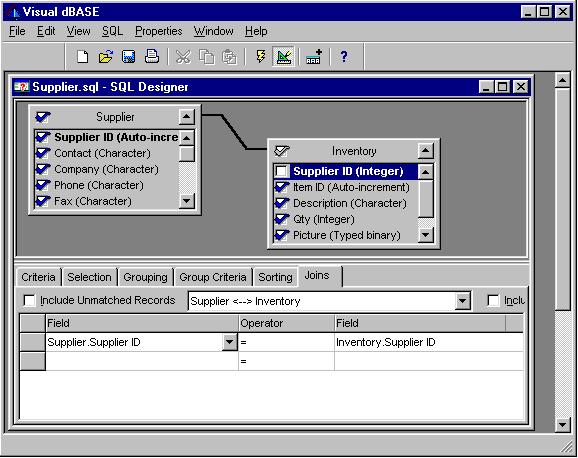
Figure IV: The Visual SQL
Builder simplifies the creation of complex SQL statements.
Now that the tables and data access components are converted, the next step in converting an application is to begin the process of migrating the forms. If all of the objects on the form are from the standard tab of the Visual dBASE 5.x Control Palette, or if they are completely custom, little or no modification will be necessary. The most noticeable exception is that the default values for the ScaleFontSize and FontSize properties have changed from "8" to "10", respectfully.
The steps to migrate Visual dBASE 5.x forms to Visual dBASE 7:
- Open the .WFM file in the Source editor (not the Form Designer.)
- Modify the code and add "This.ScaleFontSize = 8" to the class definition of the form and do the same with the forms data and text objects for FontSize properties.
- Close and save the form. (Note 1)
- Open the form in the design surface
- Drag the data module to the
form. (Note 2)
- Close the form and save the
changes. (Note 3)
- Delete the VIEW= statement
from the class definition. (Note 4)
- Update the DataLink
properties for all of the entryFields. (Note 5)
- Save the form and the conversion is complete.
Note 1: This is the minimum amount needed to get the form to open in Visual dBASE 7. It isn’t necessary to change the "this.view" property (if one is set) in order to use the form, Visual dBASE 7 will use the QBE or DBF to run the form.
Note 2: This step requires that the process of migrating a QBE to the new Data Module was completed.
Note 3: This is the step that Visual dBASE 7 will convert the code to the new object definition syntax (detailed below). At this point the form is a Visual dBASE 7 Form and will no longer function in previous versions of Visual dBASE.
Note 4: This step can be completed from the Source editor or from the Design surface.
Note 5: There are two ways of accomplishing this task. The first is to access the source editor and for each entryField object, replace the dataLink property with the text:
"form.<queryname>.rowset.fields["fieldname"].
The other option is to re-enter the design surface. During the load of the form designer, each entry field will produce a Program Alert for an undefined variable name. Ignore the alerts and enter the design surface. Once there, each entryField can be visually updated to reflect the new dataLink property.
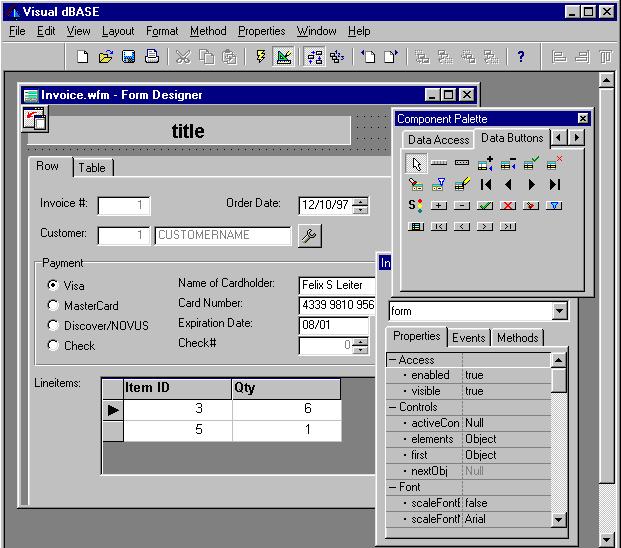
Figure V: The updated visual Form Designer
Overview
of changes
The following sections provide an overview of some of the underlying changes
between Visual dBASE 5.x and Visual dBASE 7 that have a direct impact on the
conversion process.
Syntax change in CLASS
construction.
One of the most important changes affecting forms is how objects are
instantiated and how properties are set. Visual dBASE 7 now includes the ‘with’
control statement, which allows you to group your property settings without
having to type "this" for every property of the class. This reduces
the amount of typing required, results in cleaner code, and allows us to do
some optimizing "under the hood".
In the following example, we are showing the FORM class construct using the old and new styles:
|
5.x |
7.0 |
|
CLASS
testFORM OF FORM |
class
testForm of FORM |
New Defaults Change appearance of your Form
Visually, your form will look different because the default values of the
scaleFontSize and fontSize properties of the form and data control classes have
changed in Visual dBASE 7. The default Font has been changed from "MS Sans
Serif" to "Times New Roman" and the scaleFontSize default has
been changed to 10 points. These changes were made because all US and
International versions of Visual dBASE 7 now use the same default size. If you
require to maintain the 5.x defaults explained here. You can hardcode changes
in your form to reflect the original settings. Changes to the forms
scaleFontSize and fontSize properties and any data control font properties.
Example:
CLASS testFORM
OF FORM
this.Text = "Form"
this.Top = 0
this.View = "test.dbf"
this.ScrollBar = 2
this.Left = 47
this.Height = 13
this.Width = 36
this.ScaleFont = 8
this.FontSize = 8
DEFINE
ENTRYFIELD ENTRYFIELD1 OF THIS;
PROPERTY;
Top 3,;
Left 17,;
FontBold .F.,;
FontSize 8,;
DataLink "TEST->BILLING_N",;
Height 1,;
Width 8
FORM CLASSes may have been
Subclassed
There are a few items to note before we proceed with the migration process. If
any of the controls on your forms to be migrated are subclassed from a custom
control file as "BUTTONS.CC", this library does not ship with Visual
dBASE 7. The button library can still be used with existing forms, however, the
library is superseded by the new version called "DATABUTTONS.CC".
Forms using BUTTONS.CC will produce a program alert due to an "invalid
class name". This is because BUTTONS.CC defines a class named ToolButton
that is now a native class in Visual dBASE 7. In order to continue using
BUTTONS.CC, open the library in the Source editor and rename ToolButton. When
you call the renamed ToolButton class, you’ll also have to change your class
pointers to match the renamed ToolButton class. No further modification is
necessary on any of the other controls in this library.
If any of the forms access the files, #UTIL.H, ENUM.H, and MESSDLG.H, the source code will need to be modified to #include VDBASE.H. These three files UTIL.H, ENUM.H, and MESSDLG.H have been replaced by the single file VDBASE.H and you can make the respective changes.
CLASS BROWSE and GRID
Forms which include a BROWSE object will mostly function as they do in Visual
dBASE 5.x. Some of the properties of BROWSE are now obsolete and will no longer
function. If you wish to have additional functionality available, and if
compatibility with Windows 3.1 and DOS applications isn’t necessary, then it is
recommended that the BROWSE object be converted to the more powerful GRID
control. This control has much of the same functionality as the Browse, but
provides that control through a more abstract object-oriented layer. In
addition, the GRID control has a DataLink property that can take advantage of
the LookupSQL function described in the Table section of this document. This
function alone will save hours of development time when using lookup tables.
Another time saver is the AutoEdit property of the rowset. The default of the
AutoEdit property is true and allows the rowset results to automatically switch
to edit mode when changes are made via a data component datalinked to the
rowset. Also, when autoEdit is true and editing begins, the canEdit and onEdit
events fire, allowing you to detect when and if editing starts. When the
property is set to false, all editing capability for that field is disabled.
BROWSE Class Construct and system defaults with exception to position:
|
5.x |
7.0 |
|
DEFINE
BROWSE BROWSE1 OF THIS; PROPERTY; |
this.BROWSE1
= new BROWSE(this) height = 11 |
External CLASS Controls - VBX
/ ActiveX
If your existing forms use VBX controls, these will have to be replaced with
ActiveX controls. Most vendors who provide VBX controls have already migrated
their controls to ActiveX and should be able to provide the upgraded controls.
In addition there are a number of new ActiveX controls provided with Visual
dBASE 7 including;
CHART FX
Pinnacle-BPS‘s Graph Control
VCI First Impression Chart
VCI Formula One Workbook
Visual Speller Control
If the form uses any stored resources from 16-bit DLL files, they are no longer going to work in Visual dBASE 7. A tool like the Resource Workshop may help in finding a corresponding resource in a similar 32-bit file. It may be necessary to use C++ or Delphi to create a new 32-bit resource DLL file as a solution to this problem.
Visual dBASE 7 changes the syntax used to instantiate objects. Previous versions of Visual dBASE instantiated objects using the DEFINE object syntax. Visual dBASE 7 uses THIS and WITH as identifiers. The following is a comparison between the two syntax statements:
|
Visual dBASE 5.5 Statement |
Visual dBASE 7 Statement |
DEFINE TEXT TITLE OF THIS; PROPERTY; Text "Master",; FontName "MS Serif",; FontSize 24,; Left 1,; Top 0.5,; FontItalic .T.,; ColorNormal "R+/GB+",; Height 2,; Width 58 |
this.TEXT1 =
new TEXT(this) |
Additional
Form Designer Features
As you migrate your Visual dBASE 5.x forms, you can take advantage of the many
new features offered by Visual dBASE 7, including:
- In-Place text editing of Text Objects.
- A new format toolbar with support for HTML formatting tags.
- F11 Hotkey to open the Inspector.
- F12 Hotkey to open the Procedure Editor.
- A Form Metric Property for Points, Chars, Twips and Pixels.
- A Object Container Control.
- True Win32 Controls.
- Ability to Drag and Drop Tables, Images and Menus from the Navigator
- CodeBlock builder.
- Automatic Field Labels for Fields selected from the Field Palette.
- Toolbar Class.
- Support for additional Image formats.
- An AutoCenter property for the form (no more coding to make sure the form is on the center of the screen.)
Refer to the product documentation or the Product Brief for more information on the new features of the form designer.
This section covers converting Crystal Reports 3.0 report and label files to Visual dBASE 7 Report Classes. The Visual dBASE 5.x default extension for a report is .RPT. This extension does not display under the Report tab of the Navigator or the Report folder of the Project Explorer. To view the file names in the Navigator, modify list of extensions on the "Other" Tab to include the .RPT extension. In the project Explorer these files can be found in the "Other" folder.
The Report Conversion Wizard will be located in the \Visual dBASE\UTILITIES\UPGRADE sub directory.
Here are the steps to migrate a report from Visual dBASE 5.x (as well as Crystal Report 3.0 files):
- Start the Report Conversion
Wizard using the syntax:
RPTTOREP ([<expC: Report file name>] [,<expl: overwrite] ) (Note 1) - Enter the name of the file
to convert. (Note 2)
- Upon completion of the
wizard, observe the list of "Encountered Problems" (if any) (Note
3)
- Modify the Report to correct
any problems encountered during the conversion. (Note 4)
Note 1: Similar to the .QBE converter, two optional parameters are passed in this statement as well. The first parameter is the name of the .RPT file and requires quotes around the file name (example "MASTER.RPT"). The overwrite parameter is a logical expression and determines whether the program can overwrite an existing .rep file without prompting and is passed as True or False. If no parameters are passed to the statement, the Wizard starts with system prompts for the file name to convert.

Figure VI: The opening Dialog of the Report Conversion Wizard.
Note 2: Enter the name directly or use the tool button to select the file name in the dialog box and press the Save button to continue with the Wizard. The Report Conversion Wizard reads in the Crystal file and parses it into the Visual dBASE 7 Class syntax. During this process, a number of items are addressed:
- RPT file data will be mapped to a single Visual dBASE PageTemplate.
- Band Line text will be streamed with HTML tags.
- Field objects will be streamed as Text class instances.
- Line objects will be streamed as Line class instances.
- Image objects will be streamed as Image class instances.
- OLE objects won’t be translated, but will be flagged as exceptions and streamed to the header.
- Comments will be streamed as comments in the header.
- Title text will be streamed as the Report header Text.
- Labels (standard and user-defined) and other multi-column reports are supported.
- Outputs internationalized text strings in appropriate language for version of Visual dBASE 7.
Note 3: Upon completion, the Converter will present a list of problems it encountered during the conversion process. The "Problems Encountered" can include Complex relations, Filters and Keys that could not be converted due to the differences between the work-area oriented language of Visual dBASE 5.x and the object oriented data classes in Visual dBASE 7. This list will also be incorporated into the header of the Target .REP file for viewing and modification later.
Note 4: The modifications will take place using the Visual dBASE 7 Report Design surface.

Figure VII: The new Report Designer, a Two-Way-ToolÔ using native Visual dBASE Report classes
If a complex relation is involved, this would have been migrated to a Data Module as previously described. Drop the module on the report and then re-link the text fields to the rowset using the same procedure as with the form.
Using the
Report Classes in Visual dBASE 7
Once the migration of reports is completed, they can then be incorporated on a
form using the ReportViewer object. To print the report from a form or program,
modify the Report.Output property as follows:
|
Value |
Target |
|
0 |
Window |
|
1 |
Printer |
|
2 |
Printer File |
|
3 |
Default |
|
4 |
HTML File |
The default output is to a window. If option 2 or 4 is selected, then OutputFilename property must be set as well. An alternative method for running the report is to issue the command "DO filename.rep" from the command prompt or as an event on a form.
Programs and
the Visual dBASE Language
The final step in the migration process is the Program or .PRG file. Most .PRG files will run with minimum modifications. There are a number of language differences between Visual dBASE 5.x and Visual dBASE 7 to look out for.
- Most of the dBASE User Interface commands that were carried over from IV like @ SAY, @ GET, and ON PAD are no longer supported. The dBASE DOS commands ACCEPT and INPUT have been removed from Visual dBASE 7.
- The INTEGRITY option of the SET RELATION command has been superseded by the Database Engine Integrity property of the table (part of the new file format mentioned previously) or by the features of the new Data Objects.
- Default precision is now 10 digits with a maximum of 15 digits of real precision.
- C Style comments and C operators are now available.
- Improved exception handling using the TRY, THROW and CATCH exception handler. This statement can be used to trap and handle exceptions. The basic syntax of this statement is as follows:
Try
form.rowset.parent.database.beginTrans()
// Begin a transaction
// make changes
form.rowset.parent.database.commit() //
If you got this far, there were no
// errors, so commit the changes
catch ( Exception e ) // The parameter
receives the Exception
// object that describes the error (not
// used in this example, but required)
form.rowset.parent.database.rollback()
// Undo any changes that did take
// display an error message
endtry
- There is a THROW clause that is used to generate an exception. The exception is then passed to the CATCH handler.
- The syntax for Initiating a DLL file is now LOAD DLL PATH.FILENAME .
- The syntax for prototyping a non Visual dBASE function is "EXTERN [type] <return type> <function name> ([parameter type) <filename>"
- Integers with leading zeroes are now interpreted as octal numbers. For example 031 is decimal 25. You may use a leading zero before a decimal point; for example 0.45. You may specify hexadecimal numbers with a leading 0x or 0X; for example 0x64 is decimal 100.
- The default calling convention for the EXTERN command is now STDCALL instead of PASCAL, so the function name you specify in the EXTERN command is case-sensitive. Visual dBASE isn’t case-sensitive, so once the function has been EXTERNed, it isn’t necessary to match case to call the function.
- In addition to switching to Win32 API calls, now that strings are double-byte Unicode, you cannot simply concatenate a string to be used as a structure. You must use the getByte() and setByte() methods of the String object to manipulate the individual bytes of the Unicode string.
- The CREATE SESSION statement now affects tables in work areas only. In order to use the new Data Objects, it is necessary to create a Session Object. Session objects can be included in a Data Module or directly on a form by itself. The default for sessions is now off.
- Programs are modified using the Source Editor. The Tree View of the Source Editor provides quick access to Classes and Functions in a program. Select the function in the Tree and the editor window cursor jumps to that location in the source code. Make the appropriate changes to the code, save the program and the migration of an existing application from Visual dBASE 5.x to Visual dBASE 7 is completed.
Creating
Installation Programs to Deliver Applications
Visual dBASE 7 includes a copy of InstallShield Express for creating professional setup programs. To use InstallShield Express:
- Open a project.
- Select Build from the menu.
- Select Create Install Program.
- Follow the InstallShield prompts to Create a new Setup or use an existing Setup.
- Complete the InstallShield Checklist.
Co-existing between Visual dBASE 5.x
and Visual dBASE 7
In the course of migrating your applications to Visual dBASE 7, you may find it necessary to maintain some compatibility with previous versions of dBASE. Here are a few tips to keep in mind:
- When migrating forms, only modify the font size via the code editor. This will allow the form to continue to run in Visual dBASE 5.x as well as Visual dBASE 7.
- It isn’t necessary to change the "this.view" property (if one is set) in order to use a form in Visual dBASE 7. The QBE or DBF can still be used to run the form.
- Tables created from scratch will automatically be dBASE 7 tables (as will any table that has had the structure modified). To prevent this, change the Level property in the Database Engine to 5 and match language drivers.
- The Local Share property in the 32-bit database engine must be set to ‘True’ to ensure that record locks are respected with a previous version of dBASE (or any other non-BDE application).
- As with the 32-bit version, the 16-bit database engine must also have the Local Share property set to True to maintain and respect record locks.
There have been many changes to the Visual dBASE system. Remember that Evolution is "The process of unfolding development or growth". The addition of powerful new tools and the Rapid Application Development Environment advances prove that Visual dBASE 7 has definitely evolved to a high level application development tool. Visual dBASE 7 has arrived and it is "The fastest way to deliver Business Applications".
Trademarks & Copyright © 1997-1998 INPRISE Corporation, 1999 dBASE, Inc.