Instead we will add a marker to the grid. In our example, this marker will take the form of an arrow beside those who should pay cash only, and this marker will be displayed in its own column, just beside the client's name. But you have to tell dBASE who should be trusted and who shouldn't be. The instructions it needs to know will be in a logical field called “Credit”. When it is set to true, the client could charge if he wants. When it is set to false, the client have to pay cash. For dBASE, this is simple and clear.
A calculated field in a datamodule
To display this marker, we could do field morphing. We could say to dBASE: “When you read the value true in the field "Credit", display nothing in the appropriate cell of the grid: but if you find the value false, display a marker instead.” But if we do field morphing, we will loose the ability to display the real value of the field “Credit” in any form using this rowset and we loose also the ability to write to this field. So we will create a calculated field.
In this issue of the magazine, Peter Rorlick has shown how to put a calculated field in a grid. The grid was populated with data coming from a table. Here, we will use a Datamodule (DMD). To see how we added this calculated field in a DMD, please load the Credit.dmd in the Source Editor (type modify command credit.dmd from the Command window).
In this simple DMD, we have two queries, each creating a rowset from a different table (clients.dbf and orders.dbf). The order.dbf is linked to the clients.dbf through a masterRowset and a masterFields property. We added the calculated field in the first table because it contains the field “Credit” that dBASE needs to evaluate in order to create the right value in the calculated field. If the field to be evaluated would have been in the second table, the calculated field would have been created there.
Near the beginning of the DMD code, we added a line in the Clients1 query constructor code. This line creates an onOpen method for this query.
this.CLIENTS1 = new QUERY()
this.CLIENTS1.parent = this
with (this.CLIENTS1)
onOpen = CLASS::CLIENTS1_ONOPEN
//
This
is the added line
left = 11
top = 4.6818
sql = 'select
* from "clients.dbf"'
active = true
endwith
Further down in our code, we added this Clients1_onOpen function.
function clients1_onOpen
local X
X = new field()
X.fieldName
:= "NOcredit"
X.BeforeGetValue
:= { || IIF(this.parent["CREDIT"].value = .T., " ", "Ü") }
this.rowset.fields.add(
X )
return
Lets look at each line separately.
local X // This creates a local variable called X (it could have been any name).
X = new field() // The variable X becomes a reference for a new created object. The “new” operator creates a new instance of the field class.
X.fieldName := "NOcredit" // The new field is baptized “NOcredit”. To prevent the creation of a property that doesn't exist, we used “ := ”. This is an assignment-only operator. If you inadvertently misspell the name of the property with the = operator, a new property is created; your code will run without error, but it will not behave as you intended. By using the := operator, if the property (or variable) does not exist, an error occurs. This operator can not be used to create a new property or a variable: it is used only to assign a value to a variable or a property that already exists (this paragraph is adapted from the on-line help).
X.BeforeGetValue := { || IIF(this.parent["CREDIT"].value = .T., " ", "Ü") }
This line is the heart of our onOpen function. It uses the BeforeGetValue event of field “NOcredit”. This event is usually fired after a field’s value property is successfully read from the table but before this value is placed in the row buffer. Since it is a calculated field, it doesn't exist in the table. So we are giving some instructions on what dBASE should put in the rowset when the new field will be added to the fields array.
Here, our orders are to put nothing (“ ”) or a special letter in the field “NOcredit” according to the value inside another field (“credit”). If the rowset.fields["CREDIT"].value is true (if we can give credit to the client), then the rowset.fields["NOcredit"].value will be nothing. But if we can't trust the client (if his rowset.fields["CREDIT"].value is false), then put a flag in the NOcredit field. Lastly, why does this U contain diaeresis (Ü)? We will see why when we will format the column displaying our calculated field.
this.rowset.fields.add( X ) // This adds the new field to the Clients1.rowset
Here we used a logical field. But the same principles apply to other types of fields. For date fields: to put a flag beside the name of members of an association that forgot to pay their due since January the 1st 1999, you would write:
X.BeforeGetValue := { || IIF(this.parent["dPAYMENT"].value > "98/12/31", " ", "Ü") }
For numeric fields: to “underline” clients who bought more than a million $US a year from you, you would write:
X.BeforeGetValue := { || IIF(this.parent["nTOTALYEAR"].value > 1000000, "Ü", " ") }
To add a new field in your grid
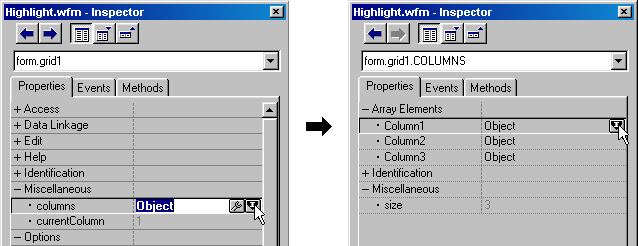
In the Form designer, click on your grid. In the Inspector (F11), go to the Columns property. Two pushbuttons will appear inside the Column property. Click on the Wrench button (not the “i” inside a triangle)

In the left pane of the Columns Property Builder dialog box, double-click on the name of your calculated field. In the right pane, drag it up to the desired order in your Grid. Push the OK button. Now the calculated field appears in your Grid.
To format the new column
We said we would put a “flag” in our grid. At its simplest expression, this flag could be done with usual signs on the keyboard: “=>”, “<=”, “—”, etc. But we will do something nicer.
Wingdings is a standard font under Windows: it is on every computer but nobody knows what to do with it. In that narrow column, just beside the cells meeting certain characteristics, you can display a n (the “n” in that font), a u or w (lower case “u” or “w”), a Ü or Û (ALT-0220 or 0219 — note: if you type ALT-0220, you will get the Ü we were talking about previously). How do you know if this font is installed on your computer? Simple: if you see the signs I am talking about, this font is installed on your computer (it is installed by default). If it is indeed installed and you would like to see the signs available to you, from the Command window, just type:
run(.T., "charmap.exe")// and choose the Wingdings font from the Combobox
Note : To be sure this would work under very different conditions, I changed the language driver in the BDE Administrator from 'WEurope' ANSI to 'ascii' ANSI: the result was identical, at least with the “flags” I am suggesting.
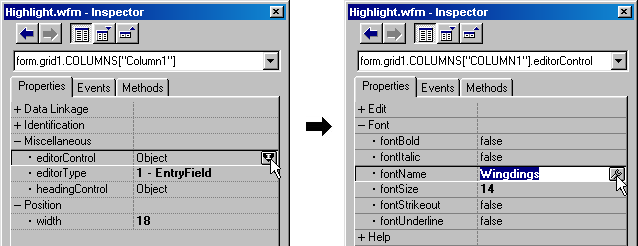
Now, how do you tell dBASE to use this font to display your markers? From the Form designer, click on your Grid. Call up the Inspector. Find the Columns property. Click on the “i” tool (not the wrench this time). Then click on the Column name holding your calculated field (here it is Column1). Also click on the “i” tool.

Set your column1.width (from the image below, you see that we have chosen 18 because our form.metric is 6 // pixels). Play with this value: dBASE will resize your form each time you set a new value and you press <Enter>. When the width suits you, click on the “i” tool beside the editorControl property. These properties are illustrated below at right. You can choose the Wingdings by typing that name in the fontName property or (if you are afraid of a typo, click on the wrench tool and pick up the right font). Do not forget to set the color you want: that property is further down (not shown).

The end result
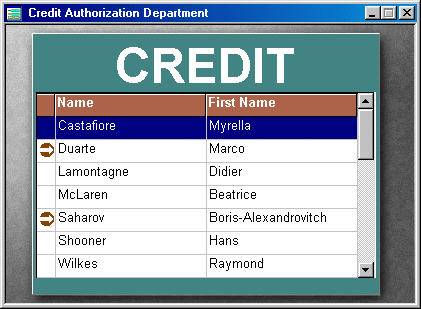
In the image below, the first column is where our calculated field is displayed. Mr. Duarte and Mr. Saharov have to pay cash. In Wingdings, the letter Ü is now an arrow pointing to those whose credit is doubtful. Would it be clearer if we could set the color of individual rows in dBASE? Probably. But for now, we have other very good ways to highlight the rows we want.

To
download this application, click
here
(it's
a 65Kb zipped executable file)