
On one particular job I was at the client's site on a weekly basis during the development of the application, and I would always make a full backup of the data to a set of floppy disks for my own use back in my office. However, this was a five-minute process to zip the files onto three disks and the client just would not do it on a daily basis. My first question when getting a problem call would be, When did you last back up the data?, and the response was usually, Oh, a week or so ago, I think... Consequently, I added Quick BackUp and Quick Restore buttons to the main form. This has helped, but I subsequently added an OnClose method that offers the opportunity to run the Quick BackUp before closing the application. I now make a practice of adding these two buttons to every application I develop.
One point I wish to make very strongly here is that, while I knew how to use COPY TO... to accomplish what I had in mind, it was the acquisition of ideas from the dBASE newsgroups that enabled me to compact the code in such a way as to make it easily reusable. I picked up the ISDIR(cDir) from reading several posts to somebody else's question. I attribute this function to both Bowen and Romain in my documentation because, as I recall, both added to my understanding of what was being accomplished with this function. The AllCopy( ) method was something that had its origin in a direct answer from Romain in response to my specific question about how to accomplish what I needed to do. I only had to make some small changes to what he had posted to make it work for me. (Hey, nobody is going to write all your code for you.)
Procedure QUICKBACKUPBUTTON_OnClick
The &cAppPath is needed because I have a utility that allows the user to set the path to the database tables. Rather than using a BDE alias, I have a table that maintains data about the path to the application and the path to the DBFs. The reason for this is that the application for which this was originally developed provided the capability of using two or more identically structured sets of tables. Refer to the Set Path code paragraph below to understand the meaning of &cAppPath and &cDataPath.
Let's first attempt to understand Bowen's ISDIR(cDir) function. While it is quite possible to use the things you glean from the newsgroup without understanding how or why they work (and we all do this sometimes), I believe you will discover it worthwhile to figure it out so you can modify it for use under a different set of circumstances.
From the OLH (or Language Reference) you will learn that funique("isdir???.???") attempts to create a file with a unique filename, isdir123.456, where the digits are random numbers. So, ISDIR(cDir) attempts to create a file in the folder you supply as the parameter cDir, which in this case is the \backup folder under the application folder, cAppPath. If ISDIR(cDir) returns an empty string, the folder must be created. Otherwise the DBFs and DBTs are just copied to the \backup folder. I do not copy the MDXs because they can be easily recreated, and they may more than double the required time for backing up the database. Remember, you want this to be quick enough so the user will not be hesitant to use the feature.
Procedure QUICKRESTOREBUTTON_OnClick
CLASS::AllCopy("&cAppPath\backup\*.db?",
"&cDataPath\")
MSGBOX("The Quick Restore procedure
is completed."+chr(13)+chr(13)+ ;
"You must
Rebuild Indexes before proceeding!","Information",64)
The Quick Restore procedure is almost identical, except that you don't need to check for the existence of the folder since you know it's there, and you need a MsgBox( ) to remind the user to run the Rebuild Indexes utility. (You might want to add an automatic reindex to this method.)
Now let's look at Romain's AllCopy() function. Two parameters are required: 1) where the files are, and 2) where you want to copy them. The two variables nAt and cFromDir should not be a problem for you as they are fully documented in the online Help (OLH). The array aFiles is declared and aFiles.Dir()returns the name of the file, the size of the table, the date stamp, the time stamp, and the DOS attribute. See the OLH for aDIR( ). This implies that aFiles.Size will return the number 5, since there are 5 elements in the array: name, size, date stamp, time stamp, and DOS attribute for each DBF file. But we only need the filename, so we use aFiles.Size/5 for the upper limit in the For...Next loop.
Procedure AllCopy(cFromSkeleton, cToDir)
Set Safety Off
nAt = rat("\", cFromSkeleton)
cFromDir = left(cFromSkeleton,
nAt)
aFiles = new array()
aFiles.dir(cfromskeleton)
LOCAL n
For n=1 To aFiles.Size/5
&& Need only 1 of the 5 fields
*-- Note:
According to Romain Strieff the color problem in the
*-- following
code is because the editor is confused by delimiters.
*-- The
code works properly as is.
cCommand =
[Copy file "]+cFromDir+aFiles[n,1] ;
+[" to "]+cToDir+aFiles[n,1]+["]
&cCommand
Next
Set Safety On
Return
The variable cCommand is a complex combination of parameters and other variables, and this complexity actually confuses the editor. You get colors that indicate you have made an error, but you haven't. Assume the first file to be copied from the \pmm5 folder to the \pmm5\backup folder is names.dbf. Element aFiles[1,1] will contain names.dbf. Element aFiles[1,2] contains the size of names.dbf, but you don't need this, nor do you need [1,3], [1,4], or [1,5]. Therefore, the literal, &cCommand, translates to:
Copy file c:\myapp\names.dbf to c:\myapp\backup\names.dbf
The [n,1] element of the array, aFiles, contains the names of each of the DBF and DBT files in the cFromDir, and the For...Next loop determines that each filename is copied to the \myapp\backup folder. Hence, you have a quick backup of all the tables in your database. In one application for which I included this procedure, the database resides on one of the three workstations, the backup files occupy approximately 20 Meg (without the MDX files), and the procedure requires less than 10 seconds! This should encourage your client to back up the database tables. Furthermore, the user at each of the other workstations can also back up the files to their local hard drive, which means that you potentially have two additional copies of the database should the server crash.
The Set Path code
In the start.prg, I use Romain's CreTable (another jewel acquired as a lurker) to recreate the dbPath.dbf if it's missing, otherwise I just Set Path To... the contents of the cPath field.
PUBLIC cPath, cAppPath, cDataPath
*** Determine the directory in which the
program is running. PROGRAM(1) returns
*** the full path of the running program.
*** RAT() locates the position of the
last \, to get the length of the SUBSTR()
*** for the mPath memory variable.
SET FULLPATH ON
cAppPath = SUBSTR(PROGRAM(1), 1, RAT("\",PROGRAM(1))-1)
*-- Added Romain Strieff's CreTable module
in case dbpath.dbf has been deleted or moved.
*-------- Code for creating DBPATH.DBF
if .not. file ( "DBPATH.DBF"
)
create
table "DBPATH.DBF" ( ;
DBPATH.'HOMEPATH'
CHAR(50),;
DBPATH.'DATAPATH'
CHAR(50),;
DBPATH.'SEARCHPATH'
CHAR(50))
*-- Check
to see if the user has moved the database.
If File("Names.dbf")
&&
It is there. No message necessary
Use dbPath
Append Blank
Replace dbPath->DataPath With Trim(cAppPath)
Use
Else &&
The database tables are in a folder other than the app.
Use dbPath
Append Blank
Use
*-- Notify the user that it was necessary to create a new dbPath.dbf,
*-- and it will be necessary to run the Set Search Path utility.
MsgBox("The file dbpath.dbf was not found in the application directory,
and had to be recreated." ;
+CHR(13)+CHR(13)+ "If you have moved the database from the default location,
you should run the Set Search Path utility and set the path to the database.")
Endif
Endif
*-------- End DBPATH.DBF
Use dbPath
cDataPath = RTRIM(DataPath)
REPLACE HomePath WITH cAppPath
cPath = cAppPath +","+ cDataPath
REPLACE SearchPath WITH cPath
Use
SET PATH TO &cPath
I have another app that is used by missionaries around the world, and it occurred to me that I needed to abandon my provincial roots and enable my users to select date formats more in keeping with the part of the world they were living in, even though many were Americans and quite accustomed to mm/dd/yy. The result of this realization was a set of three custom controls that I put together in DateBtns.cc. Depending on the application in development I include one or all of these three buttons. On a typical form they might look like the figure shown below.
![]()
The dates would appear as ![]()
If the user chooses the European format of dd/mm/yy by clicking the first button, and then also chooses to revert to the two-digit year form by clicking the second button, the screen image would change to the next figure.
![]()
The dates would now appear as ![]()
Finally, if the user resides in a country that employs the period as a separator rather than the forward slash, and chooses the favored four-digit year, they would press the third button. The screen image would be as shown in the following figure.
![]()
The date in all form fields would
appear as dd.mm.yyyy. ![]()
The text on the button displays what the format will be if you press the button, not what currently is, as you can already see that on screen. Obviously these buttons are toggle switches that work with Set Date To, Set Century On/Off, and Set Mark To. This set of buttons, in conjunction with one other feature I included in this application makes this truly a global application. DateBtns.cc makes the three buttons available on the control palette so that one or more of them can be placed on any form. (This .cc may still be available on Dan Howard's web site, but you may also request a copy directly from me if you would like to try it.)
The additional feature I have added to my forms is the ability to instruct any reports in the application to place the postal code field in front of the city field. The form appears as shown in the next image. If a particular record has this field as True, Crystal will precede the city with the postal code.
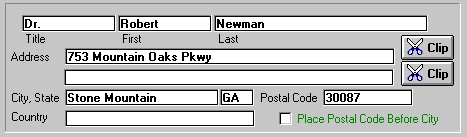
Now, if this individual lived in, say, England, where the postal code is traditionally placed before the city, the user would mark the checkbox. (The green text indicates that this field is editable without clicking the Edit button.) Once this is done, any reports will place the postal code before the city, i.e., 30087 Stone Mountain.
Incidentally, the Clip button is another feature recently added to the application. The upper one copies the entire name and address fields to the Windows clipboard, and the lower one includes the email address. So, If you want to write a note to this person, you press the Clip button, open your word processor, and press Ctrl-V to place the address in the document. I got this one from the newsgroup, too. It uses clip.prg, finalized by Gary Warren King, but based on API code by Jim Sare.
Procedure CLIPBUTTON_OnClick
FORM.efHidden.Value
= Trim(form.entryfield1.value)+" "+Trim(form.entryfield2.value) ;
+" "+Trim(form.entryfield3.value)+chr(13)+Trim(form.entryfield4.value)
;
+chr(13)+Trim(form.entryfield5.value)+chr(13)+Trim(form.entryfield6.value)
;
+", "+Trim(form.entryfield7.value)+" "+Trim(form.entryfield8.value) ;
+chr(13)+Trim(form.entryfield9.value)+chr(13)
FORM.efHidden.Enabled
= .T.
set procedure
to clip.prg additive
clipstring=form.efHidden.Value
cb = new clipboard(
)
*-- Put
stuff into the object
cb.FillContents(
clipstring )
*-- Dump
the object contents onto the clipboard
cb.Fill( )
*-- Empty
the object
cb.FillContents(
"" )
*--
Release
the object
release cb
msgbox("The
contents of the Name and Address fields are on the clipboard.","Info",64)
FORM.efHidden.Enabled
= .F.
The DateBtns.cc Code
I have included only the code for the m/d/y button for illustrative purposes; the code for the other two is nearly identical
*-- File: DateBtns.cc
*----------------------------------------------------------------------
*-- Copyright (c) 1997, 1998 BoKen Enterprises
*-- Programmer:
*-- Robert W. Newman rnewman@mindspring.com
*--
*-- History:
*-- 12/06/1997 -- Created version 1.0
*-- 01/18/1998 -- Version 1.3
*
*-- Description:
*-- This .CC file is designed to give
the designer access to
*-- three buttons to modify the date format
in an application.
*-- MdyDmyBtn toggles between MDY and
DMY.
*-- CentBtn toggles between YY and YYYY
format.
*-- MarkBtn togles between / and . as
the separator character.
*-- The .CC uses FmtDate.DBF, which should
contain fields:
*-- MDYDMY C(3) && value
MDY or DMY
*-- CENTURY C(3) && value ON or
OFF
*-- MARK C(1) && value / or .
*-- (This dbf will be created if it does
not exist.)
*--
*-- Usage:
*--
*-- Add this .CC as a custom control to
the control palette.
*-- It provides 3 buttons for modifying
the date format.
*--
*-- The file FmtDate.DBF should be in
the app directory. It
*-- will be created if it does not already
exist.
*--
*-- There need not be a code segment in
your opening .PRG file
*-- to read the contents of the FmtDate.dbf
and SET the
*-- parameters to the values chosen by
the user during the
*-- previous session. This will be done
by Init() procedure.
*--
*-- The .CC file will check the state
of the SET values for
*-- MDY, Century, and Mark and adjust
the text on the
*-- buttons accordingly.
*--
*----------------------------------------------------------------------
*-- Button to toggle between mm/dd/yy and dd/mm/yy format
CLASS MDYDMYBUTTON(FormObj,Name) OF PUSHBUTTON(FormObj,Name)
Custom
this.Top = 16
this.Text = "mdy"
this.SpeedTip = "Toggle the date format
between M/D/Y and D/M/Y."
this.OnClick = CLASS::MDYDMYBUTTON_ONCLICK
this.Left = 20
this.Group = .T.
this.Height = 1.53
this.Width = 13
this.UpBitmap = "RESOURCE #625"&&
#1130 for larger button
this.OnOpen = CLASS::OnOpen
Procedure OnOpen
Class::Init( ) &&
Create FmtDate.dbf if it doesn't exist, using Romain's CreTable method
Private cAlias
cAlias = Alias( )
&& Assume user has a table open, so save this info to return to
it
Use FmtDate In Select(
)
Select FmtDate
If RecCount( ) = 0
&& Need one record in the DBF, so append one
Append Blank
Endif
If Empty(MDYDMY)
&& The FmtDate table has no value so determine the current SET
parameter
If Set("Date")
= "MDY"
this.Text = "dmy" &&
Put the appropriate text on the button
Else
this.Text = "mdy"
Endif
Else
&& The FmtDate.dbf has data so read from the file
If FmtDate->MDYDMY
= "MDY"
Set Date To MDY
this.text = "dmy"
this.Speedtip = "Toggle the date format to D/M/Y"
Else
Set Date To DMY
this.text = "mdy"
this.Speedtip = "Toggle the date format to M/D/Y"
Endif
Endif
Use in FmtDate
&& Now close the table and return to the original environment settings
If .Not. Empty (cAlias)
&& User did have a table open
Select &cAlias
Else
&& There were no tables open
Select Select(
)
Endif
Procedure Init
*-------- Code
for creating FMTDATE.DBF && Romain Strieff's
CreTable
if .not. file ( "FMTDATE.DBF"
)
create table "FMTDATE.DBF"
( ;
FMTDATE.'CENTURY'
CHAR(3),;
FMTDATE.'MDYDMY'
CHAR(3),;
FMTDATE.'MARK'
CHAR(1) )
endif
*-------- End FMTDATE.DBF
Procedure MDYDMYBUTTON_OnClick
cAlias = Alias()
Use FmtDate In Select( )
Select FmtDate
If RecCount( ) = 0
&& Need one record in DBF
Append Blank
Endif
If Set("Date") =
"DMY"
Set Date To MDY
this.Text = "dmy"
this.Speedtip = "Toggle the date format to D/M/Y"
Replace FmtDate->MDYDMY With "MDY"
Else
Set Date To DMY
this.Text = "mdy"
this.Speedtip = "Toggle the date format to M/D/Y"
Replace FmtDate->MDYDMY With "DMY"
Endif
Use in FmtDate
If .Not. Empty (cAlias)
&& User did have a table open
Select &cAlias
Else
&& There were no tables open
Select Select( )
Endif
form.Refresh( )
ENDCLASS
The If...Endif pertaining to the (cAlias) allows these buttons not only to be offered as a Utility, where you would not expect a table to be open in a workarea, but also on a form where you know there will be a table in use. That means the utility can be used in a dynamic way during data access.
The reader may also wonder why there is an OnOpen method in the DateBtns.cc that seems to duplicate the OnClick method. This event fires after the form.OnOpen event, and checks to see if there is an active Alias() before opening the FmtDate table to configure the text on the button and the speedtip to match the settings with the current date configuration. If the form.OnOpen method sets a view, for example, the DateBtns OnOpen method saves the selected Alias() to cAlias and then restores it after configuring the Date button. The OnClick method does the same, because the FmtDate table must be opened in a workarea to save the new settings.
Some final words for encouragement
In closing, I want to return to the AllCopy() method that I got working as a result of several interchanges with Romain Strieff. I remember that when I finally got it working properly and posted my code, Romain responded with a one word reply, Nice. And believe me, that made my day, and probably my week. The message from this is: ask, try it, ask again, try again, get clarification, and when it finally works for you, tell the ones that helped you see the way, and be sure to thank them.
There is a description and screen images from one of the programs that employ these features at: http://www.mindspring.com/~rnewman/PMM51.html
To
download my DateBtns Custom Class, click
here
(it's
a 32Kb zipped executable file)