At the dBulletin, weve decided to do our best to make it easier for you to find the information you need. Thanks to Timo Ahjos (for the idea) and specially to Michael Nuwer (for the code), each issue will now carry an index of all the articles published to date in our magazine.
Moreover, weve decided to create a small Windows application from which you can select one of our official distributors Web sites, select the article you want to read, and click a button to run your browser which loads the selected article. We could have done it with a couple of listboxes and a seeker, but we wanted this application to be not only practical but also fun to use.
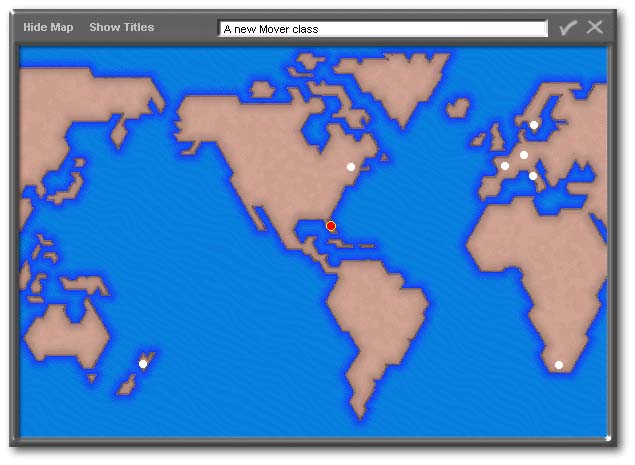
Did you really used dBASE to do that?
That does not look like a typical dBASE application. Yet you can do most of the things a normal form would allow you to do. Clicking a dot on the map selects the Web site from which the article can be downloaded. Clicking the OK button (the ü) starts this process. Clicking the X in the upper right corner closes the form.
However, some of the elements that you see on this form are just an illusion. There are no OK nor Cancel buttons, just a few strokes of pale gray paint on the background. When you click there, actually you are clicking on a small borderless transparent container placed over each of them. The function of the containers are to catch the click of your mouse, which allows you to either go to a web site where you can download the article or just close the form.
When you click on a dot on the map, it becomes red while the previous red dot is bleached. Each dot is an image object. Normally, it is dataSourced to a white gif. When you click on it, two things happen: first, its dataSource is changed to a slightly bigger red gif and secondly a custom property of the form takes a value specific for each dot. So, by looking at the value of this property, we can tell which dot was chosen. This custom property (form.country) was created by the form_onOpen() function.
Also when you choose to hide the map (in order to minimize the form), you are just reducing its height. In addition, to keep the 3D-look, we placed a copy of the bottom border over itself. By setting the anchor property of that image object to 1 (bottom), we dont have to put any special code to make this image object go up when the form shrinks.

No title bar
To take out the title bar, you
have to set these five properties to false in the form constructor code:
|
mdi = false moveable = false sysMenu = false maximize = false minimize = false |
|
Since this form doesnt have a title bar, it should not be possible to move the form. Yet you can move it by dragging its header (the part still visible when it is minimized). How is it done?
Dragging the form illegally
When the form opens, five custom
properties are created (any property not found in the stock properties
of an object is a custom property). In the onOpen() event of the form,
three of these five properties are:
|
this.dragging = false this.mouseCol = 0 this.mouseRow = 0 |
|
The custom properties are useless
by themselves, but are needed as pre-requisites for three
events of the form. These events allow the user to drag the form
by its header. The first event can be found in the form constructor
code:
|
class LoaderForm of FORM with (this) onLeftMouseUp = {;this.dragging := false} (...) |
|
This means that when the user releases
the mouse button, the forms dragging property is set to false. The
next event is in the function declaration of the form. It says:
|
Function form_onLeftMouseDown(flags, col, row) with (this) mouseCol = col mouseRow = row IF mouseCol < 6 or mouseCol > 602 or mouseRow < 6 or mouseRow > 31 dragging = false ELSE dragging = true ENDIF endwith return |
|
This event has some parameters that allow us to know where the cursor was on the form when the user clicked the mouse. Normally, we dont need that information and most of the time, we skip the parameters and their parenthesis altogether. Here we take advantage of them to set the area from where the form can be dragged. Since the form.metric is in pixels and the form is 608 pixels wide, the first six pixels at the left and the last six pixels at the far right are dead spots; you cant drag the form starting from there. Similarly, from top to bottom, you are allowed to drag the form just from the 6th to the 31st pixel (flat part of the header only).
dBASE not being a Macintosh development tool, it doesnt give a very high priority at checking every millisecond the position of the mouse cursor on the screen. So if you allow the user to drag the form from the very first pixels, the dragging process will become erratic. So, how do you find visual clues to justify to the user why the form cant be dragged from its edges? Here, it is the bevel edges. The more your justification will be convincing, the more all this will seem absolutely normal to the user.
The purpose
of the mouseCol and mouseRow properties on the form_onLeftMouseDown() event
are to keep track of the place on the form (not on the screen) where you
started dragging. This information will be used in the last event
needed in the dragging process: the form_onMouseMove().
|
Function form_onMouseMove(flags, col, row) with (this) if dragging top += (row - mouseRow) left += (col - mouseCol) endif endwith return |
|
When the mouse cursor is moved
over the form without holding down the mouse button, form.dragging = false.
But if you move the cursor holding down the mouse button, form.dragging = true; the code between the IF/ENDIF is then executed in the onMouseMove() event. The form is then moved through the same distance traveled
by the cursor since the mouse button was held down. Also, instead
of using:
|
form.top = form.top + (presentRow - startingRow) |
|
Gary White wrote a more compact
and effective way to say it:
|
top += (row - mouseRow) |
|
Finally, when this form is moved over the dBASE shell, the shifting will sometimes stream a bunch of lines that stay visible for a few seconds. On the other hand, the dragging is perfectly smooth over any Windows application and over the Windows desktop. This is why we wanted the dBASE shell to disappear when this application is launched. This is done by the line Shell(false,false) in the form.onOpen() event.
Some grid wizardry
The articles are listed using two
hidden Grids. When the user asks the titles to be shown, one of the
two hidden grids becomes visible. Moreover, four radiobuttons are
also revealed inside what seems to be a rectangle (see below). Actually,
they are inside a container object. We could have used a rectangle,
but a container provides additional benefits. If we move the container
either in the Form designer or programmatically, all its radiobuttons will
follow. In our Article Loader, we just need a single line of code
to show (or hide) the container and its four radiobuttons:
|
form.container1.visible = true // or false to hide it |
|
By default, the Grid is ordered by titles. If you choose to see it ordered by author, the authors column will seem to shift to the extreme left as you can see when you move your mouse over the following image.
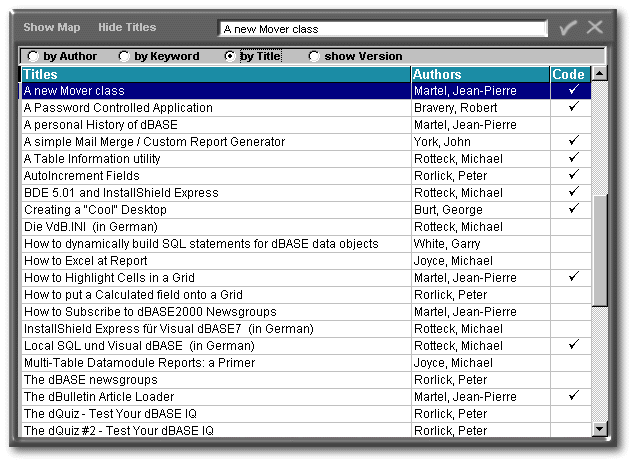
Can you move a column programmatically? The answer is you cant. So, how do we change a column datalink on the fly? It cant be changed. Well, come on, there must be a way to do what this form is doing, right? Yes, you are right. We used a trick learned from Peter Rorlick. There are two identical Author columns (one at each side of the title column) and we just set the width of one of these column to 0 (zero). When we choose to see the Grid ordered by author, the left column (author) expands for viewing while the right one is reduced completely. Clever, isnt it? When the vertical gray line that separates two columns is thicker than usual, it is an indication that a column is hidden there.
When you click the Keyword radiobutton,
Grid #2 is shown. Clicking on any other radio button will display
a different view of Grid #1. If you try, you will see that it is
faster to reveal a hidden Grid than to resize visible columns programmatically.
When any radiobutton besides the keyword pushbutton is clicked, a line
similar to this one is executed:
|
onLeftMouseDown := {;this.parent.parent.GridCol_Width(0,0,138,0,40,"Article_ID")} |
|
In this event, this means the radiobutton, this.parent means the container, while this.parent.parent means the form. The end result is that the function GridCol_Width() is a function of the form, not of the radiobutton. Instead of using a specific function for each radiobutton, we made a function identical for all of them. The only difference is the parameters passed to it. To learn the meaning of these parameters, we need to see the function itself. In line 01 below, the first parameter ( w1) will be given a value of zero when this radiobutton is clicked: this will become the width of the first column (line 03). Note: we dont change the width of the fourth column, because it is used to display the titles and it is always visible.
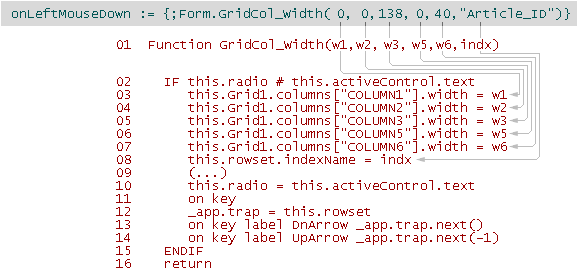
The index is also changed through a parameter passed in that function (line 08). Also the radiobuttons text (by Title, for instance) becomes the value of a custom property of the form (line 10). When the user clicks a radiobutton, this custom property is used to check if a different radiobutton was clicked (line 02): if it is the same, no code is executed. Lines 12 through 14 allow the user to use the arrow keys to select another row in the Grid.
Two last tips before going to the next chapter. To center the ü in the Code column, we just added a space at its left. When the value of the calculated field is true, the Grid displays a "ü" in the corresponding cell. Finally, in my humble opinion, it would have been nicer if the container and its radiobuttons would have been placed at the bottom of the grid. But the container is used to mask the one pixel horizontal gap at the top of the grid.
From dBASE to the Web
Now we get to the engine of the
Article Loader. When the OK pushbutton is clicked, the following
code is executed in a series of events. First, the program checks
which point was selected on the map (line 04) by looking to the form.country custom property. Then, it looks to the HTML name of the article and
adds it to the URL string (line 08). When done, we are ready for
business. The form.topmost property (line 10) is changed, so the
form will not hide part of the text that the user wants to read.
Then on lines 13 to 15, dBASE loads SHELL32.dll in memory (if it is not
already in RAM) and creates a prototype of one of its function (ShellExecute() note: on line 12, we used type() to check if this function has already been
prototyped). Once it is prototyped, this function can be called at
lines 20 and 21. Meanwhile we noted at line 19 what was the directory
before the browser was run in order to go back to that directory (or folder)
when the browser is closed (lines 22 to 24).
|
01 Procedure PYes_onClick 02 local mURL 03 do case 04 case This.parent.country = "IUSA" 05 mURL = "http://www.staubassociates.com/dbase/" 06 (...) 07 endcase 08 mURL = mURL + rtrim(this.parent.rowset.fields["HTML_Name"].value) 09 10 this.parent.topMost = false 11 // the following code by Romain Strieff [his "Open(cURL)" modified] 12 if type( "ShellExecute" ) # "FP" 13 extern cHandle ShellExecute( cHandle, cString, cString, ; 14 cString, cString, cINT ) SHELL32 ; 15 from "ShellExecute" + "A" 16 endif 17 local nHandle 18 private sd 19 sd = set( "dire" ) 20 nHandle = ShellExecute(_app.framewin.hwnd, "open", mURL, ; 21 null, null, 3 ) 22 if sd # set("dire") 23 set dire to "&sd." 24 endif 25 return nHandle |
|
Conclusion
The most important limits of dBASE are the limits of our imagination. Not that dBASE doesnt have its shortcomings, but these shortcomings are not enough to prevent us from doing about everything that we want. Sometimes it may not be the way we had foreseen. For example, you cant move columns in a Grid programmatically, but as long as we can get the same result otherwise, who cares?
When we look at an application and think that it couldnt have been done with dBASE, often it is because we didnt look carefully. With dBASE, not only can you deal with alphanumeric data, but also read bar-code, play music, show movies, dial your phone and access the Web.
If your company or yourself have a lot of documents available on a Web site, you could build an index page in HTML and make listboxes in JavaScript. But if you know very little in JavaScript, you could adapt the dBulletin Loader to your needs.
To download the code of
the Article Loader, click here
(its a 113Kb zipped file)