Over the past year, I've been working
on improving my application model. My goals were to automate the process
of opening and closing forms, improve the communication between application
objects, share common objects throughout the application, and simplify
the process of creating an application. While designing the application
model, I stored application information in a table and developed a process
to take that table information and stream out the applications start program
(the initial program run to startup an application). Finally, to
simplify things further, I created a form to manage the application information
tables and
automate the process of putting
my application model to work.
This article discusses what I call an Application Base Wizard which is intended to simplify the process of building an application. I had previously called this wizard an Application Wizard, but changed the name because this wizard does not create an application: it creates a base upon which we build an application. The first part of this article discusses the creation of the application base, its various objects and methods, and the code required to work with those objects and methods. The second part discusses the use of the Application Base Wizard.
PART 1: Application Base
What is an Application Base? Very simply, the Application Base (Base) is the core of the application. The idea of the Base came from the MUGS sample that shipped with Visual dBASE 7. The concept of a Base is important; creating application objects and methods within the Base enables you to use those objects and methods throughout the application. This ultimately reduces code and resources used, and speeds up the development process. Where is the Base? The Base is defined as an object of the _app object, so something like _app.MyApp would be the Base of an application.
Currently, the Application Base Wizard can define six objects within the Base: main form/menu, files query, database, system table, toolbars, and application forms. In addition, the Application Base Wizard defines various methods of the Base, including, ProcessFile, ZapForm, and Exit. The following is a discussion of these objects and methods.
Main Form/Menu (Required)
The primary purpose of a main form is to provide both an attachment point for the application's main menu bar as well as something to set focus to when closing other forms. This form can be designed so that it is always hidden, or always visible. If always visible, you can design the form to include icons which represent shortcuts to forms or text controls displaying information.
Normally, an SDI application uses a main form with a main menu bar attached. For an MDI application, the main menu can be attached to the _app.frameWin. However, because of problems I have experienced with maximized forms, the option to attach the main menu bar to the _app.frameWin has been excluded.
The existence of the main form serves another useful purpose in that it provides the application something to set focus to prior to closing other forms. I've had various problems with onLostFocus events trying to fire after an object gets released, and have also experienced problems when detaching toolbars from a form. The toolbars would remain visible unless you first set focus to another form prior to detaching the toolbar. As discussed later, the toolbars are shared and created one time. So the toolbars remained in memory as designed, but also remained visible when there was no form.
I have included a custom form, ABMain.cfm, which can be used to create an application's main form. The custom form includes some code to check if the form is always hidden or visible (specified in the Wizard) and runs the appropriate code depending on the result. For example, if the form is always visible, the standard Windows border is removed from the form. Also, some code is included for the forms onSize event. That code will restore the main form if it gets maximized and ensure that the visible property is false when the form is supposed to be hidden. You should base your application's main form on this custom form, or at least copy the code from it into your main form.
The application's main menu should be created and assigned to the menuFile property of this form. The main menu should include a menu item to exit the application with the onClick event code calling the Base's exit() method, onClick = {;form.appBase.Exit()}. This will ensure that you can exit the application without having to exit Visual dBASE. In addition, the main menu should include menu items to open application forms or run application files, with the onClick event code calling the Base's processFile method, onClick = {;form.appBase.ProcessFile("M0001")}. The processFile method is discussed later.
Files Query (Required)
The files query contains information about the application's forms, programs, reports, etc., which are instantiated or run in the application. The information stored in the table is used by the Base's ProcessFile() method to maintain form references, open forms, and run files. The table ABFiles is created automatically when you run the Wizard for the first time in an application's directory.
The ABFiles table and its related index file are critical to the application and must be deployed in the application's directory. I'm not sure this approach is widely used if, in fact, it is used at all. I initially started out storing the files' information in an array manually. In order have the data more accessible, I changed to a table, figuring I could always write the code to stream out an array from the table. In the end I decided to use the table directly because it was the simplest approach and it has the advantage of offering more flexibility down the road.
As mentioned, the ABFiles.dbf and ABFiles.mdx files need to be deployed in the application directory. This is done from InstallShield in the Specify Components and Files section. Under the Groups tab, you need to drag and drop the two files into the Program Files folder.
ProcessFile Method (Required)
The ProcessFile method is created in the Base by the Wizard. This method is used to control form references, open application forms, run application files, and attach toolbars. It processes the information in the ABFiles table. The File ID from the ABFiles table needs to be passed as a parameter when calling this method.
The most common file type used in an application is the form. The ProcessFile method will create form references in the Base (unless you specify to run the file), the reference name always being the File ID. If the maximum number of instances specified is greater than 1, the reference will be created as a one dimensional array with the size equal to the maximum number of instances. When a form file is processed, a check is made for an available reference. If a reference is available, a new form is instantiated and opened. If a reference is not available because the maximum number of instances has been reached, an old form is given focus and/or restored if minimized. During the opening process, the method utilizes the Windows API LockWindowUpdate and the form's visible property to open forms as gracefully as possible.
The method also creates two properties of the form, appBase and refName. The appBase property is a reference to the Base, and is available for the programmer to reference objects within the Base. For example, in the overridden open method of the form, one can assign the CompanyName property to the text property of a text object:
function Open
if type("this.appBase") == "O"
this.Text1.text = this.appBase.CompanyName
endif
return super::open()
The refName property is the name of the form's reference in the Base. This is used by the zapForm method of the Base.
ZapForm Method (Required)
The zapForm method is created in the Base by the Wizard. This method releases the specified form and nulls out the form reference defined in the Base. This method is required to be called for each form defined in the Base. The refName property of the form (created by the processFile method) needs to be passed to this method. A call to this method should be the last code executed in the form's onClose event code.
function form_onClose
// All other stuff first
if type("this.appBase") == "O"
this.appBase.ZapForm(this.RefName)
endif
return
This is the only code associated with the Application Base Wizard that needs to be included in each form that is instantiated in the Base. It's probably a good idea to include this code in the custom form's onClose event.
Exit Method (Required)
The exit method is created in the Base by the Wizard. This method basically releases/closes and nulls out the objects created in the Base. The only exception is the database, which is left open during design time so that you can design datamodules and forms which include queries where the database property is set to the database object defined in the Base. The exit method should be called from the main menu (see the main menu section above). If for some reason you exit out of the application without calling the exit method, you can call it from the command window by typing _app.MyApp.Exit(),where MyApp is the name of your application Base.
Database (Optional)
You can reference a database that is defined within the Base one time and make it available to all queries in your application instead making a reference to the database for each form, dataModule, or report. Most applications will have only one database, so once the database is referenced at the Base, it does not have to be referenced again. This is also the case for applications which need to access a different set of tables in different directories. You can reference the database one time and use BDEAlias.cc (by Romain Strieff) to change the path of the database alias, all the while keeping the same database reference at the Base.
Any time you need to access a table in the database, you can set the query.database property to the database object referenced at the Base instead of defining the database first. In the following example, the unnecessary code has been commented out:
// Following three lines no longer necessary
// d = new database()
// d.dataBaseName = "DBMain"
// d.active = true
q = new query()
q.sql = "select * from myTable.dbf"
// q.database = d
q.database = _app.MyApp.database
q.active = true
The only drawback to using this approach is when you use the designers to create your data objects. The designers do not let you type in your own database reference (_app.MyApp.dataBase). The workaround when using the designers is to subclass your queries. When using dataModules, you can create a custom dataModule for your project containing a simple custom query:
Class dbQuery of Query custom
this.database = _app.MyApp.dataBase
endclass
Then, when working in the dataModule designer, you can drag your custom query onto the dataModule form instead of the stock query. When not using dataModules, you can paste the custom query at the bottom of the form class or include the custom query in a project's custom control file (if your project has a custom control file). Note that you can have a different Base name for each project (if desired), so the custom query should be project specific. If you plan on using the same Base name for all projects, then you can include the custom query in a common custom control.
System Table (Optional)
A system table is a table containing information about an application. Some examples might be the Company name, the last period closed, program administrator ID, etc.

Defining the system table at the Base gives the application's forms easy access to system information. For example, suppose you need to get the last period closed for a particular form. In the overridden form's open event:
function open
if type("this.appBase") = "O"
this.LastPeriod = this.appBase.qSystem.rowset.fields["LastPeriod"].value
endif
return super::open()
The structure of the system table is dependent on the needs of the programmer. The structure could be a table with multiple rows with a key field to search on and a value field, or could be a one row table with multiple fields, or a combination of both.
Toolbars (Optional)
Defining toolbars within the Base gives you the ability to instantiate toolbars one time and share them with the application's forms. The toolbar classes need to be located in one toolbar procedure file. One toolbar can be attached to the application's _app.frameWin where it is visible throughout the application. Up to three additional toolbars can be defined in the Base where they can be attached to application forms.
The procedure for attaching toolbars to forms is greatly simplified using this application model, since no code is required in the form itself. The toolbars are assigned to forms by checking the appropriate Toolbar field of the ABFiles table. The ProcessFile method uses those fields to attach the appropriate toolbar prior to opening the form.
Please note that the toolbar procedure file must be designed similar to the toolbars.cc file included with the sample application. Primarily, the toolbars used in this application module are required to have a toolbar base, which is an object defined under the Application Base. The toolbar base contains properties which are used to define the toolbars, and contains the toolbars themselves. The toolbar base is primarily for convenience, as it allows you to keep all the toolbar stuff in one place. If you plan on adapting this application model for your application, I recommend that you start off using the toolbar procedure file included with the sample application. Feel free to modify that procedure file to suit your needs.
PART 2: Using the Application Base Wizard
Now that you have some general understanding of the objects and methods defined in the Base, let's talk about using the Wizard to create an Application Base.
Prior to running the Wizard you should have a general idea of your application's design. For example, you should know whether your application will be an MDI or SDI application, whether your application will use a database alias, or whether your application will use toolbars. You can always make changes after the fact. However, you can save yourself a lot of time by doing a little planning. Prior to creating the start program for the first time, you must have created your application's main form and main menu. Other options and application files can be added as you proceed through the design process.
ABWizard.wfm is a three-tabbed form. The first two tabs, Application Base - 1 and Application Base - 2 relate to the fields in ABData.DBF. The third tab, Application Files, handles the data in ABFiles.dbf.
To use the Application Base Wizard for a particular application, you need to copy the ABWizard.wfm file into your application's directory. All files specified in the Application Base Wizard, except for the toolbar's procedure file, need to be located in the application directory. When running the ABWizard for the first time in an application's directory, two tables are created, ABData and ABFiles. The ABData table stores the information about the application base, while the ABFiles table stores the information about the application's files.
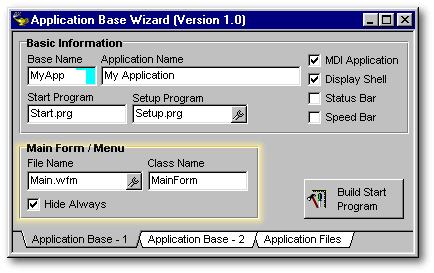
Application Base - 1
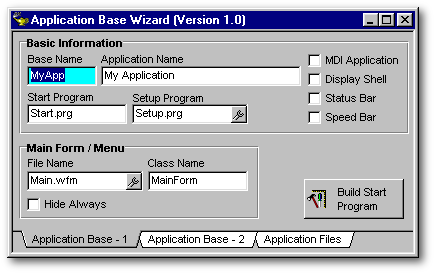
Basic Information
Base Name (Required)
The base name is the name of the object directly under the _app property. This can simply be the initials of the application name, or a more general name like MyApp.
Application Name (Required)
The application name is the text which appears in the _app.frameWin.text.
Start Program (Required)
The start program is the name of the program file which is initially run to start your application. The Wizard creates this start program, but you need to supply the name. The default name is Start.prg. When using a different name, be sure to include the file extension (should be a .prg file type).
Setup Program (Optional)
The setup program is used to run customized code which is not otherwise run in the start program. Some examples of using a setup program might include: creating additional objects in the application Base, creating or updating local user tables from the network; or looking up a user login ID in a personnel table. If using a setup program, use the toolbutton to call the Select file dialogbox and select an existing file. Use the delete key to clear this entryfield.
MDI Application
This checkbox determines the architecture of the application. When checked for MDI architecture, most options in the Wizard are available. When not checked (SDI architecture), some options are not available, and some are ignored. For example, when building an SDI application, you cannot hide the main form, toolbars are ignored, and the application form's MDI property is forced to false (regardless of what you have set in the form itself).
Display Shell
This option is available for MDI applications. When checked, the shell is displayed and the Navigator and Command windows can be accessed. During application design, it's probably best to keep this checked so that you can debug the application.
Status/Speed Bars
These options are available for MDI applications. Check the Status Bar to display the status bar at the bottom of the MDI frame window. Check the Speed Bar to use the default toolbars.
Main Form / Menu
File / Class Name
The main form is the name of the application's main form to which the application's main menu bar is attached. Clicking the toolbutton will open the Select File dialogbox. Clicking the Open button will assign the selected file name to the File Name entryfield, and also assign the first class name found in the file to the Class Name entryfield. You can override the default Class Name by typing in the name manually (this should apply only when you have more than one class in the file).
Hide Always
Checking the Hide Always checkbox will ensure that the main form remains hidden throughout the application. This option is not available for SDI applications.
Create Start Program Button
After filling in the information on this first page, you can create the start file, or continue on to the second page for more application base options. You should recreate the start program any time changes are made to either page one or page two. You do not have to recreate the start program when making changes to the application files table (on page 3). Also, after recreating the start program, you may need to recompile the program. For some reason I have experienced problems with the start program not automatically compiling.
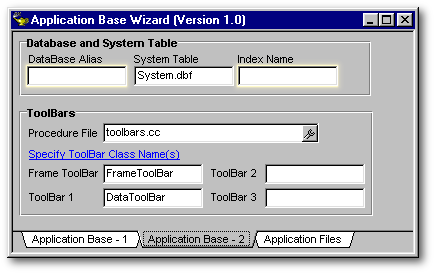
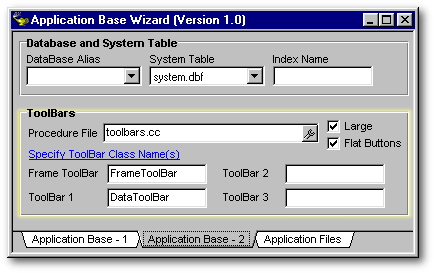
Application Base - 2
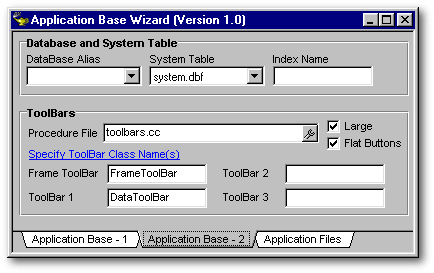
Database and System Table
Database Alias (Optional)
If your application uses a primary database, you can define that database in the Base and have it available for your queries to reference. Use the combobox to select an existing database alias.
System Table / Index Name (both optional)
If your application uses a system table, you can define the system table in the Base and have it readily available to your code. If the system table uses an index, you can include the index name in the Index Name entryfield. Note that if you had previously defined a database alias, the Wizard assumes that the system table is located in the database alias you defined. Use the combobox to select an existing table. When you select a table, the first index name found in the table definition is assigned to the Index Name entryfield. You can manually change or delete the Index Name if necessary.
Toolbars
Toolbar Procedure File (Optional)
The toolbar procedure file contains the toolbar classes defined in the Base. Use the toolbutton to call the Select File dialogbox and select an existing procedure file. Note that you must design your toolbar procedure file for the application Base. See the toolbar.cc file included with the sample application.
Large / Flat Buttons (Optional)
The toolbar Large option allows you to set your toolbars to large or small. The Flat Buttons option will allow you to have the toolbar toolbuttons appear as flat buttons, or standard buttons.
Frame Toolbar Class (Optional)
The frame toolbar class is the toolbar assigned to the _app.frameWin. This toolbar remains visible throughout the entire MDI application. The toolbar can include something like a menu button (which enables the user to get back to the main menu), as well as other common buttons. Although this is optional, it is recommended you use a Frame toolbar when using toolbars so that the toolbar area is filled throughout the entire application (otherwise the work area would constantly be shrinking and expanding) The class name you enter should be a class in the toolbar procedure file previously defined.
Toolbar Classes 1 - 3 (Optional)
You can specify up to three toolbar classes to define within the application Base. These toolbars can then be attached to your application forms by selecting the appropriate toolbar checkbox on the application files page. The class name you enter should be a class in the toolbar procedure file previously defined.
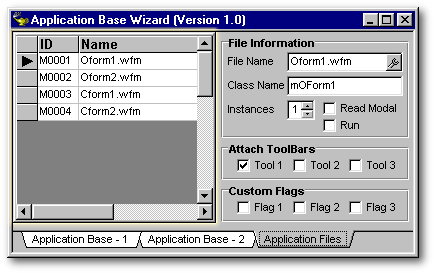
Application Files
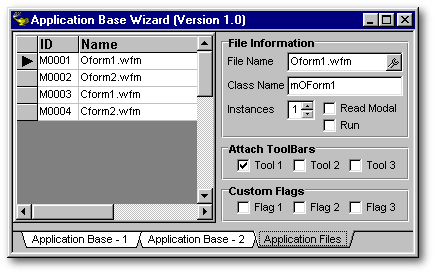
This page of the form is for adding and editing the ABFiles table. You do not have to rebuild your start program file for any changes made on this page. The ABFiles table contains an auto increment field. When the table is appended and saved, the File ID is created from the auto increment field. This File ID is the value that needs to passed to the Base's ProcessFile method.
As you create forms for your application, you can run the Wizard to add those forms to the ABFiles table to test them running under the application.
File Information
File / Class Name
Use the toolbutton to open the Select File dialogbox and select an existing file. Clicking the Open button will assign the selected file name to the File Name entryfield. Also, the first class name found in the file will be assigned to the Class Name entryfield. You can override the default Class Name by typing in the name manually. (This should apply only when you have more than one class in the file.)
Instances
This is the number of instances a form is limited to. Once the maximum number of instances is reached for a particular form, the processFile method of the Base will set focus to the first available instance of that form (and restore the form if minimized).
Read Modal
Check this box if you wish to open a particular form as modal.
Run
Check this box for the files you want to simply run (do). For these files, the class name is not needed, and the instances and read modal boxes are ignored. The file will run as if you issued the statement from the command window.
Attach Toolbars
The Toolbars 1 - 3 checkboxes correspond to the Toolbars 1 -3 class names (from toolbars.cc) entered in the Toolbars section of the application base. Checking one or more of these values means you want to use the toolbar(s) for a particular form. These values are ignored when no toolbar procedure file or toolbar class is specified (on the second form tab).
Custom Flags
The custom flag fields are available for custom use. In a particular application, I had a need to check for the existence of a situation prior to instantiating particular forms. The code to check for these flags needs to be manually added to the processFile method of the Base. This part is still under construction.
Conclusion
I have included a very basic sample application with this article to help grasp the ideas discussed here. Play around in the sample application, opening forms, minimizing and opening, maximizing and opening, adding data with the toolbars. Run the Wizard to view the application settings. Modify some of the settings and rebuild the start program. For example, change the MDI application into an SDI application, change the main form from always hidden to always visible, change the toolbars from large to small, etc. To get a general picture of the Application Base, inspect the Base by using the inspect command at the command prompt, i.e., inspect(_app.myApp).
If you think that you would like to adapt this for your applications, it is important that you look at the sample application code, especially the code in the abmain.cfm and toolbars.cc (if using toolbars). Look at the main menu bar code to see how to call the processFile method, and look at the onClose events of the forms to see how to call the Zapform method. There is really not a whole lot you have to do to adapt an application to this model, and I'm betting you will end up doing less. If you have any questions regarding the code or need any help in using this, please post the questions in the dBASE news groups.
To download the sample
applications, click
here
(it's a 124Kb zipped
executable file)