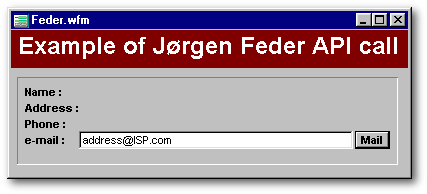
When you push the Mail button, your default e-mail software is loaded (OutlookExpress, Netscape Messenger, Eudora, Mozilla, etc.), ready to accept your message. The following is the code executed when you click the pushbutton:
function PUSHBUTTON1_onClick
/* ------------------------
by Jørgen Feder
code found in MiscAPI.prg
from Ken Mayer's dUFLP
------------------------
*/ private cAddr
if type("WinExe") # "FP"
extern cINT WinExec(
CSTRING, CINT) kernel32
endif
cAddr = "mailto:" + form.Entryfield1.value
WinExec( [start "&cAddr"],
0 )
return
With these few lines of code, any dBASE application can offer the capability to load an e-mail program. But I wanted to try something harder: is it possible to send an e-mail directly from within a dBASE application without having to load an e-mail software? In other words, can we make an e-mail software written in the dBASE language? The answer is yes, but before we see the code, lets see a sample of an interface you could use for your own e-mail application.
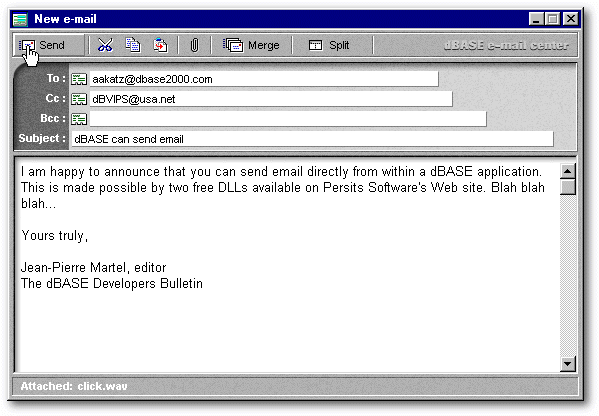
The Interface
The Toolbar
At the top of the form is a fake toolbar, not a real toolbar object. It is just like the one George Burt used in his Cool Desktop (see his article in the first issue of the dBulletin). There the illusion was created using bitmaps. Here, we take advantage of the different events of the image class to animate the form. If you move your mouse over the image underneath, you will see an example of what happens when the mouse cursor is placed over an image object.

In order to do that, we have a few nearly identical images that replace themselves to create that illusion. For example, the Cut image object (whose real name is I_Cut I for image) could be represented with any of the four images below, which are stored in the GifBank table (Gifbank2.dbf). In the I_Cut3 image, the chisel is moved one pixel toward the right bottom corner to give the illusion that the toolbutton is being pushed.
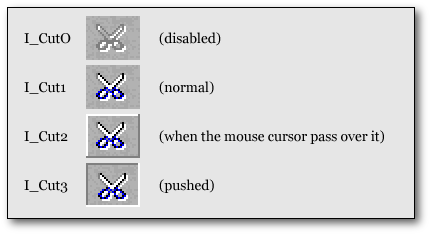
The only difference between the names of the images attributed to a toolbutton is the number at the end of their names, which is is the same for all the other toolbuttons. This allows me to easily share some functions. For example, all the image objects in that form have the same onLeftMouseUp (code shown below) and onMouseMove events.
function Image_onLeftMouseUp
if this.dataSource
= form.GifBank5.rowset.fields[this.name + "3"]
this.dataSource
:= form.GifBank5.rowset.fields[this.name +"2"]
endif
return
For the Cut toolbutton (i.e., the I_Cut image object), the onLeftMouseDown event says: if the image is I_Cut3, from now on please show image I_Cut2. The same function will be applicable to the Paste toolbutton (i.e., the I_Paste image object): if the image is I_Paste3, now show the I_Paste2 image.
Moreover, to contribute to the illusion of a real button, I added sound when you click on it (when the button is active). To make that woody click, I just snapped my fingers in front of a cheap microphone. To play that wave file, in the onLeftMouseDown, I just added this line:
play sound filename "click.wav"
If you want a deeper sound, you can change in the code all occurrences of click.wav with click2.wav. This latter sound seems like knocking on wood.
The Cut-Copy-Paste toobuttons
To be able to cut some text in a dBASE application, you just need to use the following line of code: form.activeControl.cut(). This line of code means: whatever control is active (have focus), cut the selected text. But in order to do that, the pushbutton you are clicking must not receive focus. Is it possible to click a pushbutton without giving focus to it? Yes, if its speedbar property is set to true.
Theoretically, image objets don't need such a property, because they never receive focus. Yet, if you add the line above into an image's onLeftMouseDown event, it doesn't work. Why? Because when you click on an image, the form receive focus.
The solution was to add a custom property to the form. The first time an entryfield is receiving focus, it creates such a property, through a function common to all entryfields and to the editor. The form.whichHadFocus holds the name of the active control. The form doesn't have such a function, so when it receives focus, the whichHadFocus still remember which control had focus before (hence the name). Each time another control receives focus, the value of this custom property is updated.
function E_onGotFocus
this.parent.whichHadFocus
= this.name
return
When the Cut toolbutton is clicked, the following code gets executed:
01 function Cut_onLeftMouseDown(flags,
col, row)
02 // some code
03 x = "form." + form.whichHadFocus
04 &x..cut()
05 // some code
06 return
Line 03 first creates a new variable, second, concatenates two strings, and third, gives this value to the variable just created. More precisely, it concatenates form. and the name of the last control which had focus, for example E1_To. The end result is something like form.E1_To. Line 04 seems bizarre with its two dots in a row. The first dot is a macro terminator. So &x..cut() could be replaced with form.E1_To.cut() which is easier to understand.
Unfortunately, the code for the cut and the copy toolbuttons doesn't work on certain computer. Nevertheless, if you cut some text with the Ctrl-X shortcut, the paste toolbutton works as expected.
The data to fill
The rest of the form allows the user to complete the information needed to send the e-mail: the addressee's e-mail address, where to send a carbon copy (Cc) and/or a blind carbon copy (Bcc), the subject, and of course the text of the message to send. It is mandatory to fill the first entryfield only; the next two ones are optional. In all of them, the user have to enter some e-mail addresses not the real names of the addressees. The explanation is that the motor of this form use the entryfields' value to send the message. If you build your own e-mail application and if you add an address book module, you could display the real name in an entryfield, but store the e-mail address in a custom property of the same entryfield. Then you would use the value of this custom property to send the e-mail.
The Form_onMouseMove event
Another part of the code that could be worth mentioning is the form_onMouseMove function. It is used to reset all the toolbuttons to their normal state when a mouse had passed over them.
01 function Form_onMouseMove(flags,
col, row)
02 local x
03 x = form.first
04 do
05 if x.className
== "IMAGE"
06
if x.dataSource = form.GifBank5.rowset.fields[x.name + "2"]
07
x.dataSource := form.GifBank5.rowset.fields[x.name + "1"]
08
endif
09 endif
10 x := x.before
11 until x == form.first
12 return
This function first selects the first object in the forms z-order (line 03). It creates a loop (lines 04 and 11). If the selected object is an image (line 05) and if it is represented with the bitmap used when the mouse cursor pass over it (line 06), the toolbutton is then reset to its normal state (line 07). Then the next object is selected (line 10 seems to say the contrary but it is the next object) and if this new selected object is not the first one (line 11) we go back to the beginning of the loop and the code is repeated until we come back to the first object.
Some of you may want to know why I used := instead of = in some places in this code. This operator is particularly useful when assigning values to properties. If you inadvertently misspell the name of the property with the = operator, a new property is created; your code will run without error, but it will not behave as you intended. In order to prevent the creation of a variable or property if it doesn't exist, it is recommended to use the assignment-only := operator. By using the := operator, if the property (or variable) does not exist, an error occurs (this paragraph is taken from the dBASE on-line help).
The attachment lists
When the user selects some files to be attached to the e-mail, the application builds two lists. The first one is visible and displays only the name of the selected files while the second list is hidden and contains also their paths. In this hidden list, the files are separated with a semi-colon because the application must have that list formatted exactly this way to work properly.
When the Attach toolbutton is pushed, the following code is executed (I simplified it a bit):
01 function Attach_onLeftMouseDown(flags,
col, row)
02 x = getfile()
03 if not empty(x)
04 y = x
05 do while
at("\",x) > 0
06
x= substr(x,at("\",x)+1,len(x))
07 enddo
08 if form.T_AttachedShown.visible
09
form.T_AttachedShown.text := form.T_AttachedShown.text + " + " + lower(x)
10
form.E_AttachedToSend.value := form.E_AttachedToSend.value + ";" + y
11 else
12
form.T_AttachedShown.text := lower(x)
13
form.E_AttachedToSend.value := y
14
form.T_Attached.visible := true
15
form.T_AttachedShown.visible := true
16 endif
17 endif
18 return
Line 02 not only opens the getfile() dialog box but also put the selected file's name in the variable x. If the user selected something (line 03), we make a copy of the selected file's name in another variable (line 04). Then we take out the path from the variable x (lines 05 to line 07 note: at line 05 we could have written: do while "\" $ x). If it is the first attachment selected (line 11 to line 15), the word Attached: (line 14) and the name of the selected file (line 12) become both visible in the status bar. Meanwhile the value of the variable y (the one that contains the filename and its path) is stored in the hidden entryfield (line 13). On the other hand, if it is not the first attachment selected, the word Attached: is already visible in the status bar (line 08), so lines 09 and 10 are executed. In these, we add the filename at the end of the list displayed (line 09) and we add the name that includes the path in the entryfield that will be used by the e-mail sending code (line 10).
Some validation before sending
Finally, the form is doing some very primitive validation when the send toolbutton is pushed. First, it checks if the user forgot to enter an e-mail address (line 03). Then it checks if the address entered contains an @ (line 06). If one of these conditions are not met, an error message is displayed (line 04 or line 07). Once the user closes the error message box, the focus is sent back to the data to be changed (line 05 or line 08). If everything is fine, the e-mail is sent.
01 function Send_onLeftMouseDown(flags,
col, row)
02 do case
03 case empty(this.parent.E1_To.value)
04 msgbox("Please
enter an e-mail address.", " No addressee...", 64)
05 this.parent.E1_to.setfocus()
06 case not "@" $ this.parent.E1_To.value
07 msgbox("Please
enter an e-mail address, not a real name." + chr(10) ;
+ "For example: john_smith@worldmail.com", " Error...", 64)
08 this.parent.E1_to.setfocus()
09 otherwise
10 ...
11 endcase
With a little help from my friends...
All the e-mail programs use some DLLs provided by the operating system. This application is also using DLLs but not from Windows. It uses two free DLLs from Persits Software Inc.: AspEmail.dll and AspUpLoad.dll. In order to be able to send e-mail directly from within dBASE, first you must download these DLLs. Both are in the same 141 Kb zip file called aspemail.zip available from that company's web site.
Once downloaded, you have to register AspEmail on your system. In order to do that, copy both DLLs in the c:\windows\system directory. If this directory also contains Regsvr32.exe (it usually does), open a DOS window, go to that directory and from the DOS prompt type:
regsvr32 AspEmail.dll
regsvr32 AspUpLoad.dll
exit //
to
come back in Windows
If you decide to place these two DLLs in the directory in which you deploy your e-mail application, then you have to indicate the path when you register AspEmail on your system. For instance:
regsvr32 c:\my_email_app\AspEmail.dll
Lastly, you must configure your application. Similar to the way you set an e-mail program, you must tell this program the name of the Mail Server your Internet Service Provider uses to send mail, your real name, and your e-mail address. You do this inside a class description at the end of the application.
class email of oleautoclient("persits.mailsender")
custom // do not change
this.host:="mail.mia.bellsouth.net"
//
put
your ISP's Mail Server name
this.from := "j_smith@yahow.com"
//
put your e-mail address
this.FromName := "John
Smith" //
put
your real name
this.subject := "No suject"
// default subject
this.body := "No body"
// default body text
endclass
If you are
using Netscape Messenger, your ISP's Mail Server name can be found under:
(for Netcape
4.5) Edit/Preferences/Mail&Newsgroups/Mail Server
(for Netscape
3.1) Options/Mail and Newsgroups/Servers/OutGoingMail (SMTP) server.
If you are using another e-mail software, look in Windows registry with Regedit for the key SMTPServer.
In the class declaration above, we define the class email as a member of its OLEautoClient superclass: it inherits all the properties and methods of this superclass. From now on, we will be able to create an instance of the email class with the new operator ( myEmail=new email() ) and be able to modify its properties or create new ones at will ( myEmail.property1="whatever" ). Finally, if ever dBASE have its own e-mail stock class, change the word email to AspEmail to avoid conflicts.
Properties
and methods of the email class
| Properties | Default | Description |
| Mail Host | The internet address of a SMTP host to be used to send messages (Required). For example: "mail.mia.bellsouth.net" | |
| Port | 25 | The SMTP port number |
| From | The sender's e-mail address (Required). For example: "john_smith@worldnet.com" | |
| FromName | The sender's real name (Not required). For example: "John Smith" | |
| Subject | The message subject | |
| Body | The message body. It can be in text or in HTML format. In the latter case, the IsHTML property must be set to true. | |
| IsHTML | False | If set to true, the body will be in HTML format. |
| Priority | 0 (zero) | The message priority. Valid values are 1 (high), 3 (normal) and 5 (low). When set to zero, this means the priority is not specified. |
| Helo | "AspEmail" | This string is sent with the HELO command when an SMTP session begins. Used by a SMTP client to identify its domain name to the SMTP server. |
| Methods | Parameters | Description |
| AddAddress() | a string (required) | Adds an e-mail address to the message's "To:" list |
| AddCC() | a string (not required) | Adds an e-mail address to the message's "Cc:" list |
| AddBcc() | a string (not required) | Adds an e-mail address to the message's "Bcc:" list |
| AddAttachment() | a string (not required) | Adds a file to the list of files attachments to be sent. The path must be included in the name of the files to be sent. |
| Send() | Sends the message. It throws exceptions in case of an error (see below) | |
| Reset() | Clears all address and attachment list so that a new message can be sent. | |
| ResetAll() | Same as reset plus resets all properties to their respective default values. | |
| Error code | Description | |
| 1 | Winsock initialization failed. | |
| 2 | gethostbyname failed. | |
| 3 | Socket creation failed. | |
| 4 | Connection failed. | |
| 5 | Sending data failed. | |
| 6 | Error returned from SMTP server. | |
| 7 | Opening file failed. | |
| 8 | Not enough memory. | |
| 9 | Reading from file failed. | |
| 10 | Host not specified. | |
| 13 | Invalid Priority value. |
The email class can have more properties and functions when you pay for the premium features. For example, you can send messages with embedded images (as background). The properties and functions above are part of the free version of Persits Software's DLLs. They allow you to build sophisticated e-mail applications with dBASE code quite easily.
A practical example
When the user pushes the send toolbutton, the following code is executed (I simplified it a little):
01 function Send_onLeftMouseDown(flags,
col, row)
02 // some primitive validation
code
03 try
04 e=new email()
05 catch (exception e)
06 Run(true,"regsvr32/s
AspEmail.dll")
07 Run(true,"regsvr32/s
AspUpLoad.dll")
08 e=new email()
09 endtry
10 e.subject := form.E4_Subject.value
11 e.body := form.Editor1.value
12 e.AddAddress(form.E1_To.value)
13 if not empty(form.E_AttachedToSend.value)
14 e.AddAttachment(form.E_AttachedToSend.value)
15 endif
16 if not empty(form.E2_Cc.value)
17 e.AddCC(form.E2_Cc.value)
18 endif
19 if not empty(form.E3_Bcc.value)
20 e.AddBcc(form.E3_Bcc.value)
21 endif
22 e.send()
23 msgbox("Your message
have been sent", " Message sent", 64)
24 release object e
25 e=null
26 return
Line 04 creates a new instance of the email class. If this fails, line 06 and line 07 will load in memory the two DLLs needed to allow dBASE to send e-mail directly and try again to create the instance. Lines 10 to 20 use the email class properties and functions to build your e-mail message from the data in your form's entryfields and editor. Line 22 sends the e-mail. Voilà.
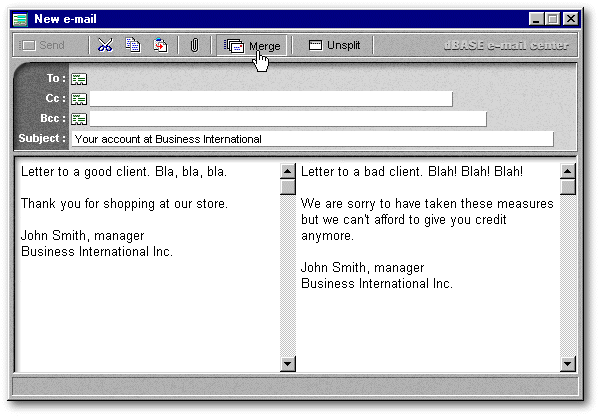
e-Mail Merge
The dBASE e-mail center allows you to do a simple e-mail merge. In order to do so, it uses the table eMailMerge.dbf. To be able to test this facility, you must complete the data in that table by inserting your own e-mail address in every record in the field eMail_Address. If the form displays a single editor when you push the Merge toolbutton, you are getting seven identical messages (there are seven records in that table). But if you had clicked the split toolbutton to access the two editors, and had written two different letters, then you would have received seven slightly different e-mails as if you were seven different clients. Some of these people were sent the first letter while the other ones received the second letter. The logical field Good_Client is the one that determines who will receive what.
Note: When you split the editor, the send toolbutton is disabled and the To entryfield disappears to show that its value will not be used as long as the editor is split. The Cc and the Bcc are still there because you could decide to sent a carbon copy or a blind carbon copy to yourself as proof that you sent the e-mail. Remember that this application doesn't have an InBox and an OutBox as in other e-mail softwares.
If you intend to do e-mail merge with different body texts, I strongly recommend you buy the premium version of Persits Software DLLs. This version allows you to use a function called AppendBodyFromFile() which accepts the full path to a text or an HTML file containing the message body. To send a different message one month later, you compose your new text and just change a single line of code (or change nothing if you give to this new text the exact name the previous version had). The price of this premium version is $99 for a single server license and $300 for the enterprise license (which allows you to install these DLLs on any number of servers within an organization or site).
The e-Mail Merge code
The code executed by the Merge toolbutton is similar to the one executed by the Send toolbutton. Lets use it to review what we have learned and as a way to underline the differences. Here again I simplifed the code.
01 function Merge_onLeftMouseDown(flags,
col, row)
02 form.wait_please()
03 r = form.emailmerge1.rowset
04 form.counterGood = 0
05 form.counterBad = 0
06 e=new email()
07 do
08 if empty(r.fields["eMail_Address"].value)
09
form.counterBad ++
10
r.next()
11 else
12
e.subject := form.E4_Subject.value
13
if form.editor2.visible = false
14
e.body := form.Editor1.value
15
else
16
e.body := "" + trim(r.fields["First_Name"].value) + " ";
+ trim(r.fields["Last_Name"].value) + "," + chr(10) + chr(10);
+ IIF(r.fields["Good_Client"].value = true,;
+ form.editor1.value, form.editor2.value)
17
endif
18
e.AddAddress(r.fields["eMail_Address"].value)
19
e.send()
20
form.counterGood ++
21
e.reset()
22
r.next()
23 endif
24 until r.endOfSet
25 release object e
26 e=null
27 r.first()
28 form.mailMerge_Result()
29 form.w2.release()
30 return
Line 02 calls a function of the form that displays a bitmap to indicate to the user that they have to wait while the e-mails are composed and sent (actually two forms are opened: the first one displays the bitmap while the other one serves as a drop shadow). To simplify the code, line 03 abbreviates the name of the rowset to simply r. Line 04 and line 05 create two counters: one for the number of succesfull e-mails and the other one for the number of failures (the latter doesn't include the e-mails that will never be received because the e-mail addresses were wrong). At line 06 we create a new instance of the eMail class. Line 07 is the beginning of a loop (up to line 24). If there is no e-mail address in our table (lines 08 to 10), we increment the counterBad (note: form.counterBad ++ is identical with form.counterBad=form.counterBad+1 ). On the contrary, if such address exists (line 11), we create the properties of this new instance of the mail class. In the e-mail, the subject will be the one displayed in the form.E4_Subject entryfield (line 12).
If there is just one editor displayed (line 13), the body of the message will be the one displayed in that editor (line 14). On the other hand, if both editors are displayed, line 16 says that the message will start with the client's name as it appears in the table. After inserting an empty line, the rest of the letter will be the one displayed in one of the editors: the good clients will receive the letter in the first editor while the others will be sent the message in the second editor.
Line 18 defines to which e-mail address the message will be sent while line 19 executes the order. Line 21 resets some properties of the eMail object. The cursor is moved to the next client (line 22) and line 24 brings us back to the beginning of the loop.
The reset() method resets only the properties related to the message itself (recipient, address, body text, etc.) and not the properties of the sender. Wouldn't it be simplier to replace old properties with new ones? Why do we have to use the reset() method? If you don't, line 18 will concatenate all your recipients e-mail addresses. And each recipient will see the list of all the clients your message was sent to (a problem Outlook Express faced not a long time ago!). For the sake of confidentiality, you must use this method...
Line 27 moves the cursor to the top of the rowset in case you proceed to another e-mail session. When the work is done, a form showing the statistics based on our counters is displayed (line 28), while we release the bitmap used to ask the user to wait (line 29).
Conclusion
Jørgen Feder's API call will probably meet most of our readers' needs: it allows the user of a dBASE application to write and send e-mail through the user's favorite e-mail software, taking advantage of all its features. No need to reinvent the wheel.
But sometimes the user will have its own client database and will want to be able to use it to e-mail and send personalized messages (to remind that an account is past due, for example). In those cases, a custom made dBASE application will be needed. In the years ahead, custom made e-mail applications will be more and more prevalent as electronic mail will replace traditional forms of communication.
The form included here is not a full fledged e-mail application. It does the minimum of what is needed to send e-mail directly from within dBASE. From that starting point you can build the custom application you client may need. For the readers that may not need such an application, this text is reviewing examples of a practical application made with dBASE. I hope it will be useful to you.
To download the sample
applications, click here
(it's a 91Kb zipped executable
file)