Introduction
Visual dBASE is a wonderful and very versatile product. But because it is such a unique product aimed at a dedicated market (database management), we tend to accept that Visual dBASE seemingly has very poor integration with Windows. We mistakenly compare VdB with other Jack of all trades types of products and expect it to live up to those standards. The users of these other products would argue how their tool can integrate with Windows, and how their particular product is superior to Visual dBASE. So the logical conclusion would be that Visual dBASE is not a worthy product. Quite the contrary, Visual dBASE is a very worthy product, and possibly the first and foremost product to use in its niche market, that being database programming. A few things to keep in mind when evaluating software:
The Form
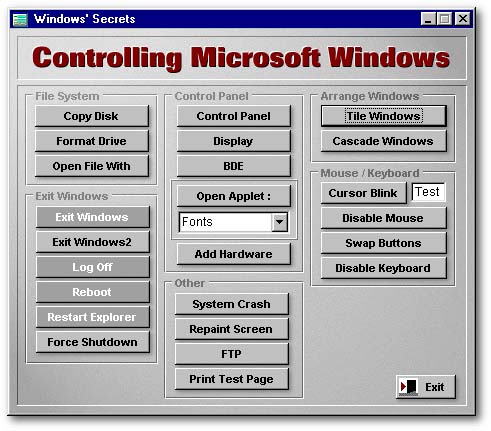
I have built a form with numerous buttons that when clicked will do various Windows function, right from the comfort of your Visual dBASE application. You might not see the need for all of these functions, but then again you might have a wild imagination. The following functions are not perhaps the only ones available, this is just an example to show you what can be done with a little bit of investigation. If you see a need for something else, try it out to see if you can get it to work. You might just surprise yourself.
In the form below, four buttons are of a darker color: these buttons use a function called SHExitWindowsEX which is available under Windows 98 but not under the very first version of Windows 95. So these buttons may not work on certain computers.
Create a form similar to the following one:
Here you see functions that one might have thought could only be accomplished from within the native Windows environment or through the API calls. But first, if you dont understand the run() function, then please read the dBASE help about it now.
We will start by adding a simple
run() command to the FTP
pushbutton. In its onClick() event
we put this code:
|
If MsgBox("You must have a connection to the Internet established! Do You want to continue?", "Caution!", 52) = 6 run("ftp.exe ftp.prorisk.co.za") endif return |
|
The message box is to warn the user that they have to have an Internet connection already established. Then we are running the ftp.exe program with a parameter to connect the user to our work site. In the absence of the .t. parameter in the run() function, the command will execute in a DOS Windows, which is what we want. Once the DOS Window is open you can then log on anonymously with your e-mail as a password.
Rundll32
To access the other Windows functions, we will use a small program that allows us to access functions in EXEs and DLL libraries. The Rundll32 program is a Windows program that enables us to run DLLs as if they were normal exes and to access their built-in functions. We can only do this, obviously if the DLL was designed to do that and has the specific function that we want to access.
NOTE: not all functions can be accessed this way, only a few. That is why this is called a Windows secret.
For example, our top right pushbutton
is called Tile Windows. This would tile all child Windows that have
the Windows Desktop as their parent. In other words, all Windows inside
a main Window. We could do this via an API call. But that needs a bit of
API understanding. Our first secret will be to place the following code
in the pushbuttons onClick() event:
|
run(.t., "rundll32 user,tilechildwindows") |
|
The
tilechildwindows is a
function found in the user library. The
Rundll32 enables us to
access that library, and the .t. parameter
tells the run() function
that it is a Windows command. Notice that the entire command is between
quotes, and that there is no space before and after the comma. We can do
a similar thing with cascading windows e.g.,
|
run(.t., "rundll32 user,cascadechildwindows") |
|
Not all functions are contained
in the user library. For instance, we can access the standard Windows
Control panel by using:
|
run(.t., "rundll32 shell32,Control_RunDLL") |
|
You will notice that we are accessing
a different library, namely shell32.
If you are used to accessing the API you will then recognise these. The
Control_RunDLL function
is what actually opens the Control Panel. We can also open individual Control
Panel applets. In the Windows System subdirectory, you will notice a whole
bunch of files with a .cpl extension.
These are the individual Control Panel applets. If we would like to change
the display properties, we could do this without opening the Control Panel
by simply using the following command:
|
run(.t., "rundll32 shell32,Control_RunDLL desk.cpl") |
|
You will notice that the command is similar to the previous one, except for an added parameter, the name of the Control Panel applet that we want to run.
You might also notice that there
are some Control panel applets that dont have a corresponding
*.cpl file. For example,
you wont find a mouse.cpl or
a printers.cpl.
This is because, if I understand correctly, they are contained in the
main.cpl file. What we
would do is use the command as above, substitute
desk.cpl with
main.cpl and then add
an extra parameter to signify which applet we want to run. The name normally
would be the same as you would find in the Control Panel. By putting this
into a combobox on our form, we can give the user a choice. In the
form included with this article, I gave you the choice of four Control
Panel applets (Mouse, Fonts, Keyboard and Printers). If your Windows is
for a language other than English, replace them in the Combobox1
dataSource with their
equivalent in your own version of Windows.
|
Comboselect=form.combobox1.value run(.t.,"rundll32 shell32,Control_RunDLL main.cpl "+Comboselect) return |
|
So now we can run individual Control Panel applets. Neat hey!
The Rest
Now that you have got the picture, study the code as I briefly explain the rest of the pushbuttons and the functions that they employ.
Copy Disk
Brings up a dialog box enabling
you to copy a disk (i.e. from A: to B: or A: to A:)
|
run(.t., "rundll32 diskcopy,DiskCopyRunDll") return |
|
Format Drive
This one sounds very scary, but
its really not. It is exactly the same as if you right click on the A:
drive and select format. It will bring up a dialog that will enable you
to choose the floppy media to format and also give you a chance to cancel.
It will not allow you to format C:, no such option. Use with caution.
|
run(.t., "rundll32 shell32,SHFormatDrive") return |
|
Open File With...
When you try to open a file that
does not have a program associated with it, the open with dialog box
appears, enabling you to select the application you wish to use to open
that particular file. Here, this pushbutton opens that dialog box.
|
run(.t., "rundll32 shell32,OpenAs_RunDLL") return |
|
Exit Windows
Shuts Windows down to a safe position
to power off.
|
run(.t., "rundll32 shell32,SHExitWindowsEx 1") return |
|
Exit Windows2
Shuts Windows down and turns off
the power. Your PC must support this function.
|
run(.t., "rundll32 user,ExitWindows") return |
|
Log Off
Self-explanatory. Logs the current
user off and restarts Explorer, or Windows.
|
run(.t., "rundll32 shell32,SHExitWindowsEx 0") return |
|
Reboot
Self-explanatory. Forces a reboot
of the PC, everything is shut down cleanly.
|
run(.t., "rundll32 shell32,SHExitWindowsEx 2") return |
|
Restart Explorer
Similar to the reboot. Restarts
Explorer, or restarts Windows without actually exiting the windows GUI.
|
If MsgBox("All unsaved work will be lost! Do You want to continue?","Caution!",52)=6 run("rundll32 shell32,SHExitWindowsEx -1") endif return |
|
Force shutdown
This is a strange one. It will
force a shutdown by closing the kernel. The machine will appear to hang
but a reset will not force a scan disk as it would do after a bad shutdown.
This is because closing the kernel flushes all buffers.
|
If MsgBox("All unsaved work will be lost! Do You want to continue?","Caution!",52)=6 run("rundll32 krnl386.exe,exitkernel") endif return |
|
Add Hardware
Runs the install device dialog
from the installing new hardware Applet wizard in Control Panel.
|
run(.t., "rundll32 sysdm.cpl,InstallDevice_Rundll") return |
|
System Crash
Simulates a crash. Do we really
have to simulate a Windows crash? Be warned this will cause your
system to hang. You will have to reset.
|
If MsgBox("All unsaved work will be lost! You will have to reset. Do You want to continue?", "Caution!", 52)=6 run(.t., "rundll32 user,disableoemlayer") endif return |
|
Repaint Screen
Self explanatory. Refreshes or
repaints the screen.
|
run(.t., "rundll32 user,repaintscreen") return |
|
Print Test page
Prints a test page. If you have
multiple printers, you can select one. The default printer will be highlighted.
|
run (.t., "rundll32 msprint2.dll,RUNDLL_PrintTestPage") return |
|
Cursor Blink
Change the cursor blink rate. The
only problem is that I cant figure out what the value should be, also
once the cursor is blinking I can only get it back to normal via the keyboard
applet in the Control Panel.
|
run(.t., "rundll32 user,setcaretblinktime") return |
|
Disable mouse
You might want to, or you might
not want to use this; anyway, this will disable the mouse. The enable parameter
does not seem to work. The mouse will only be disabled after reboot. You
can reset it via the Control Panel.
|
If MsgBox("Disabled mouse will be functional only after rebooting! Do You want to continue?", "Caution!", 52)=6 run(.t., "rundll32 mouse,disable") endif return |
|
Swap Buttons
Swap the mouse button actions from
left to right for left handed people. If click select action is on the
left mouse button, it will now be on the right button. Reset via the Control
Panel mouse applet.
|
run(.t., "rundll32 user,swapmousebutton") return |
|
Disable Keyboard
Use with caution! Same as the mouse
function above, but this will disable the keyboard. The enable parameter
does not seem to work.
|
If MsgBox("Disabled keyboard will be functional only after rebooting! Do You want to continue?", "Caution!", 52)=6 run(.t., "rundll32 keyboard,disable") endif |
|
Conclusion
I am by no means an expert in the Windows API or in the Windows programming environment. But my aim is to do the best that I can, and that means that I might have to go the extra mile to accomplish something. This is also not intended to be definitive on this subject, just an example. I hope you have fun. Viva Visual dBASE.
To
download the "Windows Secrets" application, click
here
(its
a 82Kb zipped executable file)