After spending most of the day using the browser to look at some databases, which were causing problems in a particular application, I decided that I definitely needed some kind of utility to make this type of task less tedious. Also, I desperately needed something for looking into or even changing the contents of version 7 databases at sites where only the VdB runtime system was installed.
There are a only few utilities of this type around that I am aware of, and so far I had not found one that would display things exactly the way I wanted them displayed. One of the problems is that it is often necessary to be able to view the contents of related tables. You used to be able to do that using the XDML set relation command, but again this had a drawback, in that you end up with very long rows and are forever scrolling back and forth to get to all the fields you require. Another major drawback lies in the fact that when tables are joined this way you cannot actually tell whether you are looking at one or several identical master rowset records. The best way would be to display the data in separate grids or on separate forms.
I had recently thrown together a quick and dirty utility, which would display the data from two related tables, but this was not enough. I considered enhancing this, but the number of controls was getting out of hand and there would always be the case when it would be nice to have just one more rowset displayed.
So I decided that the solution was to build an utility that would allow me to open as many tables as needed in separate windows. And still being able to link the tables as required.
An MDI Desktop
Having read Robert Bravery's article in the dBulletin (No. 4) on building a desktop, it seemed that this was exactly the right approach to the problem.
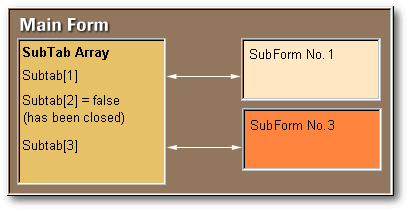
For those of you who have read his article or looked at his coding in depth, you will see, that he has put one button for each window he wants to open on the main screen. Also the approach he took was to attach the windows to the buttons that instantiate them. This had a drawback, because the number of windows you can open is limited by the number of buttons you put on the main form. So I changed this by using an array in the main form to dynamically allocate as many subforms as required. The coding required for this is very simple:
When the main form opens, it sets up an array to
keep track of the forms objects.
| form.subtab=new array()
form.subnum=0 // no of entries in the subtab array form.subsopen=0 // no of subforms currently open |

Whenever the user wants to open a new window by
clicking on the open button to look at a table the following function
is called:
| function subopen
// use the getfile function to get a database table d=getfile("*.dbf") if empty(d) return endif // search the active windows in the window
control table to
// checkdb is a function which checks if
the file (d) is a valid database table
// set proc once only
// add this database to the control table
and open a new window
|
When a new form is instantiated, some important information is passed. First the title text of the window is set to show the identity of the database which it contains. In addition, the filename of the database (dbfile) is given to it.
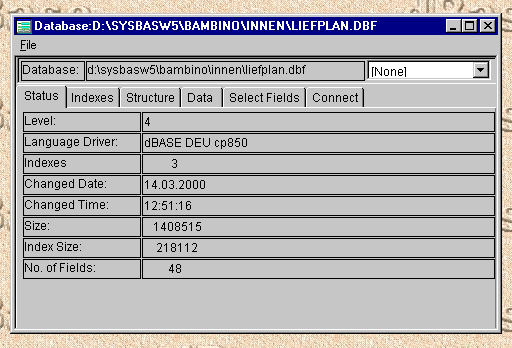
Important is the parentform property which allows the subform to easily reference controls and functions which are stored in the main form. Also each subform is given an identifier (subnum), so we know who he is when we are talking to him.
The next thing we need to deal with is the situation
when the user closes a subform, again the code is very simple. If
you look at the code for opening a subform, you will see that a variable
subnum
is passed to the window being opened. When the subform closes, it
calls the following closesub()
function in the main window and tells the main form who it is by returning
its own subnum
identifier. Subnum
is also the index to the forms definition in the subtab
control table.
| function form_onClose
this.parentform.closesub(this.subnum) return |
Don't worry about the first part of the
closesub() function at the moment.
This deals with a navigation table which controls the way databases can
be joined or rather connected. We'll discuss this part later.
| function closesub(pSubNum)
// this is called by the subform when it closes // pSubNum identifies which instance of the subform is closing // the navigation table is checked to see if this form is // referenced as a master or details form // note that form. here references the main form, even though // this function is called from a subform local iP iP=1 do while iP<=form.navnum do case case form.navtab[iP,1]=pSubNum // caller was a master // inform the details form // that the master form has // closed local p p=form.navtab[iP,2] // by calling the connect event form.subtab[p].but_connect_onclick() case form.navtab[iP,2]=pSubNum // caller was a details form local p p=pSubnum class::disconnect(p) endcase iP += 1 enddo // set the subtab entry to false and release this subform s=pSubNum form.SubsOpen=form.SubsOpen-1 form.subtab[pSubNum].release() // release this instance form.subtab[S]=false form.no_of_subs.text=form.subsOpen return |
You can see in the last part, that I don't actually delete the subtab entry for a subform when it closes. I merely set the entry to false. This has the advantage, that the subform number passed to a subform as its identifier remains the index to the subtab control array.
The code for closing a subform is put in the main form. This prevents redundancy in all of the subform instances.
Now that was the easy part. In other words, we can open and control as many subforms the user desires. Like Robert Bravery's method — everything is contained in a single main window.
A couple of trivialities:
One thing the user must be able to do is reposition and resize the subforms he opens. I found that it is possible to move a subform into a position where you can't get the mouse onto the title bar to be able to move it again. So I included some code in the subform to make sure this doesn't happen.
This brought up a small problem. When the
user moves the subform off the left side of the main window, the position
returned by onMove
event doesn't go below 0 (zero). Rather you get some ridiculoulsy
high value. Whether this is a bug or works as designed, I'm not sure.
So, I still check for the <0
condition.
| function form_onMove(nLeft, nTop)
// check if there is still enough to grab on if nleft<0 or nleft>this.parentform.width-30 this.left=0 endif if nTop<30 or nTop>this.parentform.height-30 this.top=0 endif return |
You can see in this routine how the main window is referenced using the parentform property we passed to it when it was instantiated.
There's not much point in allowing the user to
resize his forms if you don't automatically resize and reposition the controls
within it. So some coding for resizing the notebook and grids was
required.
| function form_onSize(nGroesseTyp, nWidth,
nHoehe)
form.notebook1.griddata.width=form.Width-15 form.notebook1.gridmdx.width=form.Width-15 form.notebook1.gridfields.width=form.Width-15 form.notebook1.width=form.width-5 form.notebook1.height=form.height-5 form.notebook1.griddata.height= form.notebook1.height-form.notebook1.griddata.top-40 form.notebook1.gridmdx.height= form.notebook1.height-form.notebook1.gridmdx.top-40 form.notebook1.gridfields.height= form.notebook1.height-form.notebook1.gridfields.top-40 return |
Again this threw up a couple of problems. When the form is made smaller than it was when it opened, then there was really strange bleeding around the edges of the first two grids. In fact, sometimes you could see the scrollbars twice. You could actually click on them.
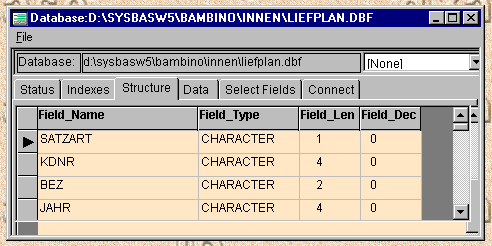
So I tried making the grids very small in the forms designer, and calling the onSize event when the form opened. This didn't work. It looked OK when the form opened, but again, as soon as the form was made smaller, the bleeding occurred. It appeared as if VdB remembered the grid size after the onOpen event had been completed.
To get around this, I call the onSize event whenever the user scrolls through the notebook tabs. This means that the grids are still their original (very small) size when the onOpen event is triggered and ends. This is also a reason why I don't use the parameters passed to the onSize function, because they would only be relevant when the event is triggered from the form itself.
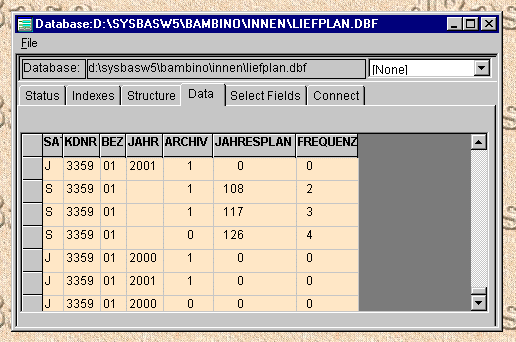
The next thing I wanted to do was to allow the user to be able to determine which fields to display in the data grid.
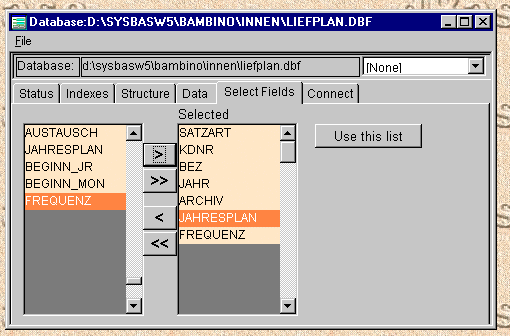
The user selects which fields he wants to have displayed by clicking on the “use this list” button. With some help from the work done by Peter Rorlick and Dan Howard, it was not too difficult to allocate the grid columns dynamically, set the colors, font sizes, etc.
Connecting Tables
Less trivial was the problem of connecting tables and refreshing the forms which displayed them.
I took the following approach:
a subform contains either a master or a details rowset. Whereby a master rowset can be the details rowset of another form and so on.
The ideal situation is when the user navigates in a master rowset and the details shown in any other subforms immediately reflect the movement.
This means that each subform requires an onNavigate event for the rowset it is displaying. It may have been possible to use the standard master-details connectivity built into VdB, however due to the imposed restrictions, it would not be practical.
The problem is that I almost never have a case where the single “indexfield” restriction of the standard method can be used. Usually the users not only want the details rowsets to be displayed as they are, but also in a specific and sometimes optional sequence. For example, our addressing system has a table which contains the names of brochures, which have been sent to each recipient. A master-details connection would be no problem, except, that the brochure information will be displayed in the sequence the data was entered. If you want to display by descending date for example, then you can't use a simple master-details connection. To achieve this you will need to use the setrange() method of the details rowset. Most of the tables we use have indexes which are built form several fields — for example address-No. + date-sent. Often we don't have a trivial address-no. index at all.
What I definitely didn't want to do was go creating indexes just to be able to view the data from different tables, when there are perfectly useable indexes available.
Another approach would have been to use SQL-queries to retrieve the details rowsets. However some recent practical experience with large files on a network put me off doing things this way because of the response times involved.
As far as I can see, the setrange() way of doing things will satisfy almost all the connections you are likely to want. Assuming there is a suitable index of sorts available.
What does the onNavigate event do?
Well, the event handler has to go and find out which other forms contain detail rowsets connected to its own rowset. To achieve this, I set up a second array in the main form called navtab. This array has two dimensions where the first column contains the identifier of the master rowset and the second column contains the identifier of the details rowset. The identifier used is in both cases the SubNum field of the form containing the rowset.
But before the onNavigate will work, we need to be able to put the connecting information into the navtab array.
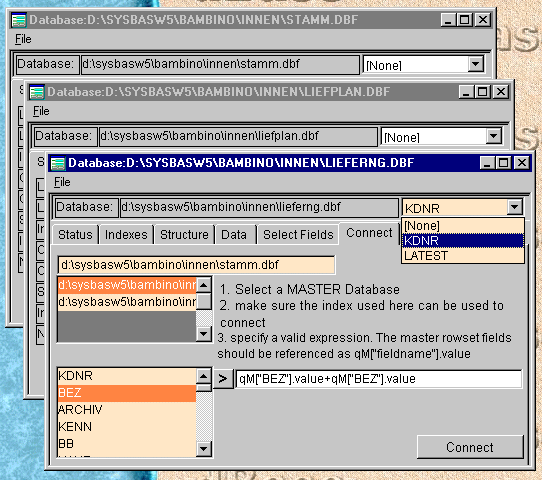
The user selects the name of the database to which the table in this form is to connect and the form builds a list of field names from the selected database and puts them in the lower listbox. At this point the user must also specify which index he wants to use for the connection (the pulldown next to the databasename) and also specifies which fields in the master rowset will be required to set the range for this details rowset.
As you can see on the form, there is a slight restriction as to how the joining expression must be specified. All the fields referenced in the master rowset must be referenced as qM["<fieldname>"].value. However, clicking on the small button next to the master rowset fields list will generate these.
If this sounds complicated, let's look at the example shown. The current rowset is the deliveries table (lieferng.dbf). We want to connect to the customers table (stamm.dbf) which is already open in the first subform.
Unfortunately there is no single joining field between the two tables, because the customer number (kdnr) is only unique within an area (bez). In this particular application all our joins are by using the concatenated key “bez+kdnr”.
Now we have an index “kdnr”, which is built from the area-code, the customer number, and the deliveries year (bez+kdnr+jahr). And it is this index which will be used in the example to connect the two tables. If you're not sure which indexes are available, you can click on the indexes tab on the notebook to display them all.
What happens when the user clicks on the “Connect” button?
The subform checks to see if it is already connected,
because the connect button toggles between connect and disconnect as appropriate.
As you can see from the comments, this function will also be called from
the main form, should a form to which this one is connected get close.
| function BUT_CONNECT_onClick
// note that but_connect is used instead of "this." // because this function can be called directly from the // main form to disconnect connections if forms close if form.sub_set=true form.parentform.disconnect(form.subnum) form.sub_set=false form.notebook1.but_connect.text="Connect" form.notebook1.conlist.enabled=true form.qdata.rowset.clearrange() form.qdata.rowset.first() return endif if empty(form.notebook1.conex.value) msgbox("Please specify a joining expression") return endif rc=form.parentform.connect(form.subnum,; form.notebook1.conselected.value) // check if connection was valid, it returns the // form number or 0 if rc>0 form.notebook1.but_connect.text="Disconnect" form.sub_set=true form.notebook1.conlist.enabled=false // now set the range the first time // go via the subtab to the master form and // reference the data rowset // and set the range for the first time qM=form.parentform.subtab[rc].qData.rowset.fields express=form.conex conex=&express // evaluate the expression key_from=conex key_to=conex form.qdata.rowset.setrange(key_from,key_to) form.qData.rowset.first() endif return |
The subform calls a function connect() within the main form asking it to add this connection to the navtab array. If the connection completed ok, connect() returns the subnum of the form to which the connection was made. Then the text on the “Connect” button is swapped to disconnect and the setrange() method for this forms rowset is called for the first time to refresh the details rowset.
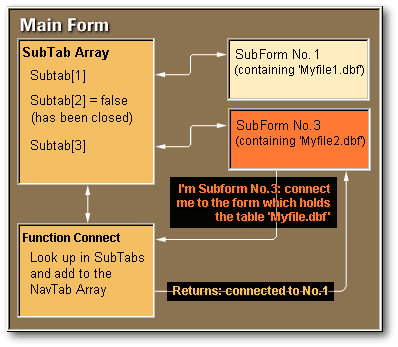
All that happens in the main form is that the connection
is added to the navtab table. Whereby there is the added complication of
checking for an endless loop — rowset 1 to rowset 2 to rowset 3 back to
rowset 1, and so on.
| function connect(pSubnum, pFileTo)
// when a subform wants to connect to another form // it calls this routine // pSubnum is the id of the requesting form // pFileto is the database to which it wants to connect to // determine the id of the form to connect to // note that form refers to this form and not the caller local connect_to connect_to=0 for i=1 to form.subnum if type("form.subtab[i]")="O" and ; form.subtab[i].dbfile=pFileTo connect_to=i exit endif next if connect_to=0 // tell the caller, that a connection was not possible return(0) endif // add this connection to the navigation table // check first for an endless loop by taking the new // master to see where it is used as details and // following up the chain of master rowsets checkfor=connect_to do while true nextcheckfor=0 for i=1 to form.navnum if form.navtab[i,2]=checkfor nextcheckfor=form.navtab[i,1] exit endif next if nextcheckfor=0 exit endif if nextcheckfor=pSubNum msgbox("loop between connections") return(0) endif checkfor=nextcheckfor enddo form.navnum += 1 form.navtab.resize(form.navnum) form.navtab[form.navnum,1]=connect_to // master file form.navtab[form.navnum,2]=pSubNum // details (requester) return(connect_to) |
Now what happens when a rowset navigates?
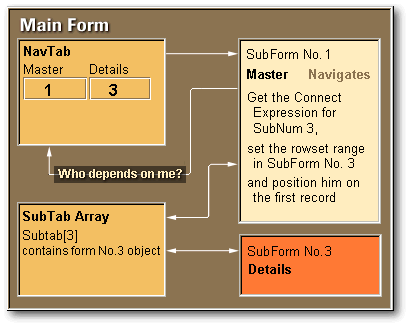
As said, every subform has an onNavigate event predefined for its own rowset. In the application I decided to put this code into the subforms and not into the main form as I had done for other functions. The reason is that navigation in one rowset will trigger the navigation events in any details rowsets connected with it. These in turn may trigger further onNavigation events in their details rowsets. This means that if we had a central function it would need to be reentrant code. By putting the code in the subforms, there is once instance for each form and so long as VdB doesn't get confused, the amount of triggers setting off the next triggers won't matter.
If you look at the following code snippet you will
see that the form that is being navigated on goes throughout the navtab
array to decide who is dependent on him. Once a subform is identified,
the main forms array SubTab
is used to get at the connecting expression.
| function qData_OnNavigate
// every subform has an onNavigate event to check // whether other connected forms must be informed // The coding for this is in each form because if it // was in the main form it would need to be reentered or // threaded // note that _app.mainform was assigned to allow the form // to be referenced. this.parent.parent did not work! local i, sf for i=1 to _app.mainform.navnum // this form is master if _app.mainform.navtab[i,1]=this.parent.form.SubNum // the form found is connected as a details rowset // the rowset will be rebuilt using the setrange method formnumber=_app.mainform.navtab[i,2] // shorten the reference to the details subform sf=_app.mainform.subtab[formnumber] qM=this.fields // qM is the reference used // in the field expressions conex=sf.conex key_from=&conex key_to=key_from sf.qData.rowset.setrange(key_from, key_to) sf.qData.rowset.first() endif next i return |
Conclusion
For me this was an interesting exercise in using many of the OODML features now available with Visual dBASE 7. I must admit though, that the reindex function was done using XDML. Maybe this will get changed in the next update.
When I was finished, I was surprised just how little code was actually necessary to complete this task. Most of the code is actually concerned with dynamically building the index, structure and data rowset grids. I know too, that in some cases the coding could actually have been tighter, but I still believe a program should be readable.
To
download Paul White's application, click here
(it's
a 84Kb zipped executable file)