dB2K is a rich and powerful software but one utility it sadly lacks is a resource builder. Back in the days of 16 bit dBASE we had Borland’s Resource Workshop. This was a good product and worked well for 16 bit development but it has some shortcomings in the 32 bit world. Unfortunately this product has problems when you try to save your work in a 32 bit format. Either the dll simply won’t work at all or worse - it will make your application become unstable.
The good news is that there is an excellent shareware 32 bit resource builder out there called Resource Builder. It can be downloaded from the following URL: http://www.sicomponents.com/. The author, Igor Siticov is very helpful with question about the product. Resource builder also supports JPEG files which is very useful.
The only downside to Resource Builder is that it works with RC (resource script) files. These are simple ASCII files which describe the resources in text format. Although Resource Builder allows you to compile your resource files in to RES files, it does not go that extra step and make the DLL for you. Fortunately there is a solution to this. To make the DLL we’ll need the help of Borland’s free C++ compiler.
Borland recently released it core C++ compiler to the public for free. This is a bare bones software. No GUI, no drag & drop, only a DOS command line interface but it’s fully functional and can be used to write any C or C++ program you want. It can be downloaded from this URL: http://www.borland.com/bcppbuilder/freecompiler/.
Once you’ve download this fairly hefty file (8 meg!) install it on your computer. I normally install it to c:\borland\bcc55 but you can specify other locations if you want but be careful not to use paths with spaces. In the install folder is a readme.txt file. This contains some configuration instructions which I’ll review for you.
Configuring Borland C++
Borland’s compiler requires only
a few settings to get it to work. First you’ll need to set the path to
the compiler itself. This will be in the BIN folder where you installed
it. If you’re using Windows 9x you have to set this in your autoexec.bat
file and then reboot. The entry might look like this:
|
PATH=C:\WINDOWS;C:\WINDOWS\COMMAND;C:\Borland\BCC55\BIN |
|
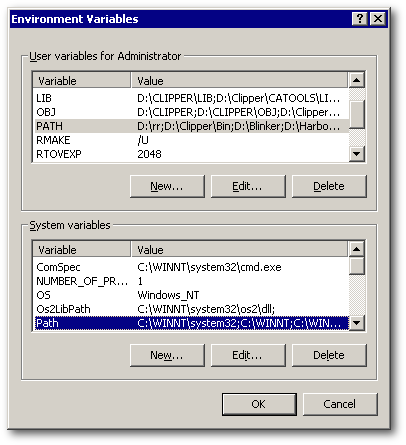
For Windows NT or 2000 you can set the path by modifying the system environment variables.
- Right click on “My Computer”
- Choose “Properties”
- Choose the “Advanced” Tab
- Click “Environment Variables”

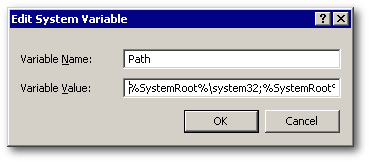
Look under the System Variables for a entry called Path and click edit.

At the end of the path string enter:
|
;c:\borland\bcc55\bin // Notice the semi-colon. That's important. |
|
Once this is done you’ll be able to run the compiler from any directory on your computer.
The next thing we have to do is create 2 configuration files. One for the compiler and one for the linker. In Borland’s readme file is a sample of these files. These can be created using any text editor like notepad or the dBASE program editor.
First we’ll create a file for the
compiler. This file needs 2 entries. Open up a new file and enter
this:
|
-I"c:\Borland\Bcc55\include" -L"c:\Borland\Bcc55\lib" |
|
Make sure that the paths are the same as where you installed the compiler. These 2 lines will tell the compiler where to find it’s include and library files. Save this file as bcc32.cfg in the BIN folder.
Next we’ll create a file for the
linker. This needs only a single entry:
|
-L"c:\Borland\Bcc55\lib" |
|
Again make sure that the paths are the same as your install. This tells the linker where to find any library files it will need. Save this file as ilink32.cfg in the BIN folder.
Creating a DLL from an RC file
Once Borland’s compiler is installed
we’re ready to create our resource dlls. Included with this article is
a batch file I wrote which will make building DLLs very easy. All you have
to do is save this file into the BIN folder and run it whenever you need
to. All you’ll need is an RC file created with either Resource Builder
or Resource Workshop and then from the DOS prompt:
|
MAKEDLL myresourcefile |
|
Notice that you don’t specify an extension. This will run the compiler and the linker and produce a DLL in the same folder as your RC file.
How it works
Creating a DLL is a 2 step process. First the compiler has to compile the RC file to convert into a binary (RES) format and then the linker has to link that binary file into the final DLL.
To compile the RC file, use the
command:
|
brcc32 -FOmyresource.res myresource.rc |
|
The compiler takes 2 parameters, -FO tells the compiler what the output file name will be — in this case myresource.res. The second parameter is the input file that will be compiled. This would be your resource script file.
Once this command runs you’ll have a compiled version of your resource file saved in the same folder as your script file. We’re half way there now. All we have to do is link this file to make the DLL.
To link the RES file into a DLL,
use this command (watch word wrap. this should all be one command):
|
ilink32 -Tpd -aa -V4.0 -c -x c0d32.obj, myresource.dll , ,import32.lib cw32i.lib, ,myresource.res |
|
The linker is more complex and
takes several parameters.
| Parameter | Meaning | |
| -Tpd | This tells the linker the type of file you want to create. You can use -Tpe to create an exe. | |
| -aa | This tells the linker that this will be a 32 bit Windows application. | |
| -V4.0 | This specifies the target Windows version that this DLL will be used for. 4.0 represents Windows 95 and later. | |
| -c | This tells the linker that you want case sensitive symbols. I'm not sure that this is critical but since C is case sensitive it's a good idea to include it. | |
| -x | This suppresses the creation of a MAP file. A MAP file is a text file which list all the memory locations of the symbols of a C program. Since this is simply a resource file we're making, it's not that useful to have a MAP file. | |
| c0d32.obj | This object file is required to link into the dll. It allows the DLL to be loaded into memory only when needed. | |
| myresource.dll | This is the output DLL file that will be created. | |
| import32.lib and cw32i.lib | These libraries are needed for the DLL. They're used to access the Windows API. | |
| myresource.res | This is your compiled RES file that will be linked. | |
Notice in the command line that there are items seperated by commas. One part of the command line has 2 commas with nothing in between. This part of the command line is for dependency files (.DEP) which we don’t need for a dll.
To
download the code of the MakeDLL batch file, click
here
(it's
a 306 byte zipped file)
About the Author:
Dan Howard is an independent software developer and a member of dBVIPS.
You can usually find him lurking around the dBASE newsgroups.