
The main weakness of the dBL Grid class is its vertical scrollbar. The position of the scrollbar elevator (its official name is scrollbox or thumb) accurately reflects the place of the row cursor in the rowset only when the table displayed in the grid is in natural order. Otherwise, the elevator has only three positions: top, middle, and bottom. It is always exactly 1/3 of the size of the scroll range to represent the three rough positions that it understands.
Why is this so? Because the dBASE indexes dont carry the position of the rows in the indexed table. This means that dBASE has no way to know where the relative position of the row cursor is except when it is at the beginning or the end of the rowset. Because of that shortcoming, the dBASE engineers decided that the elevator would sit in the middle of its shaft and consequently, that the scrollbar hint text (for example, 10 of 122) wouldnt show, even when the grid has its VScrollHintText property set to true.
The SQL solution
To overcome that shortcoming, the easiest solution is to connect your grid to a SQL query. One method is used to connect the grid if the field on which you want your grid to be ordered is indexed: however, a very different method is used when the field is not indexed.
When the field is already indexed
When the field on which you want
your grid to be ordered already has an index built on it (whether or not
the index bears the name of that field), the solution is to create a temporary
table sorted on that field before the form is instantiated. In other words,
above the form header (before the line that says
** END HEADER -- do not remove this line),
put the SQL code that will create a new table naturally ordered the way
you want. Since that table could have been created the last time
the form was opened, and since that table could have been modified since,
we should first look for the existence of that table, delete it if it exists,
and create a new one from scratch. Here we presume that the table is located
in the current folder.
|
if _app.databases[1].tableExists("Temporary_Table.dbf") _app.databases[1].dropTable("Temporary_Table.dbf") endif use My_Table order tag My_Field_Name copy to Temporary_Table use ** END HEADER -- do not remove this line
|
|
Unlike the copy table command, the copy to command needs the original table to be open. Moreover, when there is an active index in the original table, its copy will be sorted according to that index. Here we take advantage of this to create a copy whose rows will be in the same order as they are in the index. Once that temporary table is created, a query can be built on it and its data can populate the grid. Unless the Grids allowEditing and allowAddRows properties are set to false, the temporary table can be modified. If this is desired, these changes will have to be copied to the original rowset; otherwise the changes will be lost when the temporary table is abandoned.
When an index doesnt already exist
When the field is not indexed,
its even easier. There is no code to add above the forms header and nothing
to change in the Grids Constructor code. The only change necessary is
to add an order by clause
to the sql property
of the Querys Constructor code. For example:
|
this.MY_QUERY1 = new QUERY() this.MY_QUERY1.parent = this with (this.MY_QUERY1) left = 100 top = 100 sql = 'select * from "My_Table.DBF" order by My_Field_Name' active = true endwith |
|
The rowset created this way is read-only.
The dBL solution
In theory, the SQL solution is the only one. So this article should stop here.
But yes, there is a but we all know from experience that just about anything can be done in dBL. So it is reasonable to presume that there might be something else to be said on the subject. Indeed, there is a dBL alternative to the SQL solution. To be frank, the latter is easier to implement. But our dBL alternative is a nice exercise in dBL coding and a good way to learn many secrets from the Grid and the Scrollbar classes.
Our starting idea was that the Grids native vertical Scrollbar is rather useless when a table is indexed, so we should use a Scrollbar object instead since it can be programmed at will and given the expected behavior. From that starting idea, a simple application was built. It is available from the link at the end of this article.
If there were only the behavior of the vertical Scrollbar button to take into consideration, things would be quite simple. The size of the rowset and the height of the Scrollbar object are known. So we can navigate through a percentage of the rows when the vertical Scrollbar button is moved proportionally in its shaft. Of course, all this is a lot easier when the forms measurements (i.e., the Forms metric property) are in pixels.
Anatomy of the Scrollbar object
A vertical Scrollbar has four elements: an elevator, a shaft (on which the evelator slides), an up-arrow button at the top end, and a down-arrow button at the bottom end. Actually, the shaft is made of two parts. If you click the shaft above or beneath the elevator, only that part of the shaft will become dark. This illustrates that it is a distinct object.
None of these elements have been surfaced to us by dBASE engineers. For example, you cant specifically change the color or the size of the elevator. There is no Scrollbar.upArrow.onClick() event. Theres no Scrollbar.LowerShaft.onLeftMouseDown() event either. In a nutshell, we are quite limited. When we are faced with limited resources, there is only one valid attitude to have: to be imaginative. So lets see the resources at our disposal.
The elevator
Officially, there is no property, event, or method associated with the elevator. Unofficially, the Scrollbar rangeMin and a rangeMax properties are de facto properties of the elevator. These properties represent, respectively, the minimum and maximum values of the position of the elevator in its shaft. Any integer can be given to the rangeMin property as long as it is smaller than the rangeMax value; we have set it to 1. Similarly, the rangeMax property can be set at any integer bigger than the rangeMin value. We have set it to the number of rows in the rowset (form.rowset.count()).
The Scrollbar value property is the position presently occupied by the elevator in its shaft. That value can be any integer between the rangeMin and the rangeMax values. There are four ways to change the Scrollbar value property:
The Scrollbar object is the only one I know whose onLeftMouseDown() event is not fired when the mouse button is pushed, but rather when it is released!!! More precisely, when the elevator is dragged and released, the onChange(), the onLeftMouseDown() and the onLeftMouseUp() events are fired successively, in that order, the exact moment the mouse button is released. When the elevator is not dragged but simply clicked, only the latter two events are fired. In other words, the onChange() event is fired only when the elevator is moved.
This means that the onLeftMouseDown() and the onLeftMouseUp() events cant be used to obtain information about the number of pixels traveled by the mouse since the mouse button was pushed. This is why we must use the onChange() event to code navigation in our Grid.
In order to establish a link between the onChange() event and navigation in a table, two things need to be done. First, we must store the original value of the Scrollbar in a variable or in a custom property before the elevator is dragged. In our test form, weve decided to create a custom property (called oldValue) of the Scrollbar. In the Scrollbar onOpen() function, that custom property is created and is given a starting value of one.
Secondly, we need to tell the Scrollbar
what to do when the elevator is moved. The code has to be put on the Scrollbar
onChange() function.
|
Function verticalScrollbar_onChange Form.rowset.next(this.value-this.oldValue) this.oldValue = this.value return |
|
In the above function (which is fired after the elevator has been moved), the difference between the new value of the Scrollbar and the one it had before is calculated. That result is used to navigate ( Form.rowset.next(n)). Finally the Scrollbar oldValue is updated. Those are the only things needed to obtain a vertical Scrollbar that accurately reflects the placement of the row cursor in the rowset. However, this is true only if the Scrollbar is the sole means by which user navigates in the rowset.
The arrow buttons
Ideally, I would have liked for the user to be able to navigate one row when an arrow button was pushed and one screenful of rows when the shaft was clicked. Unfortunately, since the shaft and the arrow buttons are not surfaced as distinct objects within the Scrollbar class, they must share the same behavior for now. At least, thats what I thought. In our next section about the shaft, we will see what can be done about that.
There is nothing special to code for the arrow pushbuttons. When they are pushed, the onChange() event is fired. The value of the Scrollbar object is increased or decreased by one and the position of the elevator (and the rowset pointer) is changed accordingly.
The shaft
If we want a click on the shaft to have a different result from pushing an arrow button, we must know when the shaft has been clicked. Thats obvious. The onLeftMouseDown() or the onLeftMouseUp() event can be used for that purpose. Both are fired practically at the same time and both return three parameters: flags, col, and row.
The
row parameter is the distance
(in pixels) between the top of the Scrollbar object and the pixel over
which the mouse pointer tip was located when the left mouse button was
pushed or released. The first 16 pixels are occupied by the up-arrow button.
So the shaft spreads from the 17th pixel to a pixel equivalent to the Scrollbar
height minus the height of the down-arrow button (another 16 pixels). However,
its not enough to know that the shaft was clicked somewhere between these
two limits. We must know if it was clicked above or below the elevator.
The code needed to determine that is shown below.
|
01 Function VerticalScrollbar_onLeftMouseUp(flags, col, row) 02 if this.height > 3*16 // otherwise there's no room for the shaft 03 local g, n 04 g = Form.Grid1 05 n = floor(g.height/(g.cellHeight + g.gridLineWidth)) 06 do case 07 case row > 16 and ; row < round(((this.height-48)*(this.value/this.rangeMax)),0)+16 08 Form.rowset.next(-n) 09 this.value -= n 10 case row < this.height-16 and ; row > round(((this.height-48)*(this.value/this.rangeMax)),0)+32 11 Form.rowset.next(n) 12 this.value += n 13 endcase 14 this.oldValue = this.value 15 endif 16 return |
|
 Line
2 says to do something only if the Scrollbar is taller than the height
of the two arrow buttons plus the height of the elevator (whose heights
are 16 pixels each). Line 4 just gives a nickname to the grid in order
to shorten the following lines of code. Line 5 calculates how many rows
are displayed in the Grid. Thats simply the height of the grid divided
by the height occupied by each row. Line 7 determines if the Scrollbar
was clicked below the up-arrow button (row
> 16) but above the top
of the elevator.
Line
2 says to do something only if the Scrollbar is taller than the height
of the two arrow buttons plus the height of the elevator (whose heights
are 16 pixels each). Line 4 just gives a nickname to the grid in order
to shorten the following lines of code. Line 5 calculates how many rows
are displayed in the Grid. Thats simply the height of the grid divided
by the height occupied by each row. Line 7 determines if the Scrollbar
was clicked below the up-arrow button (row
> 16) but above the top
of the elevator.
How do we calculate where the top of the elevator is located? First we calculate the relative position of the elevator in its shaft (this.value/this.rangeMax). Then we multiply that fraction by the distance over which the elevator can be dragged. That distance is the height of the Scrollbar minus the height of the two arrow buttons and minus the height on the elevator itself. But that distance doesnt start from the top of the Scrollbar, but rather from the bottom of the up-arrow button (hence the 16 pixels added at the end of the line).
Line 8 navigates backward a screenful of rows while line 9 moves the elevator up. Note: this.value -= n is shorthand for this.value = this.value - n.
At line 10, we determine if the Scrollbar was clicked above the down-arrow button (this.height-16) but below the elevator. In order to calculate where the bottom of the elevator is located, we simply use the formula needed to find the position of the top of the elevator and add 16 more pixels (i.e., we add 32 pixels at the end of the line instead of 16).
Line 11 navigates one screenful of rows (equivalent to PgDn) while line 12 moves the elevator down. Line 14 resets the Scrollbar oldValue custom property.
Navigating without the Scrollbar
To complicate things a bit, we have to deal with the fact that the user can employ means other than the Scrollbar to navigate in the rowset. Mouse scrolling (since dBASE PLUS 2.6), menu or keyboard shortcuts, and clicking a row displayed in a grid, are different means to navigate. Since the Scrollbar will not be alerted to either of these actions which move the row pointer, the Scrollbar will not update its value for the pointer position. A discrepancy will thus have been introduced between the actual pointer position and the position considered current by the ScrollBar. Solutions for this problem are described below.
Clicking the Grid
As described above, each time the user clicks on a different row, the Scrollbar value is not updated. The more the row on which the user clicks is far from the one that was highlighted, the more we add a discrepancy. Before mouse scrolling was supported, the user could only click among the limited number of rows displayed in the grid. With mouse scrolling support, navigation can happen anywhere in the rowset. To take into account the possibility that the user might click on the grid, we will use two event handlers.
The canNavigate() event handler is fired just before navigation. We will use it to bookmark the row at which the row cursor was located before navigation. The code needed after navigation was placed inside an onLeftMouseDown() function. We chose the onLeftMouseDown() event instead of the onLeftMouseUp() event because the latter is not fired when the rowSelect property of the Grid is set to false. Moreover, the code of our Grid.onLeftMouseDown() function has to take into account another possibility: mouse scrolling.
If we are using a version of dBASE newer than dBASE PLUS 2.5, the user might have used the mouse to scroll the grid before clicking to a row in it. So the code follows these six steps:
|
local r, vsb, nRowsNavigated r = this.datalink vsb = this.parent.VerticalScrollbar r.bookmark1 = r.bookmark() r.last() nRowsNavigated = vsb.rangeMax - vsb.value r.bookmark2 = r.bookmark() do while NOT r.bookmarksEqual(r.bookmark1, r.bookmark2) r.next( - 1 ) r.bookmark2 = r.bookmark() nRowsNavigated -- enddo vsb.value += nRowsNavigated |
|
Even with the notifyControls property set to false, I wouldnt try the code above on a million-records rowset because of the need to jump to the end on the rowset and to navigate back row by row. On the reasonable rowsets on which Ive tried that code, its faster than I thought.
If mouse scrolling is not possible, the function follows these eight steps:
|
local r, vsb, nRowsNavigated r = this.datalink vsb = this.parent.VerticalScrollbar r.bookmark2 = r.bookmark() r.goto(bookmark1) nRowsNavigated = 0 nRowsDisplayed = Ceiling( this.height / this.cellHeight ) r.next( nRowsDisplayed ) nRowsNavigated += nRowsDisplayed r.bookmark1 = r.bookmark() do while NOT r.bookmarksEqual(r.bookmark1, r.bookmark2) r.next( - 1 ) r.bookmark1 = r.bookmark() nRowsNavigated -- enddo vsb.value += nRowsNavigated |
|
Menu Shortcuts
When a Grid has focus, pushing the End key or the PgDn key will navigate one screenful of rows. The down arrow or the up-arrow keys will navigate to the next or to the previous key, respectively. However, none of these shortcuts will update the vertical Scrollbar on our form since it is not native to the Grid. In order to trap these keys and give our elevator the appropriate behavior, weve added a menu. Since the Menu Designer has not been the subject of any article we have published so far, we will take a few moment to explain how to use it. Move to the next section if you already know how to create menus.

Under the Form Files tab, double-click the third item in the Navigator to open the Menu Designer. Using the Designer is childs play. Merely type the text of new menu items and they will automatically be created for you by the Menu Designer. Use the Tab key or the Shift-Tab keys to create or move to an item on the Menu bar. Use the Enter key, the down-arrow key, or the up-arrow key to create or move to a sub-menu item. The Ctrl-T shortcut will insert a separator. Crtl-U deletes the current item.
As you create new item names, add an ampersand (&) before a letter to create a conventional shortcut. In the Menu bar above, Alt-F and Alt-N will drop down the File and the Navigate sub-menus, respectively, while pushing the L key once the Navigate sub-menu is open will run the onClick() function of the Last Row sub-menu item. You can also create a real shortcut, totally unrelated to the name of an item, that doesnt need a corresponding menu item to be displayed. To do this, use that items shortcut property. You might want to use the ShortCut Property Builder. If so, just click the wrench tool at the right of the shortCut property in the Property Inspector. If the shortcut you want to use is not listed among the ones offered by the ShortCut Property Builder, just type it directly in the entryfield at the right of that property, in the Inspector. Thats what we did for the End shortcut, illustrated above. In order for it to work properly when you to type it directly, you must know the exact name of that key. down-arrow will not work: DnArrow will. These exact names can be found in the on-line help, under the item on key.
Under the Events tab of the Inspector,
click the wrench button at the right of the onClick item to open
the Source Editor. Type the code to be run. If you just want to reproduce
what happens when an event is fired in your form, simply run that event
from the onClick() function
of that menu item. If you chose to run one of the functions of the
form, the code will be run from the point of view of the form. For example,
each this will
refer to the form, not the meaning you might have intended.
|
** END HEADER -- do not remove this line // // Generated on 04/11/01 // parameter formObj new ORIGINALMENU(formObj, "root") class ORIGINALMENU(formObj, name) of MENUBAR(formObj, name)
(.....) this.MNAVIGATE.MLAST = new MENU(this.MNAVIGATE)
(.....) Function mLAST_onClick
|
|
Finally, you have to set the forms
MenuFile property from
the Inspector or from the Source Editor:
|
class AncestorForm of FORM with (this) (....) mdi = false menuFile = "Ancestor.mnu" endwith |
|
In the case of a SDI form, the menu will be attached to the form itself. In the case of an MDI form, it will be attached to _app.frameWin.
The column header
When we add a column header to a Grid, all the data is pushed down. When a Grid is clicked, the onLeftMouseDown() function will return a row parameter whose value might be dependent upon whether or not the Grid has a column header.
The very first pixel of the Grid is taken by its top border. The row parameter returned by the Grid.onLeftMouseDown() event doesn't start from 1 but from 0 (zero). This means that when the mouse pointer is over the first pixel of a Grid (occupied by its top border), the row parameter has a value of zero. So we will just ignore the top border in our calculations.
The thickness of the header changes according to the Grid borderStyle and cellHeight properties. But whatever the values of these properties, the first row returned by the onLeftMouseDown() event is always 2 pixels more than the cellHeight when the Grid has a header. In the onLeftMouseDown() function, we will have to take that measurement into consideration in order to determine which row (in the usual sense of the word) was clicked. Hopefully, we dont have to take into consideration the possibility that the header itself could have been clicked because the onLeftMouseDown() event does not fire when the header is clicked (the header being a different object than the rest of the Grid).
When the form opens, we create
a custom property called nondataPixels. Its value is calculated by the
following formula.
|
// we will calculate the number of pixels over the ones that display the data this.GRID1.nondataPixels = iif(this.GRID1.hasColumnHeadings = true, 23, 0) |
|
In this formula, the iif(this.GRID1.hasColumnHeadings = true, 23, 0) statement means that if the hasColumnHeadings property is true, the nondataPixels custom property equals 23; otherwise it equals zero.
But there is one last question to address. The user might click one of those horizontal lines dividing the rows. If he does, no navigation should take place. What should we do in our code? Nothing. The onLeftMouseDown() event is not fired when one of these lines is clicked.
Precautions/bugs
A GridScrollbar will work with filters (and partial indexes) as long as your code performs the following steps as soon as filters are applied or removed:
GridScrollbars are totally incompatible with Grids whose rowset will be used with a Seeker. That is, this custom class cant work with Seekers. Moreover, since the GridScrollbar has a Grid inside a container, it is not recommanded for any version of dBASE before dB2K (since any form using a GridScrollbar could make dBASE unstable if a VdB 7.x form is opened and closed a few times in a row).
While I was writing the code for the GridScrollbar class, I learned that there was a bug in the stock Scrollbar class. Strangely, I had not noticed that bug until I read about it in the NewsGroups. The bug happens when the up or down-arrows of the scrollbar are clicked a few times and then the elevator is dragged. The elevator starts to move by itself. This bug is scheduled to be corrected in the next release of dBASE.
The Scrollbar Custom Class
The code in our test application has been used to make a custom class called GridScrollbar.cc (available from the link at the end of this article). To make that custom class appear in the Component Palette of the Form Designer, follow the instructions given in the section A new tool in your toolbox located in the article entitled A new Mover class (published in our second issue). Then, the only things you will need to do in order to be able to use a GridScrollbar with your data are these steps:
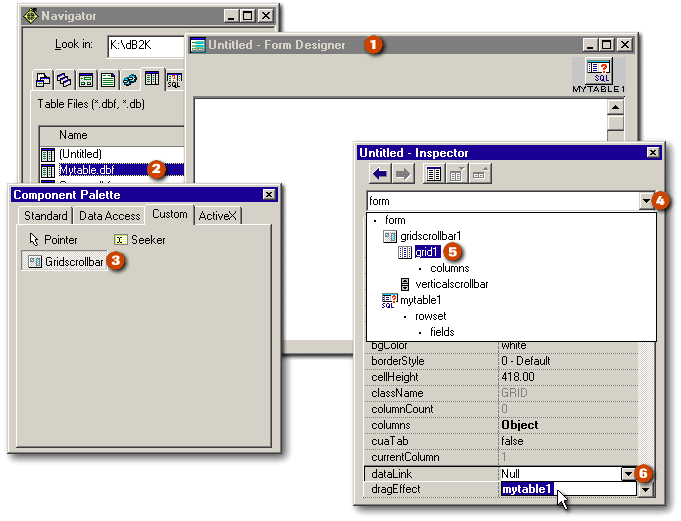
Transforming an existing Grid into
a GridScrollbar might take less than 15 minutes. First, make a copy of
the form (one can never be too prudent). Then load the Form in the Source
Editor. Seek and replace the name of your Grid, lets say
Grid1, with
GridScrollbar1.Grid1 (and
possibly Grid2 with
GridScrollbar2.Grid1
note it is still Grid1 etc.). Add
set procedure to GridScrollbar.cc additive to
your Form Constructor code. Next, over the Grid Constructor code,
paste the
GridScrollbar Constructor code below. Copy the
left,
top,
width and
height properties from
the Grid to the Scrollbar Constructor code. For the Grid, set these properties
as below. Under the Grid Constructor code, paste the VerticalScrollbar
Constructor code below If there is more than one GridScrollbar, replace
GridScrollbar1 with the appropriate number).
|
** END HEADER -- do not remove this line // // Generated on 16/11/01 // parameter bModal local f f = new My_Form() if (bModal) f.mdi = false // ensure not MDI f.readModal() else f.open() endif class My_Form of FORM
(...) // The new GridScrollbar
Constructor code
// Your Grid Constructor
code
// The new VerticalScrollbar
Constructor code
(...) endclass |
|
If your application already has a menu or is taking advantage of a rowset.onNavigate() or a grid.onLeftMouseDown() event, you will have to merge your code with the code from the GridScrollbar. Moreover, if filters are used, also make ajustments to your code.
Lastly, one of the things that the GridScrollbar class does when the form opens, is to set the rangeMax property of the Scrollbar object to the number of rows in the rowset datalinked to the Grid: when that rowset is big, this will slow down noticeably the opening of the form.
Conclusion
Many dBL developers are under the impression that when an indexed rowset is displayed in a Grid, it is impossible to have a functional Scrollbar. Thats not exactly the case. Under certain circumstances, applications can have perfectly functional scrollbars, thanks to SQL or to dBL.
This article is the first part of a two-part series. In this first article, weve seen how to exploit the intimate mechanisms of the stock Grid and Scrollbar classes in order to create Scrollbars which are perfectly integrated to Grids. In the second part of this series, we will see how to create Scrollbars that have more functionality than the ones usually found in Windows applications.
To download the sample application
and the GridScrollbar Custom class code, click here
(both are in that 9 Kb zipped
file)