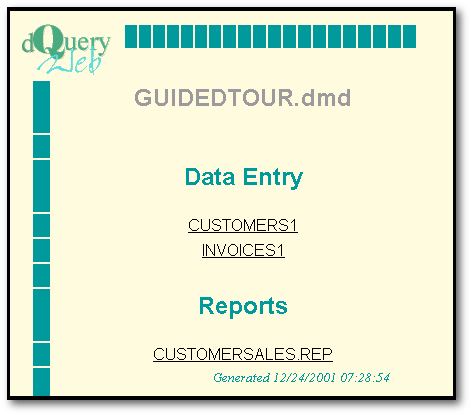
Figure One: Main
menu page for the Guided Tour's One-Click Web application
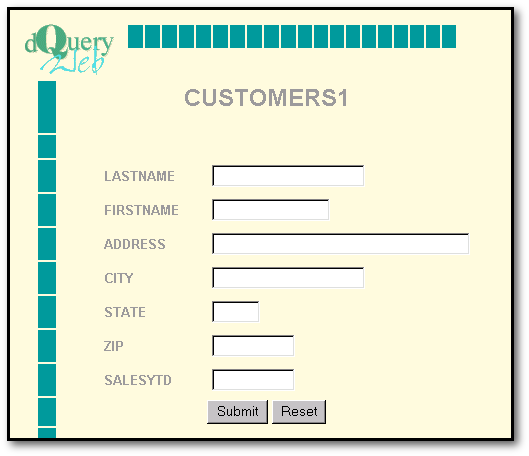
Figure Two: Customers
data-entry page
Guided Tour's One-Click
Web application
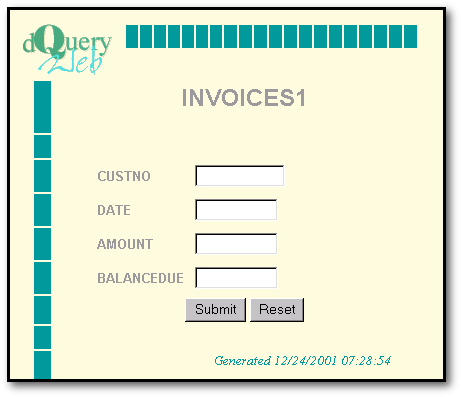
Figure Three: Invoices
data-entry page
Guided Tour's One-Click
Web application
dQuery/Web includes the ability to create a Web application that is based on an active dataModule. It's easy! Create a new dataModule, add the queries and set their relations, create some reports, and then, with a single command (or click), you can create a Web application for remote data-entry and live reporting. This article will discuss enhancements that you can add to a One-Click Web application.
A One-Click Web Application
The One-Click Web application that we will use for this article is based on the dB2K Guided Tour. If you haven't completed the Guided Tour, or if you have deleted it, you can obtain the required files here.
This archive contains the following six files.
If you create a One-Click Web application from the GuidedTour.dmd dataModule, dQuery/Web will generate three HTML pages. The first page is the main menu for the application, which is represented in Figure One. The two data-entry links on this page call their respective data-entry HTML form. For instance, the user can use the CUSTOMERS1 link to add a new customer. This link brings up the HTML form depicted in Figure Two.
Adding a customer is a straight-forward task and doesn't require further explanation. However, we will note that a One-Click Web application does not offer the capability of editing a customer already on file. This is one of the enhancements that will be explored in the current article.
Similarly, the INVOICES1 link in Figure One brings up the Invoices1 data-entry form depicted in Figure Three. In the Guided Tour application the Invoices table is a child of the Customers table. When a new Invoice is added, the user must enter the correct customer number so that the invoice record is related to the customer record. Another enhancement that we will offer is a procedure that systematically links child records with parent records.
Figure One: Main
menu page for the Guided Tour's One-Click Web application
Figure Two: Customers
data-entry page
Guided Tour's One-Click
Web application
Figure Three: Invoices
data-entry page
Guided Tour's One-Click
Web application
One thing that will make these enhancements easier to implement is a custom class that adds more functionality to the dQuery/Web webclass. You can obtain this file, OneClickWeb.cc, here. Save this file in the same folder as the GuidedTour files are located (C:\OneClick\). We will use this file later.
Step One: Create Two Lookup Reports
The first step in enhancing our One-Click Web application is to create some new reports. Although from a coding point of view these reports will be like any other dB2K report, from the user's point of view these reports will be used as lookup forms so that a specific customer can be identified.
Add Invoices lookup report
To create these reports we will use the dB2K report wizard, rather than the dQuery/Web One-click report. If you are comfortable with the dB2K report designer, you can build the reports using that tool instead of the Report Wizard. Either way you should close dQuery/Web. Switch to the Navigator window, click the Reports tab, and then double-click the first Untitled icon.
When prompted for a New Report, select Wizard.
The second modification that we
need to make in this report is to replace the
Customer No with an HTML
link that calls a cgi program. To do this, switch to the Inspector
and in the combobox at the top of the Inspector find
form.streamsource1.detailband.textcustno1.
This is the text object that currently contains the Customer's Number.
Set the text property to any string value like, for example,
"CustNo"; type
{||"CustNo"}
Next click on the Inspector's Events
tab, then click the canRender row.
At the far right of this row there is a small wrench icon; click it.
The Source editor should pop up with the following empty function:
|
function TEXTCUSTNO1_canRender return true |
|
Enter the following code for this
function:
|
function TEXTCUSTNO1_canRender this.text = '<A HREF="GuidedTour.exe?cmd=ADDINVOICES1&CUSTNO=' + ; ltrim( str(this.form.customers1.rowset.fields["CustNo"].value)) + ; '">Add new invoice' return |
|
The
canRender()
function will
execute each time the TextCustNo1
object
is printed on the report. The code will set the text property of
this object to an HTML anchor tag,
which will look something like this:
|
<A HREF="GuidedTour.exe?cmd=ADDINVOICES1&CUSTNO=3">Add new invoice</A> |
|
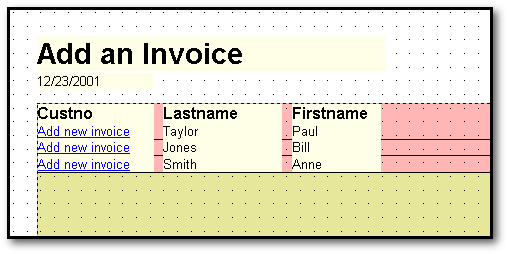
Figure Four: AddInvoices
Report in Design View
When displayed in a Web browser this tag will write Add new invoice as an HTML link. If clicked, the link calls our dBL Web program (GuidedTour.exe) and passes two parameters: cmd (which is set to ADDINVOICES1) and the CUSTNO of the selected customer.
Save this report (File | Save) and name it AddInvoices.rep. Close the Report Designer.
EditCustomers Report
The next report is going to be almost identical to the AddInvoices report. Use the Report Wizard, select the Customers.dbf table and add CustNo, LastName, and FirstName as the fields. The report title can be Edit a Customer.
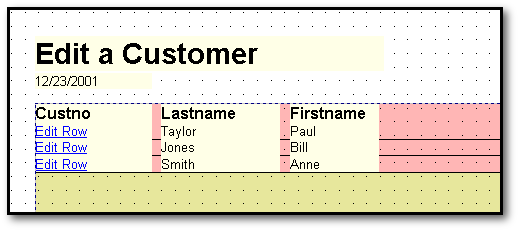
Figure Five: EditCustomers
Report in Design View
When you enter the Report Designer
you must change the background color and add a
canRender()
event handler
for the textcustno1 text
control. Use the following code for this method:
|
Function TEXTCUSTNO1_canRender this.text = '<A HREF="GuidedTour.exe?cmd=EDITCUSTOMERS1&CUSTNO=' + ; ltrim( str(this.form.customers1.rowset.fields["CustNo"].value)) + ; '">Edit Row' return true |
|
The only difference between this hyperlink and the one we construct in the AddInvoices report is the value for cmd. In this case we are using EDITCUSTOMERS1.
Save this report as EditCustomers.rep.
Step Two: Create the Web Application
Now we are going to build our Web application with dQuery/Web. First we must associate our two lookup reports with the GuidedTour datamodule and then we must create a One-Click Web application which will contain these reports.
Be sure the Report Designer is
closed and then open GuidedTour.dmd in
the dQuery/Web designer. After dQuery opens, select Associate
Report With DataModule from the Reports menu. In the the
Path
to new report entryfield, enter (you can alternatively use the button
with the yellow folder to select the report file):
|
C:\OneClick\AddInvoices.rep |
|
Then click the Add button.
Repeat this process for the EditCustomers.rep report.
After you have associated the two reports, save the updated dataModule.
Now we can create the One-Click Web application. On the dB2K menu bar, click Applications, then click One-Click Web
In the Web Application dialog form enter C:\OneClick\ for the Folder for HTML files and Folder for program files. In order to keep this example simple we will store the HTML files and the program files in the same folder (we will have more to say about file locations later in this paper). Finally, enter /OneClick for the URL for CGI folder. Then click the OK button.
Now we have a One-Click application which includes the two lookup reports created above. You may notice that there are two versions for each report: AddInvoices.rep and AddInvoices_Rep.rep, EditCustomers.rep and EditCustomers_rep.rep, and finally, CustomerSales.rep and CustomerSales_Rep.rep. The first instance of each report is the version we built in the dB2K designers. The second instance is generated by dQuery/Web. The only difference between this version and our original version is that the reports output property is set to CGI response (5). This way when the report is run the output goes to the browser and not to a preview window or a printer.
Note: When you deploy a One-Click Web application, you must deploy the filename_REP.rep version of the report files. Also if you modify the report, you must recompile and rebuild the CGI versions of the report.
To test our One-Click Web application
it will be necessary to configure your Web server. For users of the
Apache Web server, one possible configuration is to add the following at
the end of your httpd.conf file:
|
Alias /OneClick/ "C:/OneClick/" <Directory "C:/OneClick">
|
|
You can then start Apache, open a browser, and type the following address to bring up the application's main page: http://localhost/OneClick/. (Note that the URL may be case-sensitive when using the above configuration.)
Step Three: Modify the HTML pages
After dQuery/Web creates our Web Application, there will be three HTML files in the OneClick folder:
We are going to convert the HTML data-entry forms to HTML templates. Our Web application will read these templates and stream them to the Web browser. They will not be called directly by the client.
There is a method called DisplayHTML() in OneClickWeb.cc that is designed to read an HTML-formatted file, replace field codes with data, and return the page to a Web browser. There are at least two advantages to using this method. First, it provides a simple way to retrieve data from a query object and present it the user. To use this method you simply need to position the query object's row pointer on the desired record and call DisplayHTML(). Second, this method simplifies the process of editing HTML pages for users of HTML editors. The HTML code is not embedded in your program file, and thus, the HTML page remains a separate file accessible to your editor.
Open
GuidedTour_Customers1.htm
in
a text editor. Scan the HTML code in this file and look for the
INPUT tags. The
text-type HTML INPUT tag
is similar to the dBASE entryfield objects. The first
INPUT tag should be datalinked
to the LASTNAME field.
It looks like this:
|
<Input type="text" size="20" name="CUSTOMERS1*@LASTNAME"> |
|
To convert this to an HTML template
we must add a value property
and assign it with a specially formatted field code. For the
LASTNAME field add
value="<#LASTNAME>" so
that the updated tag looks like this:
|
<Input type="text" size="20" name="CUSTOMERS1*@LASTNAME" value="<#LASTNAME>"> |
|
DisplayHTML() will
open the template file and read it line-by-line. If the line being
evaluated includes a field code, the code will be replaced with a value
from your table, or from the CGI array,
or with an empty value. The response page will then look something
like this:
|
<Input type="text" size="20" name="CUSTOMERS1*@LASTNAME" value="Taylor"> |
|
Add the value property and field code to the other text-type INPUT fields in this file. The fields include FIRSTNAME, ADDRESS, CITY, STATE, ZIP, and SALESYTD. Note that CUSTNO in the Customers table is an autoIncrement field and dQuery/Web does not include it in the HTML forms.
After the
SALESYTD
entryfield, you
should see two more INPUT tags
one is the submit tag
and the other is the reset tag.
These create the respective buttons on the HTML form.
|
<div align="center"> <input type="submit" name="Submit" value="Submit"> <input type="reset" name="Reset" value="Reset"> </div> |
|
We need to add two hidden elements
to this page. The hidden INPUT tag
is used to pass a parameter to a CGI application, but the value is not
visible to the user. In our case, the hidden
INPUT
tag will be used
to tell our application (1) how to process the form data and (2) which
CustNo to act upon.
Note that the name/value pairs
are case-sensitive so be sure to type
cmd and
NEXTcmd in this tag.
Your updated HTML will look like this:
|
<div align="center"> <input type="hidden" name="cmd" value="<#NEXTcmd>"> <input type="hidden" name="CUSTOMERS1*@CUSTNO" value="<#CUSTNO>"> <input type="submit" name="Submit" value="Submit"> <input type="reset" name="Reset" value="Reset"> </div> |
|
We need to do substantially the
same thing for the other HTML data-entry page. Open
GuidedTour_INVOICES1.htm
in
a text editor. Add the value property
to each of the text-type INPUT fields using the fieldname for the field
code. Also add the following hidden fields to the page:
|
<input type="hidden" name="cmd" value="<#NEXTcmd>"> |
|
Save the updated files.
There is one last thing that we should do before moving on to Step Four. Since we have created two HTML templates rather than two static HTML pages, we should change the .htm extension to .tpl for both files. You can do this with Windows Explorer.
Step Four: Modify the Program File
When dQuery/Web generated the One-Click
Web application in Step Two, it created a program file named
GuidedTour.prg. The program
file is rather simple.
|
01 Try // Error trap entire CGI applet. 02 03 ////// Create new instance of the Web Class 04 05 Set procedure to dQWebClass.cc Additive 06 oCGI = new CGISession() 07 08 ////// Connect to the Web Server (StdIn/StdOut) 09 10 oCGI.Connect() 11 12 ////// Open data module 13 Set Procedure to GUIDEDTOUR.dmd Additive 14 dMod = new GUIDEDTOURDATAMODULE() 15 16 ////// Append rows and update fields 17 oCGI.loadDatamoduleFromArray(dMod,true) 18 19 Catch (exception e) 20 oCGI.ErrorPage(e,"#FEFAD8","#009999") 21 endTry 22 23 oCgi.StreamResponsePage("#FEFAD8","#009999") 24 oCgi = null 25 Quit |
|
The purpose of this program is to do the following:
1. Replace lines 05 and 06 with
the following:
|
Set procedure to OneClickWeb.cc Additive oCGI = new OneClickWeb() |
|
2. Next comment out lines 17 and 23
3. Then add the following three
lines at line 18
|
oCGI.ParentQuery = "CUSTOMERS1" oCGI.ChildQuery = "INVOICES1" oCGI.LinkField = "CUSTNO" |
|
These custom properties are used for streaming the response page. If you decide to use OneClickWeb.cc in another Web application, you should set these properties so that the response page will contain the parent record ID whenever a child record needs to be added.
4. Finally, we need to insert an if/elseif block between lines 18 and 19. This block will be used to manage multiple calls to the CGI application. For example, if we are adding a new customer, we need to append the data; but if we are modifying an existing record we need to update the current data.
Before we actually write the code, let's review what we need our application to do. First we must add new customer records. We also must add new invoices, but we want to to be sure that the invoice record is linked to a customer record. Additionally, we need the ability to edit customer records. Each of these tasks will require two procedures. For example, to add a new invoice we must first stream the data-entry form to the user with the customer number already entered. Then, when the user completes the form and submits it back to the server, we must append the data to the invoice table.
So our program file needs to handle six procedures two for each of the three previously mentioned tasks. You probably have noticed from the work we've completed in the previous steps, that each call to the GuidedTour.exe program sends a parameter named cmd. This parameter is used in our program file to control the application flow. For example the command ADDCUSTOMERS1 is used to stream the customers data-entry form. That form will contain the command APPENDCUSTOMERS1 and, when it's submitted, the data will be appended to the customers table. The command EDITCUSTOMERS1 will also stream the customer data-entry form, but in this case the form will contain the specified record that needs to be modified. This time the form contains the command UPDATECUSTOMERS1. When submitted, the appropriate record must be updated with the form data.
The following is the general structure
of the if/elseif block
that we will use in the GuidedTour application.
|
if oCGI['cmd'] == 'ADDCUSTOMERS1' // stream the customers data-entry form // called by GuidedTour.htm elseif oCGI['cmd'] == 'ADDINVOICES1' /// Child records // stream the invoice data-entry form with a CUSTNO // called by AddInvoices.rep report elseif oCGI['cmd'] == 'APPENDCUSTOMERS1' // append the customers data to the table // called by GuidedTour_Customers1.tpl elseif oCGI['cmd'] == 'APPENDINVOICES1' // append invoice data to the table // called by GuidedTour_Invoices1.tpl elseif oCGI['cmd'] == 'EDITCUSTOMERS1' // stream customer data-entry form populated with data // called by EditCustomers.rep report elseif oCGI['cmd'] == 'UPDATECUSTOMERS1' // update customer data as modified in HTML form // called by GuidedTour_Customers1.tpl else oCGI.sorryPage('There is nothing to do') endif |
|
Now we will fill in the code for
each of the commands.
|
if oCGI['cmd'] == 'ADDCUSTOMERS1' // called by GuidedTour.htm // declare the template file to use cHTMLFile = 'GUIDEDTOUR_CUSTOMERS1.TPL' // store the cmd reference to use in the template oCGI['NEXTcmd'] = "APPENDCUSTOMERS1" // call the method that will stream the template oCGI.DisplayHTML(NULL,cHTMLFile) elseif oCGI['cmd'] == 'ADDINVOICES1' /// Child records /// called by AddInvoices.rep Report oCGI['NEXTcmd'] = "APPENDINVOICES1" cHTMLFile = 'guidedtour_invoices1.htm' oCGI.DisplayHTML(NULL,cHTMLFile) elseif oCGI['cmd'] == 'APPENDCUSTOMERS1' // called by GuidedTour_customers1.tpl // append data to queries in the datamodule oCGI.loadDatamoduleFromArray(dMod,true) // stream the response page oCgi.StreamResponsePage("#FEFAD8","#009999") elseif oCGI['cmd'] == 'APPENDINVOICES1' // called by GuidedTour_invoices1.tpl // append data to queries in the datamodule oCGI.loadDatamoduleFromArray(dMod,true) // stream the response page oCgi.StreamResponsePage("#FEFAD8","#009999") elseif oCGI['cmd'] == 'EDITCUSTOMERS1' // called by EditCustomers.rep report // declare the template file to use cHTMLFile = 'GUIDEDTOUR_CUSTOMERS1.TPL' // store the cmd reference to use in the template oCGI['NEXTcmd'] = "UPDATECUSTOMERS1" // seek the row to be edited nLookFor = val(oCGI['CUSTNO']) rs = dMod.Customers1.rowset rs.indexName = "custno" if rs.findkey(nLookFor) // display the template populated with data oCGI.DisplayHTML(rs.fields,cHTMLFile) else oCGI.sorryPage('Field '+oCGI['CUSTNO']+' not found') endif elseif oCGI['cmd'] == 'UPDATECUSTOMERS1' // called by GuidedTour_Customers1.tpl // seek the record that HAS BEEN edited nLookfor = val(oCGI['CUSTOMERS1*@CUSTNO']) dMod.CUSTOMERS1.rowset.indexName = 'CUSTNO' dMod.CUSTOMERS1.rowset.findkey(nLookfor) // update data to the queries in the datamodule oCGI.loadDatamoduleFromArray(dMod,false) // stream response page oCgi.StreamResponsePage("#FEFAD8","#009999") else oCGI.sorryPage('There is nothing to do') endif |
|
Step Five: Build the new Application
We must now rebuild the One-Click
Web application. Type the next four lines in the Command Window and
the One-Click application will be updated.
|
compile OneClickWeb.cc compile GuidedTour.prg compile :dQuery:dQWebclass.cc build GuidedTour.pro,OneClickWeb.co,:dQuery:dQWebclass.co ;
|
|
Step Six: Modify the HTML menu page
The last thing that we need to do is modify the application's main menu. Figure Six depicts the menu page before any changes are made. We need to modify this page so that is looks more like Figure Seven. First we deal with the two data-entry links. These links call HTML data-entry pages which need to be replaced with calls to GuidedTour.exe.

Figure Six: Main
menu page for the Guided Tour's One-Click Web application
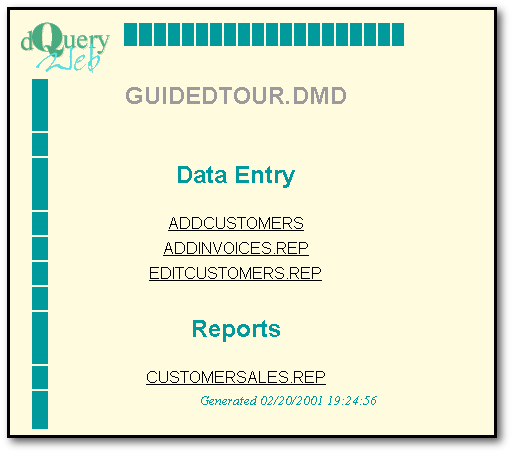
Figure Seven: Main
menu page modified for our enhanced application
Open
guidedtour.htm in a text
editor and look for the first Anchor tag:
|
<a href="GUIDEDTOUR_CUSTOMERS1.htm">CUSTOMERS1</a> |
|
Replace it with with following
Anchor
Tags.
|
<a href="GUIDEDTOUR.exe?cmd=ADDCUSTOMERS1>ADDCUSTOMERS</a> |
|
Next we need to move the links
for the EditCustomers and
AddInvoices reports (look
in the following HTML code). They represent two rows of an HTML table.
|
<tr> <td width="4%"> </td> <td width="4%" bgcolor="#009999"> </td> <td width="92%" align="center"><font face="Arial, Helvetica, sans-serif"> <a href="/oneclick/EDITCUSTOMERS_Rep.exe">EDITCUSTOMER.REP</a></font> </td> </tr> <tr> <td width="4%"> </td> <td width="4%" bgcolor="#009999"> </td> <td width="92%" align="center"><font face="Arial, Helvetica, sans-serif"> <a href="/oneclick/ADDINVOICES_Rep.exe">ADDINVOICE.REP</a></font> </td> </tr> |
|
These two rows should be moved
up and replace the row that contains the link for
INVOICES1. The row that
you need to overwrite is:
|
<tr> <td width="4%"> </td> <td width="4%" bgcolor="#009999"> </td> <td width="92%" align="center"><font face="Arial, Helvetica, sans-serif"> <a href="GUIDEDTOUR_INVOICES1.htm">INVOICES1</a></font> </td> </tr> |
|
Save these changes. If you view the page in a web browser it should look like Figure Seven.
Summary
In six easy steps, a one-click Web application can be enhanced to give the user the ability to add and edit data in a parent query. Further, the parent query's key field value can be automatically appended when child records are added. The technique discussed in this article is to create lookup reports with hyperlinks that contain the value of a key field. Additionally, we use HTML template files which contain special field codes to populate the forms with data. The program file uses a conditional structure to control the data processing options. We have options to add new customer records, to add new invoices that are linked to a customer record, and to edit customer records.
We hope these techniques offer you a quick and easy way to enhance your One-Click Web application.
Click here to obtain the source code for this article.