If you are not using popup menus in your applications, you are depriving your users of a very good thing. They are easy to create and moderately easy to implement. In this article, I’ll walk you through several examples of the use of popups. Below is a list of topics that will be covered in this article.
Quick
Start: If you’d rather just look at the commented code in the forms
used for this article, here is a zipped copy
of the sample forms and menus.
The
basics — create a form-based popup menu using the Popup Menu Designer,
and connect it to a form
Top|Topic
List
It's easiest to throw together a popup menu using the Popup Menu Designer. Before you do so, you might want to make a new folder in which to store all the goodies that follow below.
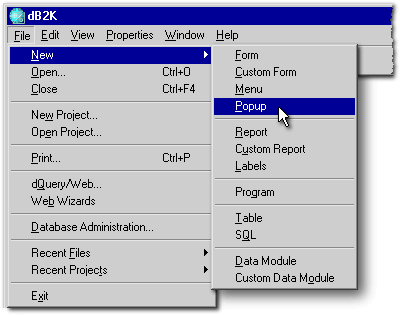
To kick off the process of creating a popup menu, you have two choices from within dBASE: Either use File | New | Popup as shown below…

…or type create popup into the Command window and press the Enter key: you will then get the dBASE interface for creating a popup menu, which is just a blank popup menu:
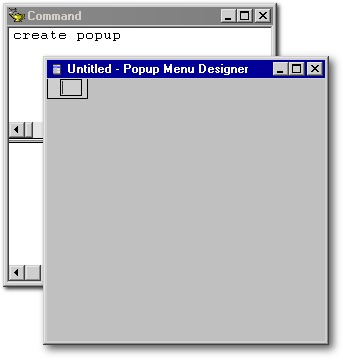
Popup menus are different from pull-down menus — they lack the top-level menu (technically referred to as a “menu bar” and represented by the MENUBAR class in dBASE) which provides the user with a horizontal array of choices.
Instead, popups resemble just the pulled-down portion of a single pulldown menu. Actually, Windows considers any menu other than the MENUBAR to be a “popup”, but here I am differentiating between “pulldown” (beneath a menubar) and “popup” (shortcut or context) menus. Any popup menu, whether pulldown or shortcut, can employ sub-menus that branch off of the main choices.
Create a one-item menu:
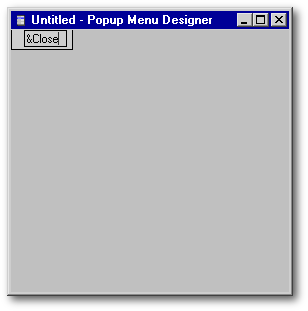
Let’s keep things very simple here and begin by creating a popup menu that has only one item — we’ll use it to close the form. So, in the empty space shown in the above screenshot, type &Close to get what’s shown below. This will be the only choice on this popup menu. As usual, the ampersand (“&”) will cause the letter to its right to be underlined (“Close”) when the menu is displayed.
Then, as you would for a normal menu, open the Inspector if it isn’t open yet, and under its Events tab, in the slot for the onClick() event for this new menu item, get rid of the default null and type form.close() instead as shown in the Inspector slot below.
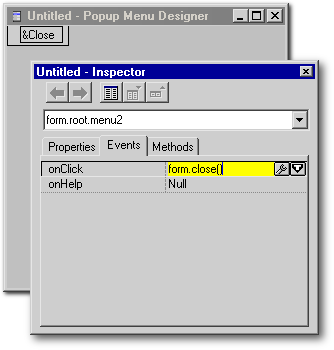
Then press the Enter key to have the Inspector fill in the rest of the codeblock details, as shown below.
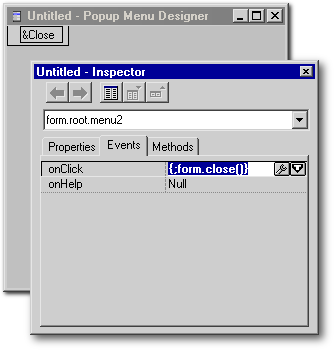
That’s it. You’ve just created a simple popup that can close any form to which it is attached.
Talking to the form:
Speaking of forms, notice in the menu’s codeblock above that we referred to an event (form.close()) of the form. That’s because the popup menu will itself belong to the form in the same way an entryfield or checkbox belongs to the form, and consequently “knows” what the form is and can refer to it.
In the same way, the
onClick() code of an item
in a popup menu can call any built-in method or programmer-written
function of the form, just as the code in a pull-down menu can:
|
form.my_custom_copy_function() |
|
and can also call any function
normally invoked by a pushbutton or associated with any event code of any
object:
|
form.Delete_PB_onClick() |
|
By duplicating the functions of other menus or of pushbuttons, the popup menu achieves its goal of useful redundancy. Actually, you can just copy/paste the codeblock from a pull-down menu’s onClick() slot straight into the onClick() slot of a popup menu item that you wish to perform the same function.
There is another way for the popup
menu to refer to the form. For example,
|
form.my_custom_copy_function( ) |
|
can be replaced by
|
this.parent.parent.my_custom_copy_function( ) |
|
where
this refers to
the current menu object (the particular menu choice whose
onClick() event we are
coding), the 1st
parent refers
to the Popup menu object that contains this menu item, and the 2nd
parent refers
to the form, which contains the Popup menu object. It seems clear that
form is easier
to use than
this.parent.parent
because
it requires less typing, so I will use it here.
| Do you see the slot at the top
of Inspector that says form.root.menu2?
The dot-connected sequence shown in this slot is usually very useful
to us because it tells us, in our code, how we can refer to the object we are inspecting.
However, in the Inspector slot pictured above,
form.root.menu2 is not
how you should refer to the popup menu from the form. I don't know why
the inspector displays this sequence; it wrongly implies that these menus
can be referred to in the same way that pulldown menus are addressed (i.e.,
using form.root.menuWhatever).
Perhaps it is because the Popup Menu Designer is a subclass of the Menu
Designer? The proper way(s) to refer to popups will be covered below.
|
||
Now use File | Save As… to save the menu as closeform.pop:
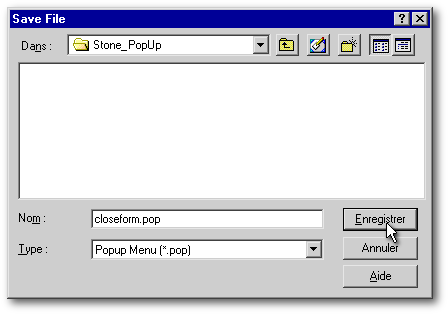
Then close the Menu designer.
Look at the menu code:
Before we attach this menu to a form, let’s take a look at the code dBASE generated to define this popup menu. To do this, right-click the Closeform.pop item in the Navigator as shown below…
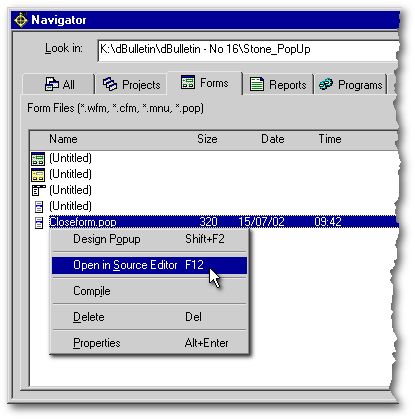
…and open the popup menu file in the Source Editor.
The code is delightfully short:
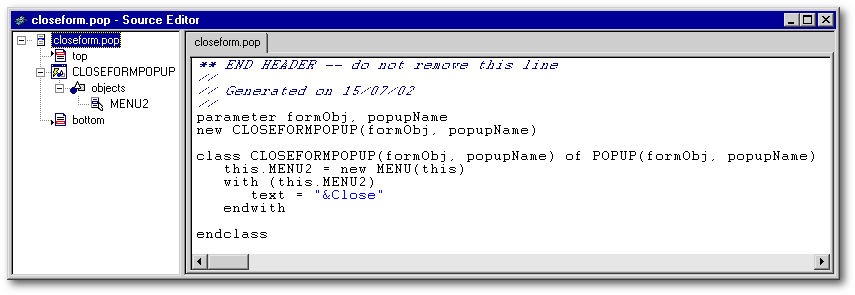
As you can see, the entire file is nothing more than
1. a parameter list: the closeformPOPUP subclass takes two parameters — the first(formObj) to provide the object reference of the form to which the popup will be attached, and the second (popupName) to provide a name for the popup menu itself. Both parameters will be passed to the actual POPUP class itself;
2. a line (beginning with new) that uses the parameters to create an instance of the popup; and
3. the class constructor code. In this case, since there is only one menu item (the one to close the form), there is only a single menu item which dBASE has arbitrarily named MENU2, instantiated from the MENU class to attach to the popup.
The properties of
MENU2 are the two pieces
of information you typed in: the codeblock of the onClick event ({;form.close()}),
and the text of the menu item (Close).
| For those who are a bit uncomfortable
with “this”:
In the above “constructor” code,
we use the word “this”
as a placeholder until we later call upon the
closeformPOPUP class to
create a popup menu object, at which point we also provide an actual name
for the popup menu. The use of this as
shown above is thus a bit trickier to grasp than when
this is used to instantiate
an object of a form such as a pushbutton:
In this code, this means form and you can literally replace the word this with the word form and the code will run. Class (or subclass) constructor
code is one of the few cases in dBASE code where the placeholder word
this cannot be replaced
by another word — we must use it. After we create (instantiate) the popup
menu and name it FirstPOPUP,
we’ll be able to use form.FirstPOPUP to
refer to the menu.
|
||||||
Attaching
the popup menu to a form
Top|Topic
List
There are two steps to making your popup menu work on a form:
Step 1. Instantiate the menu into
a property of the form. It really doesn’t matter when/where it’s done in
the form’s code as long as it precedes step 2.
Step 2. Write a few lines of code
associated with an event (customarily the
onRightMouseDown event
for a control, but it's up to you to decide) that open the menu and that
define where on the screen the menu should appear.
That’s it! How much simpler could it be?
Well, actually, it can be one step simpler: we can eliminate Step 2 if we instantiate the popup menu into dBASE's built-in form property called form.popupMenu instead of into a custom form property that we create for the purpose.
So, in our first example of attaching a popup to a form, we are going to use the built-in mechanism for this purpose that has been provided with the Form Class. It’s easy enough to do the more generic 2-Step attachment of a popup to a form, but we’ll start with the built-in one because it’s the one described in the OLH and, well, dBASE Inc. (actually, Borland) made it for us to use and so we should at least give it a look. We’ll use the generic approach later. You should become familiar with both, right? Right.
No matter how we attach a popup menu to a form, we need a form in order to do it since popups only happen in the context of a form. So, create a form called FIRSTPOP.WFM, and drop a pushbutton on it (we need SOMEthing on this very simple form), set its text property to Close, and use the Inspector to set its onClick() event to close the form just as you did for the popup menu:
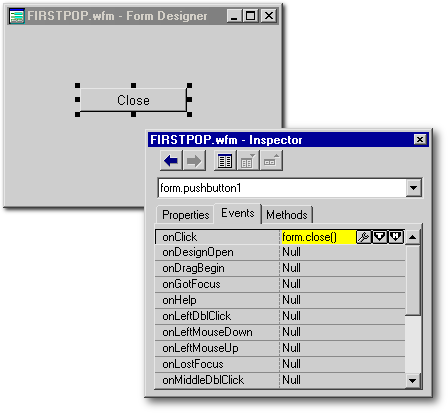
Incidentally, this Close button and its code have no connection whatsoever to the popup (well, other than identical functions). We’re just sticking it in there because closing forms is what Close buttons do; and you should always provide another means of performing each of the actions available on a popup menu.
Now let’s attach the menu to the form. We’ll divide the one necessary Step (Step 1, above) into a few tiny sub-steps:
1. Click on the form so it is the current object in the Inspector, then click on the properties tab in the Inspector, then scroll down to the property called popupMenu:
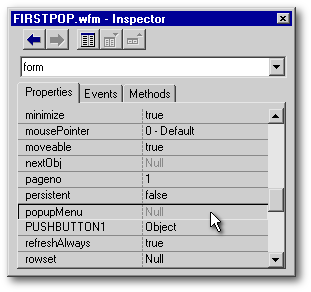
Notice that it has a null value and is inaccessible! Well, that’s because we don’t attach a form’s popup menu in the same way we attach a regular pulldown menu to a form. Attaching a popup is a bit more involved, but only slightly so. When you attach popup menus in the future, you can skip this first tiny sub-step…
2. Click the Events tab in the Inspector, then find the form’s onOpen() event, and click it’s wrench-thing so that you can create some popup-related code for this event.
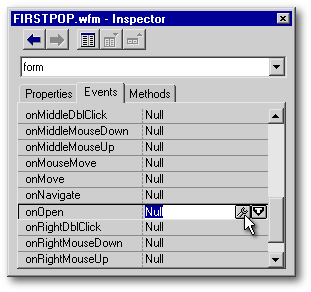
3. Type in (or copy/paste from
here) the two new lines you see below in red:
|
Function form_onOpen set procedure to closeform.pop additive this.popupMenu := new closeformpopup(this,"FirstPOPUP") return |
|
Then save the form. That’s all there is to it. Now a few explanatory comments:
Notice that the first line of code
is to set procedure to the
popup menu file so its class constructor code (which describes the popup
menu’s particulars) will be available to the form. The second line of code
instantiates the popup menu into the form's built-in
form.popupMenu property.
| This is the built-in aspect of
the menu attachment we are currently doing — the advantage of using the
form.popMenu
property
is that it will not require establishing any
onRightMouseDown( ) event
code… that response is built-in. That’s why we need no Step
2.
|
||
In the second line of code above, the word this refers to form; you could substitute the word “form” and the result would be the same.
Also in the second line of code,
the name (2nd parameter) being specified for the popup menu is
FirstPOPUP. This is an
arbitrary choice. If you’d prefer to call it “MONGOOSE” or “ACHILLES”,
go right ahead. But remember what you decided to name it because this name
is a convenient (but not the only) way to refer to the menu in your code.
What
is the purpose of the given popup name?
There’s a bit more to this than you might think. First, it provides dBASE with a name for a new custom property of the form which will hold the object reference to the popup menu. So, if the name you provide is FirstPOPUP, dBASE will create a new custom property of the form called form.FirstPOPUP, and that custom property then holds the object reference to the popup menu. OK so far?
Second, the form’s popupMenu property (form.popupMenu) will also hold the object reference. Hence, there will be 2 copies of the popup menu’s object reference: one in form.FirstPOPUP and the other in form.popupMenu. You can use either to ask the popup menu to do things such as opening, graying out or check-marking a menu item.
In effect, then, a popup menu that is instantiated into form.popupMenu appears to have 2 names: form.popupMenu or form.FirstPOPUP. However, if you specifically inquire about what’s in the name property of this popup, via either form.popupMenu.name or form.FirstPOPUP.name, dBASE will return FirstPOPUP. So its real name is the name you gave it. If this is a bit confusing, don’t worry about it — no need to understand it in order to use the popup menu.
And what’s special about form.popupMenu?
Regardless of any other popup menus that may have been instantiated into custom properties of the form, it is the popup menu whose object reference is in form.popupMenu which will automatically be invoked by an onRightMouseDown() event anywhere on the form (including over any form objects such as grids, so beware!). And yes, you may have as many popups instantiated as you wish, but only one (at a time) can have its object reference stored in form.popupMenu.
Now run the form, and right-click anywhere on it:
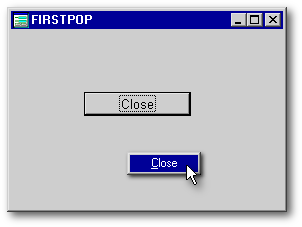
The popup menu should come up as
shown above… well, it barely looks like a menu since it’s composed of only
1 item. Be sure that choosing “Close” closes the form. If it doesn’t, go
back and fix the onClick() codeblock
in the menu file!
Spot the bad code: Here
is a little puzzle — what is wrong with the instantiation code shown below?
You’ll get a Cannot have more than one form object with the same name error. This makes sense, since form.popupMenu already exists, and we are providing a name for the popup that is the same as this existing property. When dBASE tries to name a new custom property using the name we provided, there will be a conflict. If you use this code:
you’ll get a different error —
Property is read-only. Here we establish a custom property of the form,
then we attempt to give the same name to the menu. The error message does
not make clear what’s conflicting with what, but obviously you’ll need
to avoid duplicate property and menu names.
|
||||||||||
Add
a couple more menu choices
Top|Topic
List
Just for fun (and for practice, and for the next functional example), re-open the closeform.pop file in the Popup Menu Designer and add these two items:
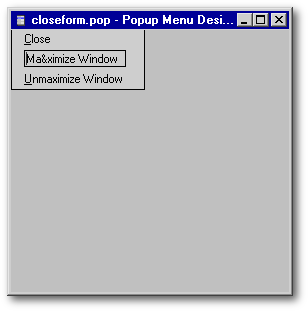
In the Inspector’s onClick() slot
for “Maximize Window”, type (or paste) the following:
|
form.windowstate = 2 |
|
and press Enter. Then in
the Inspector’sonClick()
slot
for “Minimize Window”, type (or paste) the following:
|
form.windowstate = 0 |
|
and press Enter.
Then save and close (Ctrl-w) the popup menu file, right-click the menu file in the Navigator, then compile it [this seems to get around a bug that occasionally prevents your menu changes from being “seen” by dBASE], then run the form again.
The revised popup menu looks like this…
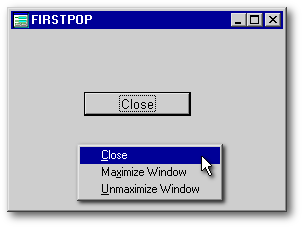
…and should behave as you have asked. If it doesn’t, get in there and fix the onClick() code!
Before moving on to fancier popup
menus, let’s look at a few manipulations that can be directed at any popup.
Disable/enable
or check/uncheck an item on the popup menu, on-the-fly
Top|Topic
List
Since the form’s popup menu (the
one using the built-in form.popupMenu
property)
usually remains instantiated while the form is open, you have access to
the properties of its menu items. To be able to alter the properties of
the menu items, you’ll have to know how to refer to them. Perhaps you recall
in the popup menu constructor code that the menu items are numbered (e.g.,
MENU2,
MENU157) so that each
menu item will have a unique name. The unique name of each menu item provides
the means to either disable/enable it or to check/uncheck it in the popup
menu.
| The naming of each
menu item as MENU plus
a randomly chosen number (e.g., MENU2)
is just dBASE’s way of generating unique names for each menu object. If
you’d prefer giving them names you find more useful such as POLLY or ALLIGATOR
or GHANDI, go right ahead… use the Source Code Editor and Find/Replace.
The latter ensures that you replace all instances of the original
name with the new one so dBASE doesn’t err…
|
|||
Here’s the code that dBASE streamed out for my popup menu (yours may have different MENU numbers! If so, you may wish to change them so they match these):
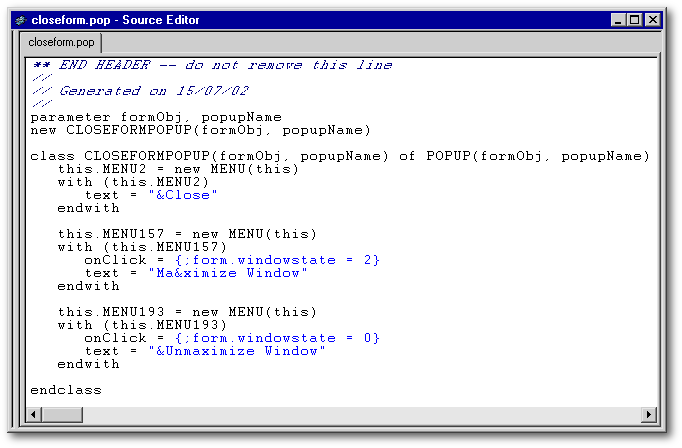
There are two straight-forward ways for the form to get access to this popup menu’s properties. The first is through the form’s PopupMenu property — it now holds one of the copies of the object reference to the popup menu.
So, it’s easy: if you want to disable
the top (Close)
menu choice, one way to do it is like this:
|
form.popupmenu.menu2.enabled = false |
|
The other way is to refer to the
popup menu by the name you gave it when it was instantiated in the form’s
onOpen() code, which in
the above case was FirstPOPUP:
|
form.FirstPOPUP.menu2.enabled = false |
|
dBASE doesn’t care which way you
do it. My personal preference is to use the given name just to remind me
which menu I’m using in case there is more than one popup menu instantiated.
| Bug alert!
Unfortunately, a nasty and seemingly unpredictable bug in the popup class may prevent the expected graying-out of the menu choice, although the action associated with the menu choice is correctly disabled. With a little wading through old
posts to the dBASE newsgroups and a little experimentation, I can report
some reassuringly predictable behaviors of this bug: It seems to not happen
if the form is SDI, and it seems to not happen in an MDI form if there
is a standard menu attached to the form. Hence, I have provided a very
simple standard menu with this form, called
firstpop.mnu. Your requested
disablements should thus show up as grayed-out menu items. Of course, each
of your real apps’ MDI forms has a standard menu anyway, right? (Otherwise
the menu reverts to that of _app.framewin
—
not good.)
|
||
To re-enable the menu item, set
the enabled property
back to true:
|
form.FirstPopup.menu2.enabled = true |
|
If you wish to add a checkmark
to the second menu choice (Maximize
Window), do it like this:
|
form.FirstPopup.menu157.checked = true |
|
To uncheck it, set the property
back to false:
|
form.FirstPopup.menu157.checked = false |
|
Pretty simple, right? For that
matter, you can change the other properties as well, such as the text of
the menu item, or even the codeblock of the menu item so its function is
changed:
|
form.FirstPopup.menu157.text = "All new text!" form.FirstPopup.menu157.onClick = {;msgbox("Brand new command!","I have been profoundly altered...",16)} |
|
The above code for modifying the menu can be placed anywhere that has access to the form to which the popup menu is attached, including “child” forms that have a communication channel back to the “parent” form via a form.oParent (or similar) custom property. The code can also be placed in the menu file itself; examples below.
As an unrealistic but simple example, add two more buttons to the form, as shown below:
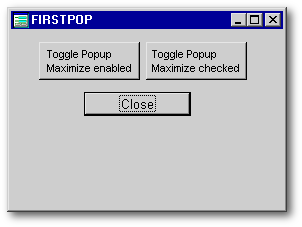
Use the Inspector to add, for the
left-hand button, this line of code in its
onClick() event slot:
|
form.FirstPopup.menu157.enabled = not form.FirstPopup.menu157.enabled |
|
This code will change the
enabled property to the
opposite of its current setting; in effect, a toggle. Then use the Inspector
to add, for the right-hand button, a similar line of code in its
onClick() event slot:
|
form.FirstPopup.menu157.checked = not form.FirstPopup.menu157.checked |
|
Then run the form and try the popup menu. It should look as it did before:
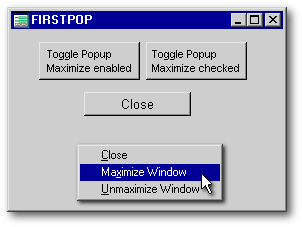
but now release the menu and click the right-hand button to toggle the Checked property, and try the menu again:
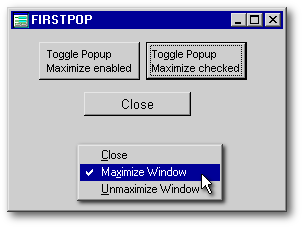
If you toggle the Enabled button, the “Maximize” menu item should be grayed-out, and should not work until you toggle it back “on” again by pressing the button again.
Place the menu modification code in the menu file itself
The above is not a particularly good example of when to use checkmarks in a popup menu — a more appropriate use would be a list of indexes for a table, and the current index would have a checkmark, as shown below:
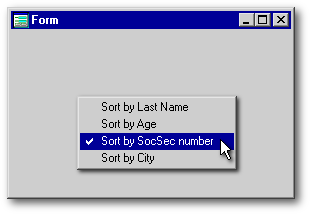
Here, the code to change the menu
items is in the menu code rather than in the form’s code. The
onClick() codeblock for
one of the menu items is shown below in red. It contains three commands
separated by semicolons. Each menu item’s
onClick() would contain
a codeblock differing only in the indexname.
|
class INDEXPOPPOPUP(formObj, popupName) of POPUP(formObj, popupName) this.MENU50 = new MENU(this) with (this.MENU50) onClick = {;this.parent.deCheck();this.checked = true; form.rowset.indexname="SOCSECNO"} text = "Sort by SocSec number" endwith |
|
The codeblock first calls a
deCheck() function (included
in the menu file, after the menu constructor code but before the
ENDCLASS) that sets
false the
checked property of each
menu item:
|
Function deCheck // this is a function located in the popup menu file rather than in the form file // set all checked props to false this.menu2.checked = false this.menu337.checked = false this.menu50.checked = false this.menu152.checked = false return |
|
The codeblock then sets its menu item’s own checked property to true, and finally sets the indexname of the form’s rowset as appropriate.
Use the popup menu’s onInitMenu() event to alter popup attributes
Here is one additional approach to the placement of code that sets attributes of a popup menu. The example will be an improvement of the Sorting example above, since it is likely that an application would allow the user to choose an index by some means other than the popup, hence the popup will need to be updated to reflect this change the next time it is opened. This does complicate things a bit, as the two ways to set the index need to remain synchronized.
One way to do this is to exploit the popup menu’s onInitMenu() event. This event fires just before the popup menu opens, so it is an ideal time to alter a menu’s appearance.
In order to write code for the onInitMenu() event, we have to first load the popup file into the Popup Menu Designer, then open the Inspector and do a little work to get the Inspector to show us the popup object rather than the default first menu object. Scroll to the parent property and open the Object…
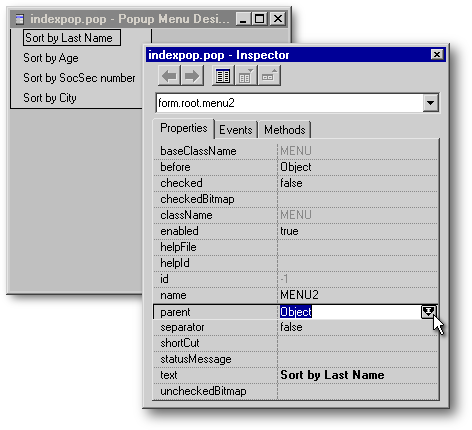
…which will take us to the “root” (the Popup object itself) where we can click the wrench-thing next to the Popup’s onInitMenu() event…
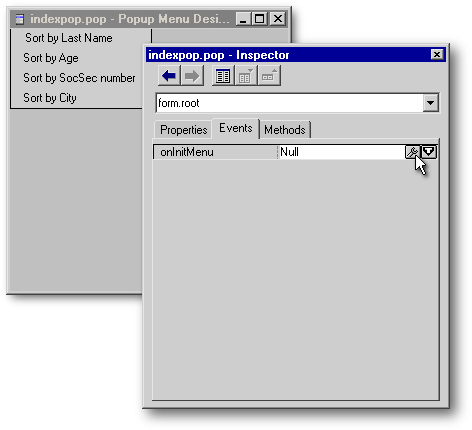
…and write a function to manage the appearance
of the popup just before it opens each time. The menu item which corresponds
to the rowset’s indexname has
its checked property
set to true:
|
Function ROOT_onInitMenu // set menu item "checked" property to either true or false // according to current indexname this.menu2.checked = iif(form.rowset.indexname = "LastName", true, false) this.menu337.checked = iif(form.rowset.indexname = "Age", true, false) this.menu50.checked = iif(form.rowset.indexname = "SocSecNo", true, false) this.menu152.checked = iif(form.rowset.indexname = "City", true, false) return |
|
Next, a codeblock is written for the
onClick() event of each menu item in the
popup. Each codeblock uses the API function called
SendMessage()
to programatically “click”
the appropriate radiobutton on the form to set the index desired by the
user. Below is the constructor code for the popup subclass itself and for
the first two of the four menu items:
|
class INDEXPOP2POPUP(formObj, popupName) of POPUP(formObj, popupName) with (this) onInitMenu = class::ROOT_ONINITMENU endwith this.MENU2 = new MENU(this)
this.MENU337 = new MENU(this)
|
|
| The syntax for the
SendMessage() function, e.g.,
sendmessage(form.lastname_rb.hwnd,0x00F5,0,0) requires
4 parameters: the hWnd of
the button being “clicked”; a number (the value of the
BM_CLICK constant) that specifies a “programmatic
click” which is 00F5 in
hexadecimal or 245 in
decimal (either can be used in this function); and two unused parameters
that must each be set to zero.
The SendMessage()
“programmatic
click” will work for both radiobuttons and checkboxes, but will not work
for pushbuttons. Marc Van den Berghen, in addition to providing the inspiration
for the “programmatic click” approach used here, has kindly provided the
analogous code for pushbuttons in case you ever need to programmatically
“push” one:
|
||||||
Back in the form
The onOpen() for
the form is shown below, and it first “externs” (i.e., makes available
for use in dBASE) the API function called
SendMessage()
mentioned above that will
be used by the popup menu to “click” the form’s radiobuttons. The
onOpen()
also sets up the popup menu,
and then uses SendMessage() to
“click” the SocSecNo radiobutton
so that the rowset’s indexname is
set to the SocSecNo index:
|
Function form_onOpen // extern the API function to talk to the radiobuttons if type('SendMessage') # 'FP' extern clong SendMessage(chandle, cuint, clong, clong) user32 from "SendMessageA" endif // set up the popup menu
// programmatically click
the Social Security No radiobutton
|
|
Each of the four radiobuttons’
onLeftMouseDown()
event has code
(as a codeblock in the constructor code for each radiobutton) that sets
the indexname associated
with that radiobutton and moves the rowset to the first row:
|
this.LASTNAME_RB = new RADIOBUTTON(this) with (this.LASTNAME_RB) onLeftMouseDown = {;form.rowset.indexname = "LastName";form.rowset.first()} height = 16 left = 12 top = 138 width = 110 text = "Last Name" fontSize = 8 group = true value = true endwith |
|
Here’s what the form and popup look like:
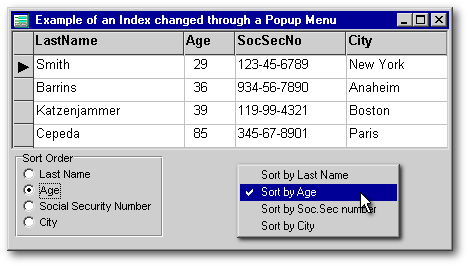
When an index is chosen via the popup, the code
in the popup menu “clicks” the appropriate radiobutton. If an index is
changed via a radiobutton, the popup menu recognizes the change in its
onInitMenu event code, and updates itself.
This form (indexpop2.wfm)
and its table, index, and popup menu are included with the other files
for this article.
Switch
back and forth between 2 or more form-based popups
Top|Topic
List
If you want two or more form-based popups,
you’ll need to switch among them. To do this, use the built-in
popupMenu
property of
the Form Class and assigning a different popup menu to the
form.popupmenu property:
|
form.popupMenu := form.MyFormPopup2 |
|
Before the above can be done, though,
form.MyFormPop2
has to
have been instantiated. You can instantiate any number of popups, each
into its own custom property of the form where it will be “held” until
your code assigns it to form.popupMenu:
|
// set procedure to the popup menu filename set proc to MyFormPop2.pop additive // instantiate the popup into a custom
property of the form (form.MyFormPopup2)
// analogous comments here...
etc... |
|
You can do the above instantiations in the form’s onOpen() event or in any other function or event code that seems appropriate, and you can assign any of the menus to form.popupMenu as appropriate.
The above code is only slightly different from the procedure we followed for our FirstPOPUP menu. (Here’s its instantiation code: this.popupMenu := new closeformpopup(this,"FirstPOPUP")) We did not instantiate that popup into a custom property of the form. Instead, we instantiated it directly into the form.popupMenu property — a built-in property (although dBASE, as you recall, also stored a copy of the object reference in a custom form property called form.FirstPOPUP). In this second example, we are creating our own custom form property and assigning the alternate menu’s object reference to that property.
The hodge-podge of popup-related names!
Have you noticed that the names assigned to each file, subclass, and form.property can get pretty confusing? For the sake of organization (and perhaps sanity), let’s list the various names associated with the first example above (MyFormPop2.pop) :
The icing on the convoluted cake:
when you assign one of your alternate popup menus to the form’s
popupMenu property by
using either of the menu’s references
|
form.popupMenu := form.MyFormPopup2 |
|
or
|
form.popupMenu := form.MFP2 |
|
you then have a third copy of the object reference for that popup in the form.popupMenu property!
OK, enough time/verbiage on the built-in popupMenu function… it’s very nice, but there's much more that can be done. So, on to the more generic approach.
Slicker
— an Object-Specific Popup
Top|Topic
List
If a form allows many actions by the user, it will usually include a few controls such as grids, combo/listbox, editor, etc. Under these circumstances, it’s a good idea to make several popups, each designed for and associated with a specific object on the form. This type of popup menu is particularly useful for a grid since a grid usually displays data that can be manipulated in a variety of ways. So let’s create an example of a grid with a right-click popup.
You already know most of the popup
moves from the preceding examples — the main difference here is the way
in which we will instantiate the popup. Furthermore, because we will use
the “generic” approach to managing this popup, we’ll need to include our
Step
2. (described in previous section), which positions and opens the popup
menu in the grid’s onRightMouseDown()
event
code.
Create
the form and popup files
Top|Topic
List
First, we need a form that is a
little more complex — we have to justify the object-specific popup. So,
type
|
modi comm OSpopup.wfm |
|
into the Command Window and press
Enter,
then paste the following code into the empty Source Editor and save it.
[both the form and the popup file are provided
if you would prefer to use them pre-created]
|
if not file("maintbl.dbf") CREATE TABLE MAINTBL (; SALESID AUTOINC,; CUSTOMERID CHAR(10); ) use maintbl
class OSpopForm of FORM
this.MAINTBL1 = new QUERY()
this.SALESGRID = new GRID(this)
with (columns["COLUMN1"].headingControl)
with (columns["COLUMN2"].headingControl)
bgColor = "white"
this.ENTRYFIELD1 = new ENTRYFIELD(this)
this.PUSHBUTTON1 = new PUSHBUTTON(this)
this.PUSHBUTTON2 = new PUSHBUTTON(this)
this.rowset = this.maintbl1.rowset endclass |
|
The above is a form that contains a grid to display some randomly generated data and an entryfield to allow row info to be edited/added. We’ll associate a popup menu with the grid.
Now save the following popup menu
code to a file called OSgrid.pop:
|
** END HEADER -- do not remove this line // // Generated on 06/07/2002 // parameter formObj, popupName new OSGRIDPOPUP(formObj, popupName) class OSGRIDPOPUP(formObj, popupName) of POPUP(formObj, popupName)
this.MENU293 = new MENU(this)
this.MENU188 = new MENU(this)
this.MENU509 = new MENU(this)
this.MENU387 = new MENU(this)
this.MENU98 = new MENU(this)
this.MENU117 = new MENU(this)
endclass |
|
You now have a form with a grid and a pop-up menu for the grid, but the grid hasn’t yet been introduced to the popup! So let’s do that.
Associate
the popup with the grid
Top|Topic
List
I am using the word “associate” here rather than the word “attach” because a popup is actually attached to (or is a child of) the form. It will be “associated” with the grid only in the sense that we’ll use two grid events to manage the popup.
The grid’s onOpen() event: The first of these two events is the grid’s onOpen() event. The reason we’ll use this event to instantiate the popup menu code is just to remind ourselves that it’s a grid-related popup. This is an arbitrary decision, though — the popup could just as well be instantiated in the form’s onOpen() or in the onOpen() of any other object associated with the form. All popup menus belong to the form rather than to any objects on the form, so there is no connection, per se, to the grid itself.
Open the OSpopup.wfm form in the Form Designer, then use the Inspector…

…to create (or paste from here)
the following lines in red into the grid’s
onOpen()
event code:
|
Function SALESGRID_onOpen if not type("form.OS_pop") = "O" do OSgrid.pop with form,"OS_pop" // instantiate popup form.OS_pop.alignment = 0 // center menu on pointer arrow endif return |
|
| As you can see above, the entire
chunk of code is encased within an if/endif.
This is a necessary precaution if the form will be closed but not released
and then re-opened.
Why? Because each time the form
is re-opened, so is the grid, and thus the grid’s
onOpen( ) event will fire
again. So, in case the latter occurs, we need a test to see if the menu
is already instantiated. If it is, we bypass the instantiation step, because
the same menu name (OS_pop)
can only be used once as a property name, and we’re already using it. We’d
generate an error: Cannot have more than
one form object with the same name: OS_POP
|
||
The next line in the
SALESGRID_onOpen() function
“does” the popup menu file in order to instantiate it. Remember those first
two lines of code in the popup menu file — the parameter line and then
the instantiation line? The parameters are specified here following
with. The first parameter,
form, specifies that the
menu be attached to the form, and OS_pop
is
the name being given to this popup menu.
| Notice that I am using a method
of instantiating the popup menu that is different than the method employed
for the form-based popup. I am only doing it this way to illustrate the
alternative approach. Either method of instantiation will work for either
“flavor” of popup — “form-based” or “object-specific”. In fact, popups
are just popups, and any way you get them instantiated is fine.
|
||
The third line of the function uses the alignment property of the popup menu itself to help specify that the menu be centered on the “click point”… which is the tip of the mouse pointer. More specification (and sometimes much more) is needed to accomplish this, however, as described below.
The grid’s onRightMouseDown( ) event
The second grid event that needs coding is the grid’s onRightMouseDown(), and of course it will fire every time the user right-clicks the grid. We will exploit this event to open the menu and to precisely position the menu on the screen in relation to the mouse pointer.
So, use the Inspector…
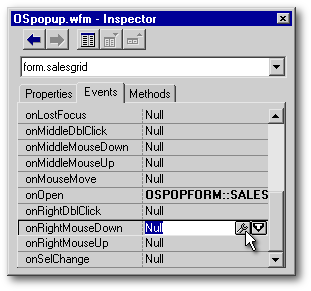
…to create the following code in
the grid’s onRightMouseDown()
event
code:
|
Function SALESGRID_onRightMouseDown(flags, col, row) form.OS_pop.left = this.left + col // set popup coordinates relative to the grid form.OS_pop.top = this.top + row form.OS_pop.Open() return |
|
Notice that this code first sets the left and top coordinates of the popup menu relative to the grid: this.left and this.top together specify the grid’s upper-left corner. These positional data are then added to the mouse pointer’s row and col data (its distances from the grid’s top and left, respectively), and complete the information necessary to orient the popup menu correctly in relation to the tip of the mouse pointer. Then the popup menu itself is opened.
Keep in mind that the popup was
instantiated when the grid was first opened, so the popup has been biding
its time, waiting to be opened. Just like a form that has been instantiated
but not yet opened, the popup menu’s positional properties are available
for manipulation.
| What are the
col and
row parameters in
SALESGRID_onRightMouseDown(flags, col, row)?
Below is a screenshot of the form, the grid within it, and the mouse pointer within the grid. The first thing to be aware of is that the grid and the form have separate coordinate systems. Since the mouse pointer is positioned over the grid when the right-click occurs, the mouse pointer’s position will be specified by col and row using the grid’s coordinate system: the col value is the horizontal numeric “offset” (distance) of the tip of the mouse pointer from the grid’s left edge, which is zero. The row value is the vertical numeric offset of the tip of the mouse pointer from the grid’s top edge, which is zero.
But the popup menu doesn’t know about the grid and needs to have its position specified in terms of the form. Hence, we also need this.left, which is the numeric offset of the left edge of the grid from the left edge of the form, and this.top, which is the numeric offset of the top edge of the grid from the top edge of the form. Since we are trying to position the popup menu in relation to the mouse pointer, we have to set the popup menu’s coordinates to be the sum of the positions of both the grid and the mouse pointer within it. Hence we have to add the grid’s form-related left offset (this.left) to the pointer’s grid-related left offset (col), i.e., this.left + col, and add the grid’s form-related top offset (this.top) to the pointer’s grid-related top offset (row), i.e., this.top + row These two sums will then be used
(in conjunction with the menu’s alignment property, discussed below)
to assign the position of the popup menu.
|
||
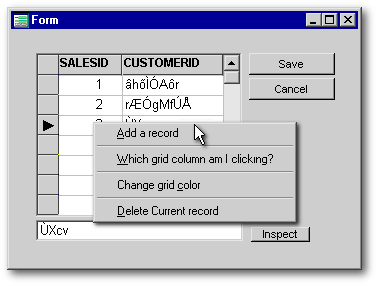
Save the form, run it, and try out the popup. If you right-click and hold the mouse button down, it should look something like the following image and the various choices should do the things they claim they’ll do.
| A reminder, and two solutions
to a problem: The reminder is that you need not feel you must use
the grid’s onRightMouseDown() event
to open a popup menu. Some commercial software employs the
onRightMouseUp() event
instead. This overcomes an occasional annoying problem: the inadvertent
selection of the first item on the popup menu on the right mouse up-click.
This is prevented when the menu is only opened on the up-click.
However, there is a property of
the POPUP class
that addresses this problem: the TrackRight
property. When set to
false, it prevents the
user from choosing a menu item via the right mouse button. So,
…will prevent an inadvertent menu selection even if the onRightMouseDown() event opens the menu. The disadvantage to setting this property to false, however, is that the popup will not close until you left-click somewhere — either on the menu itself or somewhere on the form.
|
||||||
Notice that when the menu opens, the tip of the mouse pointer is positioned at the middle of the upper edge of the menu. This is specified by setting the alignment property of the menu to 0 (zero). But this is not quite as slick as having the menu appear to emerge from one of its own corners, leaving the pointer at a corner of the menu. Here’s how you do the corner trick:
If you want the menu to appear to emerge from the mouse pointer toward the right…
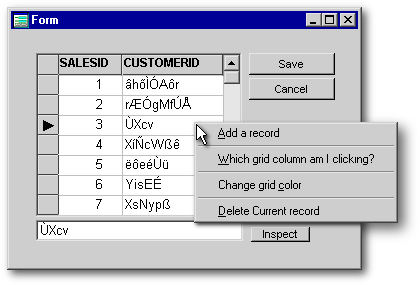
…leaving the tip of the pointer
at the upper left corner of the menu, use this setting:
|
form.OS_pop.alignment = 1 |
|
If you want the menu to appear to emerge from the mouse pointer toward the left,
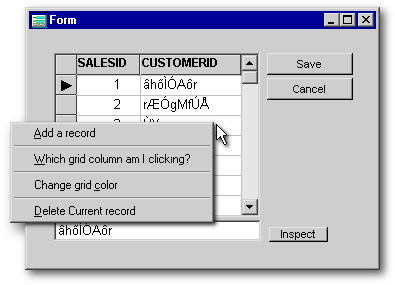
leaving the tip of the pointer
at the upper right corner of the menu, use this setting:
|
form.OS_pop.alignment = 2 |
|
The original setting was
|
form.OS_pop.alignment = 0 |
|
which leaves the mouse pointer in the middle of the upper edge of the popup menu.
Done… That’s how
you can associate a popup menu with a grid. The real “association” here
is, of course, the opening of the menu in the grid’s
onRightMouseDown(). You
could, by using the same few lines of code, open this popup in any other
object’s onRightMouseDown()
event
code, but that would be pointless since the menu has mostly grid-specific
commands on it.
Slickest
— a Dynamic Object-Specific Popup
Top|Topic
List
There may be circumstances in which you’ll need to change, on-the-fly, the choices/actions of a popup menu. Let’s call it a “dynamic” popup. It’s pretty easy to create now that you’re familiar (I hope!) with basic popup control and behavior.
We’ll create our dynamic popup
from scratch. Well, not completely from scratch — we’ll use the Popup Menu
Designer to generate the constructor code, but then we’ll throw away the
subclass bits and have a listbox’s onRightMouseDown()
event
code do two things: create the menu object directly from the POPUP class
(no subclassing!) with varying menu items depending on our needs, and then
open the popup.
Create
dynamic menu code with the Designer, then modify it by hand
Top|Topic
List
In the left-hand column below is shown a very simple (2 items) popup menu that I created in the Popup Menu Designer. I copied all the code from the original .pop file (which we won’t otherwise be using) to the editor to modify it. In grey is the code which will be deleted. In burgundy, the code which will be changed.
In the right-hand column is the
modified version of the menu code. The already-edited code is in burgundy,
and there is new code in bold red.
The code in the right-hand column will become part of a listbox’s
onRightMouseDown() event
code.
|
** END HEADER -- do not remove this line // // Generated on 06/08/2002 // parameter formObj, popupName new quickpopPOPUP(formObj, popupName) class quickpopPOPUP(formObj, popupName) of
POPUP(formObj, popupName)
|
// instantiate
new popup menu object
form.popper = new Popup(form) // create menu items |
||
| this.MENU2 = new MENU(this)
with (this.MENU2) onClick = {;msgbox("Process that is always available")} text = "Do a basic process that always has to be on the menu" endwith |
form.popper.MENU2 = new
MENU(form.popper)
with (form.popper.MENU2) onClick = {;msgbox("Process that is always available")} text = "Do a basic process that always has to be on the menu" endwith |
||
| this.MENU16 = new MENU(this)
with (this.MENU16) onClick = {;msgbox("Another process that is always available")} text = "Do another basic process that always has to be on the menu" endwith endclass |
form.popper.MENU16 = new
MENU(form.popper)
with (form.popper.MENU16) onClick = {;msgbox("Another process that is always available")} text = "Do another basic process that always has to be on the menu" endwith |
||
How has the code been changed? First, the original instantiation code of the subclass (quickpopPOPUP) has been deleted entirely. No subclassing. Instead, we directly instantiate a popup menu object from the POPUP class itself into a custom property of the form: form.popper = new Popup(this)
Then, as you can see by comparing the two columns above, the only change to the popup menu constructor code in the left-hand column is the replacement of each this (which refers to the would-have-been-instantiated object called quickpopPOPUP) with the new property to hold its object reference, form.popper. The new popup menu code will have some extra code tacked onto it:
1. A series of
If/Endif’s or a
Do Case structure to decide
which of various additional Menu objects should be attached to the popup
menu object according to specified conditions. This is very simple to do,
as shown in the single example below:
|
if form.ckbx1.value // in this case, the condition refers to whether a checkbox's value is true quick.popper.MENU3 = new MENU(quick.popper) // instantiate a new menu item with (quick.popper.MENU3) // assign its condition-specific properties text = "Do something related to checkbox 1" onClick = {;msgbox("Process that involves first checkbox")} endwith endif |
|
2. At the end, the usual lines
of code for positioning the menu relative to the pointer:
|
quick.popper.alignment = 1 quick.popper.left = this.left + col quick.popper.top = this.top + row quick.popper.Open() |
|
What about the Cannot have more than one form object with the same name error that occurs with re-instantiation of a popup menu? It is the nature of popups that they are opened repeatedly, and here, each time the user right-clicks the listbox, the menu is re-instantiated. So, recalling our previous concern with avoiding duplicate instantiations of a popup (and our If/Endif solution to it), are we not going to have that problem here?
Fortunately, we won’t, and the reason is this: we are not specifying a name for the popup. Although the POPUP class can receive both a form object and a name as parameters, we are only supplying the first parameter (form) , and we are specifically not supplying a name. If we instantiated it with a name (form.popper = new Popup(form,"DaPopper")), we'd get the above error on the second instantiation.
Multiple instantiations of an object into the same custom form property are not a problem, as we are not asking for a new object by the same name. Each instantiation merely replaces the object reference of the previous menu in the form property with a new object reference. This is analogous to a simpler situation: form.MyProperty = 8 followed by form.MyProperty = 9 which produces no error because we’re just changing the contents of a property.
But, each time the popup menu is instantiated, it is a new menu object that is instantiated. Furthermore, even though we are not providing a name for each new menu, each one is receiving a name “behind the scenes”. As is the case for most objects placed on a form, if you do not provide a name for the object, dBASE will provide one. In this case, the first popup menu that we create is given the name “POPUP” by dBASE, the second is named “POPUP1”, the third is named “POPUP2”, etc.
You might wonder, “Why not just
release the menu at the end of the onRightMouseDown()
function
and re-use the name the next time around?” This is a very good question,
and it has a somewhat perplexing answer: dBASE will not let us fully release
the named object — we can use release
object form.MyPopup
and
thus release the particulars of the menu and presumably the memory it occupies
(and it will not be Openable
again — Attempt to access released object error),
but there will still
be a property of the form with the name we gave to the menu. However, we
are allowed to re-name this object to, say,
form.oldPopup, and then
re-use the original name if we wish, but the next time around we’ll have
to re-name it to something other than
form.oldPopup, because
the first re-named object still exists with that name. So, in effect, a
unique name is required for each instantiation. It's easiest to just let
dBASE do that with its internal naming system, although if for some reason
you wish to provide a name, you can set up your own system for incremental
naming — MyPop1, MyPop2, etc.
| If you
Inspect() the form after,
say, 5 uses of the object-specific popup, you will find 5 menus listed
(under the User_defined section) and named by dBASE as described
above. This accumulation of discarded menu baggage does not seem to hamper
performance or use appreciable resources. I have used a loop to instantiate,
with and without releasing each menu, more than 400 popup menus with no
noticeable effect on either GDI or User resources in Win98.
|
||
A
sample form with a dynamic popup menu
Top|Topic
List
A working example of the above
menu is in the form below. There is no need for a separate
.pop file since the menu
is completely defined in the onRightMouseDown()
event
code of the listbox. Copy/paste the below file into a file called
Dynapop.wfm and save/run
it. Right-click the listbox to see the menu.
|
** END HEADER -- do not remove this line // // Generated on 07/02/2002 // parameter bModal local f f = new dynapopForm() if (bModal) f.mdi = false // ensure not MDI f.readModal() else f.open() endif class dynapopForm of FORM
this.RECTANGLE1 = new RECTANGLE(this)
this.CKBX1 = new CHECKBOX(this)
this.CKBX2 = new CHECKBOX(this)
this.CKBX3 = new CHECKBOX(this)
this.CKBX4 = new CHECKBOX(this)
this.CKBX5 = new CHECKBOX(this)
this.LB1 = new LISTBOX(this)
this.CKBXNOTICE = new CHECKBOX(this)
function LB1_onRightMouseDown(flags, col, row)
// Add a couple of items that
will always be on the menu
form.popper.MENU1 = new MENU(form.popper)
// Now begin a sequence of
conditionally included menu items
if form.ckbx2.value
if form.ckbx3.value
if form.ckbx4.value
if form.ckbx5.value
if form.ckbxnotice.value
// set alignment and menu
position
// release the menu--doesn't
seem to be necesesary, but why not?
|
|
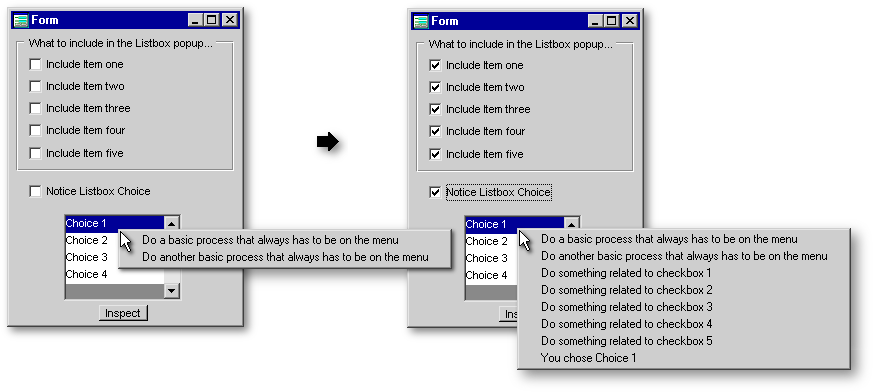
Below are two shots of the form and popup menu: at left, when none of the checkboxes are checked; and at right, when all of the checkboxes are checked.
Remember the very first form described in this article, the one with the simple popup menu instantiated into the built-in property called form.popupMenu? What if you also want an object-specific popup in such a form? Or perhaps 2 or 3 object-specific popups?
This is a bit trickier to accomplish than it may seem at first glance. The problem is this: the standard form-based popup instantiated into form.popupMenu will be invoked anywhere on the form, even over objects such as grids and listboxes with their own popups. Furthermore, dBASE is constructed such that the form’s popup “event” takes precedence over the onRightMouseDown() event of any object on the form. This leads to some bizarre behavior: right-click the grid and get the form’s popup; then, after releasing it, the grid’s popup appears. Obviously, this is not what we want.
A while back, Gary White provided a nice example of how to get around this problem, and it is very simple. The solution is to not use the built-in form.popupMenu property. Instead, instantiate the form’s popup into a custom form property with a different name (anything other than form.popupMenu will do), and then write the usual few lines of code to position and open it in the form’s onRightMouseDown() event. This event respects the onRightMouseDown() of objects on the form and so doesn’t fire when the mouse is right-clicked over form objects.
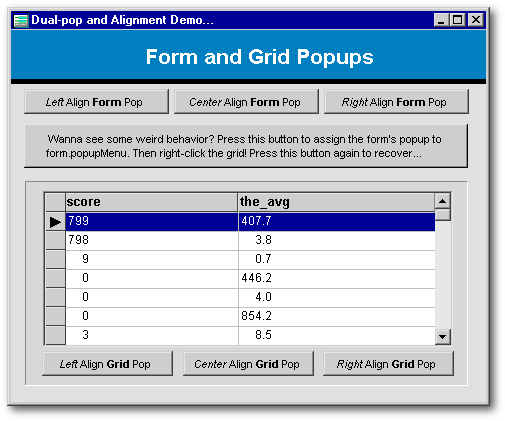
Below is DemoAlign.wfm, a form to show how a “form-based” popup can comfortably coexist with an object-specific popup. This form does additional duty as a demo of the three alignment options for popup menus and also shows you (in a reversible way) the strange behavior of the two popups when the form’s popup is assigned to form.popupMenu.
The form is shown below:
When the programmer wishes to associate a popup menu with a grid or other control that is contained in either a Notebook object and/or 1 or more (nested) Container objects, correct placement of the popup menu in relation to the mouse pointer becomes trickier. In fact, there is in this regard even a dBASE behavior which has been reported as a bug, although it is usually quite minor. In dealing with the challenges of precise menu placement under these circumstances, I have received some very useful and clever help from Marko Mihorko, Jamie Grant, and Marc Van den Berghen, all from the dBASE Programming NewsGroup.
There are two problems. The first is an extension of an issue we have already looked at — the necessity of accounting for the separate coordinate systems of the form and the object that we are right-clicking in order to place the menu precisely where we wish. As an example, see the form below which has a grid within a Notebook:
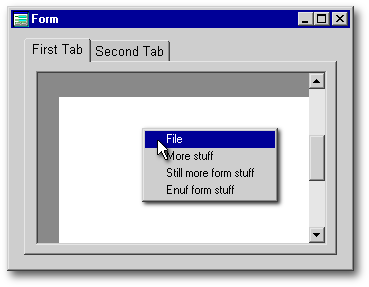
The above popup menu, whose upper left-hand corner is supposed to align with the tip of the mouse pointer, is clearly not being properly placed.
Following is its placement code:
|
Function GRID1_onRightMouseDown(flags, col, row) form.gridpop.alignment = 1 form.gridpop.left = this.left + col form.gridpop.top = this.top + row form.gridpop.open() return |
|
As you can see, the code accounts
for the grid’s position (but in relation to what?!) and the position of
the mouse pointer within the grid, but as Marko Mihorko correctly pointed
out, does not account for the position of the Notebook in the form. In
fact, the grid’s position (this.left and
this.top) is in relation
to the Notebook which contains it, rather than in relation to the form.
So, modifying the above code to account for the Notebook as follows…
|
Function GRID1_onRightMouseDown(flags, col, row) form.gridpop.alignment = 1 form.gridpop.left= form.notebook1.left + this.left + col form.gridpop.top = form.notebook1.top + this.top + row form.gridpop.open() return |
|
…fixes most of the placement problem:
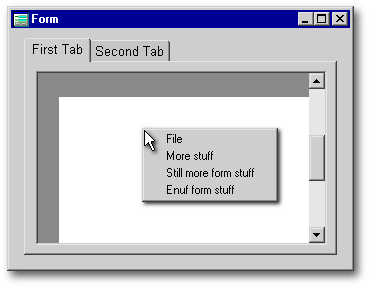
As it turns out, an elegant procedure called doPopup() for managing this problem has already been authored by Jamie A. Grant, AV-Base Systems, Inc., and has been graciously provided for use in this article.
Instead of coding the usual menu
placement in the onRightMouseDown() event
code of the object that is being right-clicked, a call to the
doPopup() procedure is
placed there instead. The procedure is shown below:
|
Procedure doPopup(form, currentObj, popupVar, mouseCol, mouseRow) // Example: // Function GRID1_onRightMouseDown(flags, col, row) // DoPopup( form, form.notebook1.container1.grid1, form.grid1Popup, col, row ) // return firstObj = currentObj popupVar.top = mouseRow
do while not currentObj == form
// Ensure it loads left-aligned
to the starting point.
popupVar.open() |
|
This function receives several parameters:
| To visualize how this procedure works,
first imagine a grid within a
Container within a Notebook within a Container within a Notebook (pictured
below). This set of nested container objects represents a parental
hierarchy, with the Form at the top.
From the inside outward, it is this: the grid’s parent is the Container which contains it, and that Container’s parent is the next Container, whose parent in turn is the Notebook, whose parent is the form. Keep this parental hierarchy in mind as you
try to understand the explanation of the procedure below.
|
||
The procedure thus begins by storing the values of row and col to the popup menu’s top and left properties (popupVar.top and popupVar.left). It then adds the right-clicked object’s positional data to the popup menu’s top and left values. It then enters a loop which exploits the parent property of the current object to move “focus” to the object’s parent (its container), and then adds its top and left values to the totals. The loop continues up the parental hierarchy for as many parent “container” objects as exist and stops when it reaches the form itself. So, in essence, it is merely adding the mouse pointer’s row value to all the tops from the clicked object up the container hierarchy to the form and adding the mouse pointer’s col value to all the lefts from the clicked object up the container hierarchy to the form.
To test the doPopup() procedure, I devised the somewhat unrealistic but challenging example of popup menu placement mentioned in the Note above: a grid within a Container within a Notebook within a Container within a Notebook. With only the original code (grid position and mouse pointer position) to define grid and pointer placement, the mouse pointer is initially placed far away from the menu:
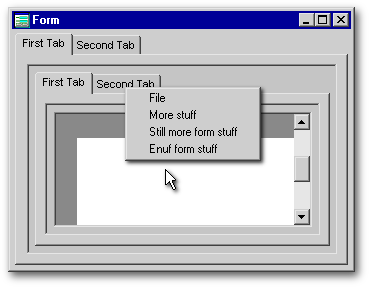
But by using Jamie's doPopup() procedure instead of the basic code, here is the result:
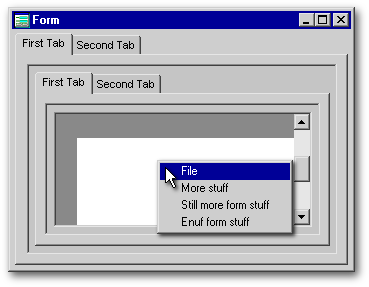
As you can see, the corner of the
menu is placed much closer to the tip of the pointer. The code is below.
Although Jamie apparently uses the procedure as part of a
.prg file, I have placed
it below as a custom method of the form (i.e., it is within the
Class/Endclass of the
form rather than outside it), so it is called below as
form.doPopup (etc.):
|
Function GRID1_onRightMouseDown(flags, col, row) form.DoPopup( form, form.notebook1.container1.notebook1.container1.grid1, form.gridPop, col, row ) return Procedure doPopup(form, currentObj, popupVar, mouseCol, mouseRow)
firstObj = currentObj
do while not currentObj == form
// Ensure it loads left-aligned
to the starting point.
popupVar.trackRight := false
|
|
There is no difference between
a function and a procedure in dBASE. You may use either term. Thus,
…is equivalent to
|
||||||||||
That pesky mouse pointer again!
In the screenshot above, you may have noticed that the tip of the mouse pointer is still slightly displaced to the right and down from the upper left corner of the menu. Why has this occurred? There are no flaws in Jamie’s code. It is instead related to a minor glitch (or perhaps a purposeful omission) in dBASE — a failure to account for the thickness of the border of objects such as containers, grids, and listboxes when reporting theirleftand top values. A couple of additional examples are shown below to illustrate the extremes.
On the left, three nested containers and a grid with borders of maximum thickness; and on the right, those same containers and grid with no borders. Both forms use Jamie's custom procedure to position the popup menu in relation to the mouse pointer.
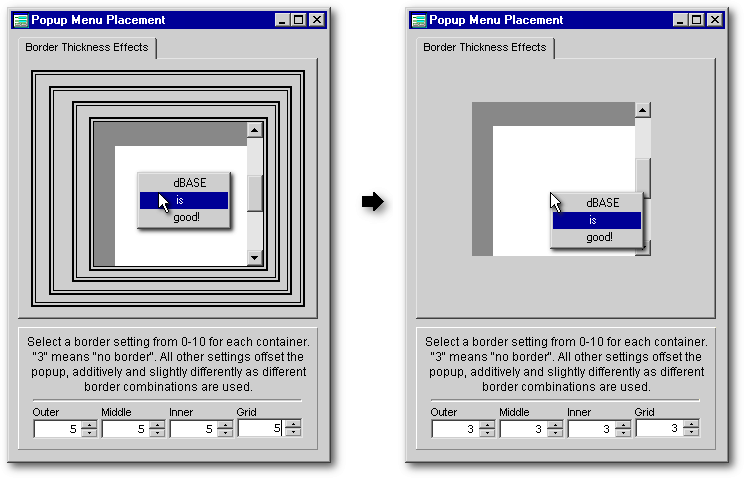
The difference in placement of the popup menu is evident: when the menu pops up within 4 double-thick borders, even Jamie’s procedure cannot overcome the menu’s substantial offset from its proper position; but when there are no borders present, the placement becomes perfect. You may never use three nested containers with a grid and its popup menu located in the deepest level, but you will run into this issue to some degree with any number of nested objects if they have borders. Then again, you may not care about this relatively minor problem! Your users would probably not even notice it.
Still, as with most problems associated with dBASE, there is a fix for the border problem. It comes from Marc Van den Berghen, who is one of the more imaginative and skilled adventurers into the land of API calls. He has used a custom class written by Gary White (a long-time first-rate API’er) which provides a means to extract data returned by API calls, and has used it to exploit two API functions: GetCursorPos() and ScreenToClient(). The concept is straightforward: GetCursorPos() returns the coordinates of the mouse pointer in relation to the entire screen, and ScreenToClient()translates the latter coordinates to those of the current window, i.e., the form. Since the popup menu’s coordinates use the form’s coordinate system, and we have the precise position of the pointer on the form, we can set the menu’s upper left corner to the same coordinates as the tip of the mouse pointer and thus bring them together.
This approach also solves the previous problem of having to make adjustments for multiple left and top offsets, so if you use it, you won't need to use Jamie’s doPopup() procedure. Below is an example of a form that shows both positioning problems being solved at once — the popup is located several “offsets” deep and is within three thick container borders and a grid border, yet it is precisely aligned with the tip of the mouse pointer:
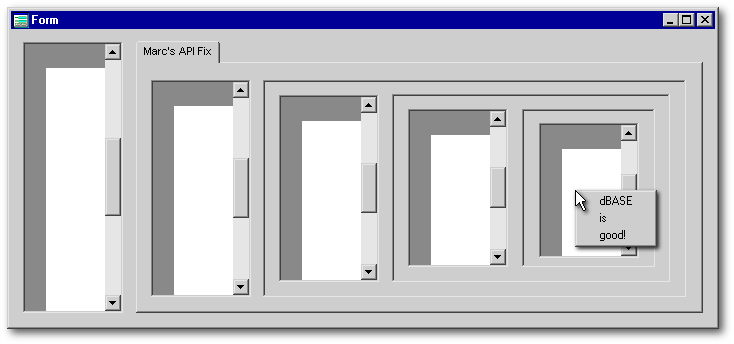
Only the grid’s
onMouseDown() event code
is shown below, but the above form has been included with the others that
accompany this article so you can explore the rest of the code in dBASE’s
Editor:
|
Function GRID1_onRightMouseDown4(flags, col, row) Form.NBPopUp.alignment = 1 // Instantiate a new instance
of the POINT class
// Get the coordinates of
the mouse pointer
// Convert them to the form's
coordinate system
// Set the popup menu's .left
and .top properties
// Open the popup menu
// Release the p object
|
|
You are now at the cutting edge
of research regarding popup menu placement in relation to the mouse pointer,
and the methods described above should handle almost any menu circumstance.
dBASE's
built-in popups
Top|Topic
List
To wrap up this article, let’s take a quick look at a couple of dBASE’s built-in popup menus.
The Form’s useTablePopup Property
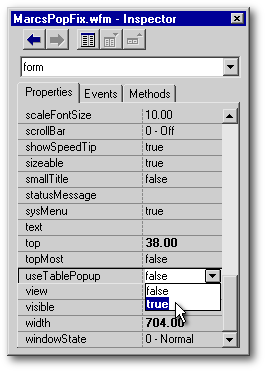
Drop a grid and a query on a form without a form-based popup, and datalink the grid to the query. Then, in the Form Designer, set form.useTablePopup to true
…and run the form. Then right-click anywhere on the form and voilà…
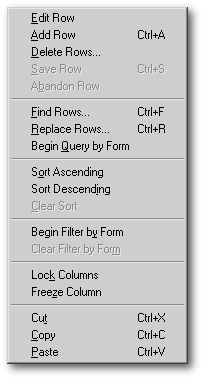
I’m embarrassed to admit that I was unaware of the existence of this popup until preparing this article. I’m not sure I will ever use it in a real app, but it’s a handy-dandy little tool. Be sure to try out the Sort commands — it even offers to create new indexes for you!
If you do not have a query on the
form, but do have entryfields or other editable controls, most of the choices
on the popup are grayed out, but the usual editing
choices (Copy|Cut|Paste) are available as appropriate.
If the form’s
built-in popupMenu has a popup attached to it, the
UseTablePopup is
over-ridden. But if you want to be able to have both and switch between
them, set form.useTablePopup to
true,
attach a popup to form.popupMenu,
then include on the form a couple of pushbuttons like these:
Setting the form’s popupMenu property to false keeps UseTablePopup from being over-ridden. When you want to bring back the form’s regular popup, reset the property using the popup’s name. In the above form, the popup’s name was set (during instantiation) to FirstPOPUP, so it is referred to here as form.FirstPOPUP. [Remember that a form-based popup has its object reference stored in two places: in form.popupmenu, and in form.popupName where popupName is the name given to the popup during instantiation]. What you are doing here is temporarily obliterating the popup’s object reference in form.popupmenu. |
||||||
How does the form’s UseTablePopup property interact with an object-specific popup? I leave it to you to do the research.
The Editor object’s popEnable Property
The Editor object has a built-in popup that provides useful editing functions. It is shown below.
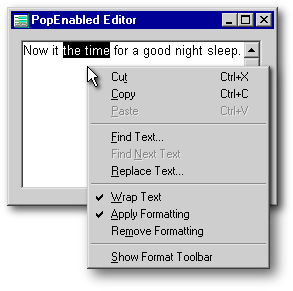
Set the editor’s
popupEnabled property
to false if
you prefer that this popup not appear when the editor is right-clicked.
The property defaults to true.
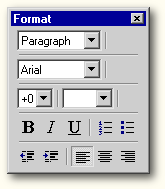 Incidentally,
the bottom choice in the popup, Show
Format Toolbar, refers
to a tool bar that provides additional editing options for the Editor.
This toolbar has been known to “pop up” unexpectedly (and somewhat annoyingly)
in compiled applications. There are a couple of ways to turn it off: Incidentally,
the bottom choice in the popup, Show
Format Toolbar, refers
to a tool bar that provides additional editing options for the Editor.
This toolbar has been known to “pop up” unexpectedly (and somewhat annoyingly)
in compiled applications. There are a couple of ways to turn it off:
|
||||||
Conclusion
Top|Topic
List
If you have managed to stick with this lengthy article long enough to read this conclusion, I hope you now see that popups are not so hard to create and they make your apps more friendly and efficient. Use ’em!