by Gary White, dBVIPS
Example files for this document are in xlcode.zip.
One of the more commonly requested, but least understood tasks of the developer is communication between applications. Windows solves all that for us doesn't it? Well, maybe not all, but with the advent of OleAutomation (or what MS refers to as just Automation), you can create communication channels that will allow you to exchange data with any ole compliant application. This is a primer on communicating with Microsoft Excel.
The first thing you must understand about OleAutomation is that you are talking to an application (in this case Excel) in its own language. Excel's native language is Visual Basic, or one of the variations on it. This article is not designed to teach you Visual Basic, but how to use Visual dBASE to execute Visual Basic commands in Excel.
The syntax of Visual dBASE is slightly different than that of Visual Basic. In VdB, functions and procedures are called with a parenthesis after the function, or procedure name, i.e. MyProc(). There is the exception of calling a procedure as DO MYPROC WITH PARAM, but for our purposes, we'll ignore that for the moment. Parameters are passed by placing them inside the parenthesis. This is not necessarily true for Visual Basic. The following two functions do exactly the same thing. They shut down MS Excel, assuming that "oExcel" is an OleAutomation object referring to an Excel Application and "oAppObject" is a reference to the application object in Excel.
Visual dBASE Excel
Note that, without the parenthesis, VdB does not recognize "quit" as being a method, but views it as a property. If it were a property, then there should be some kind of assignment operation. Since there is no assignment, VdB generates an error. Placing the parenthesis after the method name causes VdB to recognize "quit" as a method, which it passes to Excel for execution.
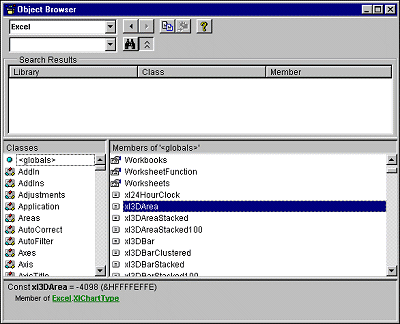
As you will have noted by now, Excel's Visual Basic uses the same dot notation that is used in VdB. There are a couple of different ways to attack the project from this point. You can INSPECT(oExcel) in VdB, or you can use the Object Browser in Excel. While my preferred development platform is VdB, I must confess that I prefer the Object Browser in this case. The reason is, when you look at topics in the VB reference, they will be listed with obscure constants, such as xlWBATExcel4MacroSheet. These can be very time consuming to decipher. The object browser contains the definitions for all the constants.
The easiest way to figure out the Visual Basic code to accomplish something in Excel is to go into Excel and record a macro to do what you want done. This will generate the code for you. Of course, this code is not likely to run in Visual dBASE. For example, the following code was generated by the macro recorder in Excel:
Sub Macro1()
Range("A1").Select
ActiveCell.FormulaR1C1 = "11"
Range("A2").Select
ActiveCell.FormulaR1C1 = "12"
Range("A3").Select
ActiveCell.FormulaR1C1 = "22"
Range("B1").Select
ActiveCell.FormulaR1C1 = "21"
End Sub
The next step in converting VB code to run in VdB is to understand the code generated by Excel. The first place to go is Excel's Visual Basic Reference (help file). Look first at the Object Model.
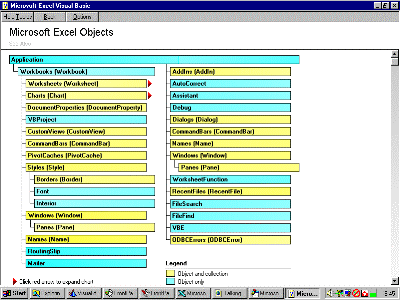
Help Topic: Microsoft Excel Objects
At the top of the hierarchy is the Application Object. Below the Application object are a number of other objects, but the one that most concerns us is the Workbooks (Workbook) entry. Workbooks refers to a collection (an array) of Workbook objects. Each workbook contains a collection of Worksheets, a collection of charts and other assorted objects. Each worksheet contains a collection of cells and a number of other objects.
To convert the generated code to something VdB will recognize and run without complaint, you just need to clean up the syntax a little:
* create an OleAutoclient link to Excel
oExcel = new oleAutoclient("Excel.Application")
* create a new workbook
oExcel.Workbooks.Add()
* Range("A1").Select
* Need to add parenthesis
oExcel.Range("A1").Select()
* ActiveCell.FormulaR1C1 = "11"
* Assign value
oExcel.ActiveCell.FormulaR1C1 = "11"
* Now do the rest the same way
oExcel.Range("A2").Select()
oExcel.ActiveCell.FormulaR1C1 = "12"
oExcel.Range("A3").Select()
oExcel.ActiveCell.FormulaR1C1 = "22"
oExcel.Range("B1").Select()
oExcel.visible = .T.   && show Excel
There is another way to address cells that can be much more useful to the developer. While the above code uses the familiar letter/number cell addressing ("B2"), you can address cells by numbers, as though they were a two dimensional array because that's what the cell collection is. Suppose we have the following array we wanted to export into Excel:
aMyArray = new array( 2, 4 )
aMyArray[ 1, 1 ] = "First"
aMyArray[ 1, 2 ] = "Second"
aMyArray[ 1, 3 ] = "Third"
aMyArray[ 1, 4 ] = "Fourth"
aMyArray[ 2, 1 ] = 111
aMyArray[ 2, 2 ] = 222
aMyArray[ 2, 3 ] = 333
aMyArray[ 2, 4 ] = 444
By using the cells collection, we can address cells by number:
oExcel = new oleAutoclient("Excel.Application")
oExcel.Workbooks.Add()
for nRow = 1 to alen( aMyArray, 1 )
  for nCol = 1 to alen( aMyArray, 2 )
    oCell = oExcel.ActiveSheet.cells( nRow, nCol )
    oCell.formula = aMyArray[ nRow, nCol ]
  endfor
endfor
oExcel.visible = true
Note that assigning values is a two-step process either way you address the cells. You must either select the cell and then assign the value, or you must get a reference to the cell and then assign a value. Theoretically, oExcel.ActiveSheet.cells(1,1).formula="MyValue" should work (and does in VB), but it does not work with VdB.
As a learning exercise, let's move a table into Excel. As I'm sure you're aware, Excel does not yet recognize the new level 7 dBASE table format, so this is one way to get your data into Excel. Let's assume you have a TRANSACT table with, among others, the following two fields:
Field Name   Type   Length   Dec
District       C     10
SaleAmount     N     10       2
Using OODML, you could export the entire table to Excel, or more useful, calculate the totals, by district. Further, let's say you'd like to have a pie chart of the results. Using oleAutomation, it's really very easy. I've defined a number of the Excel constants in xldef.h, which is included with this zip file. Note that this program is designed for Excel 97. The data export should work fine with Excel 95, but changes in the object model make the charting and some of the formatting different for the two versions. It is untested with Excel 2000.
/*
  Program: Talk_XL.prg
   Author: Gary White
     Date: July 18, 1998

This program is designed to show examples of
using ole automation to communicate with MS
Excel. The example uses a transaction table.
Among the fields in the transaction table are
fields for District and SaleAmount.  What we
want to accomplish, is to export the sales
totals by district to Excel and create a pie
chart of the result.

This program will create a table named
TRANSACT.DBF and generate sample data for
the demonstration.

*/

#include xldef.h // Some Excel constant definitions

local oExcel, oRange, oCell, q, r, i, ;
   nRow, cFormula, cRange, nTop, nLeft

// Create instances of our variables so we can use
// the assignment (:=) operator from here on out.
store 0 to oExcel, oRange, oCell, q, r, i, nRow, ;
    cFormula, cRange, nTop, nLeft

// create a sample table
if not file("transact.dbf")
   create table transact( ;
      District char(10),;
      SaleAmount numeric( 10, 2))
   use transact excl
   generate 10000
   replace all district with ;
      transform(int(random(0)*10)+1,"@L 999")
   index on district tag district
   use
endif

// Okay, now the program begins
// First generate a query object that will
// extract the totals by district.
q := new query()
q.sql := "select District, sum(SaleAmount) as" + ;
   " Sales from transact group by District"
q.active := true

// get a reference to the rowset to shorten
// addressing
r := q.rowset
// make sure we start at the top of the table
r.first()

// now we start Excel
oExcel := new oleAutoclient("excel.application")

// Uncomment this next line if you want
// to watch it while it happens
// oExcel.visible = true

// create a new workbook
oExcel.workbooks.add()

// initialize our row pointer
nRow := 1

// First, let's put in column headings
for i = 1 to r.fields.size
   // select a cell
   oExcel.ActiveSheet.cells( nRow, i ).select()
   with ( oExcel.ActiveCell )
      // set the width to match the field length
      ColumnWidth := r.fields[i].length
      // set the content to the field name
      formula := r.fields[i].fieldName
   endwith
endfor

// Let's add one more column to show the percent
// for each district
oExcel.ActiveSheet.cells( nRow, i ).select()
oExcel.ActiveCell.formula := "%/Total"

// select the entire top row
oRange := oExcel.ActiveSheet.Range("1:1")
// make it boldface
oRange.font.bold := true
// and align it to center text
// you can get this value from Excel's
// Object Browser
oRange.horizontalAlignment := xlCenter

// now we'll just loop until we run out of records
do while not r.endOfSet
   // increment our row pointer
   nRow ++
   for i = 1 to r.fields.size
      // get a cell reference
      oCell := oExcel.ActiveSheet.cells( nRow, i )
      // store the field contents to the cell
      do case
         case r.fields[i].type = "CHARACTER"
            // if it is a character field, we'll
            // prepend a single quote to insure
            // that Excel treats it as text
            oCell.formula := ;
               "'"+trim(r.fields[i].value)
            oCell.horizontalAlignment := xlCenter
         case r.fields[i].type = "DOUBLE"
            // otherwise just stuff the value
            oCell.formula := r.fields[i].value
            // Here, I'll cheat a little.
            // The calculated field is typed as a
            // double. I want to format that as
            // currency.
            oCell.NumberFormat := "$#,##0.00"
         otherwise
            // just stuff the value
            oCell.formula := r.fields[i].value
      endcase

      // we want to color every other row to
      // address the worksheet up and make it
      // easier to read
      if nRow % 2 # 0   // if the row is odd...
         // select the first three
         // columns of the row
         cRange := "A" + ltrim( str( nRow ) ) + ;
            ":C" + ltrim( str( nRow ) )
         oExcel.Range( cRange ).select()
         // set the fill color
         oExcel.Selection.Interior.ColorIndex := 40
      endif
   endfor
   // get the next record
   r.next()
enddo

// skip down one more row to insert totals
nRow ++

// select the first column
oCell := oExcel.ActiveSheet.cells( nRow, 1 )
// and stuff a label there
with ( oCell )
   // insert the label for the totals
   formula := "All Districts"
   // make it bold
   font.bold := true
endwith

// now we'll create the formula to total
// all the transactions
cRange := "(B2:B"+ltrim(str(nRow-1))+")"

// our total is in the second column
oCell := oExcel.ActiveSheet.cells( nRow, 2 )
with ( oCell )
   // assign the formula
   formula := "=sum" + cRange
   // format it as currency
   NumberFormat := "$#,##0.00"
   // make it bold
   font.bold := true
endwith

// let's also calculate an average while we're
// at it select the cell in the first column
oCell := oExcel.ActiveSheet.cells( nRow + 1, 1 )
// and stuff a label there
with ( oCell )
   // insert the label for the totals
   formula := "Average"
   // make it bold
   font.bold := true
   // and green
   Font.ColorIndex := 10
endwith

oCell := oExcel.ActiveSheet.cells( nRow + 1, 2)
with ( oCell )
   // assign the formula
   formula := "=average" + cRange
   // format it as currency
   NumberFormat := "$#,##0.00"
   // make it bold
   font.bold := true
   // and green
   Font.ColorIndex := 10
endwith

// select the data portion of the
// percentage column
cRange := "C2:C" + ltrim( str( nRow - 1 ) )
oExcel.Range( cRange ).select()

/*
Addressing in a formula can be relative or
absolute. In our formula we use a relative
address to select the cell to the left of
our percentage cell and an absolute to
address the total at the bottom of the
column.

Absolute addressing is done by specifying
the exact address:
   "B12", "cells(2,12)", or "R2C12".

Relative addressing is done by specifying
an offset. For example:
 RC[-1]  selects the cell once column to the left
 R[-1]C  selects the cell directly above
 R[-1]C[-1] selects the cell above and to the left
*/
// Create a formula to calculate the percentage.
cFormula := "=RC[-1]/R" + ltrim(str(nRow))+"C2"
// and assign it to the selected cells
oExcel.Selection.FormulaR1C1 := cFormula
// format it as percentage with 2 decimals
oExcel.Selection.NumberFormat := "0.00%"

// create a formula to calculate the total
// of the percentage column
cFormula := "=sum(C2:C"+ltrim(str(nRow-1))+")"
// get a reference to the cell at the bottom of
// the percentage column
oCell := oExcel.ActiveSheet.cells( nRow, 3 )
with ( oCell )
   // store the formula
   formula := cFormula
   // format it as percentage w/2 decimals
   NumberFormat := "0.00%"
   // and make it bold
   font.bold := true
endwith

// let's insert a blank line at the top
oExcel.Rows("1:1").Select()
oExcel.Selection.Insert()

// Select the first 3 cells in the top row
oExcel.Range("A1:C1").Select()
// and merge them for our title area
oExcel.Selection.Merge()

with( oExcel.Selection )
// align it to center
   HorizontalAlignment := xlCenter
   VerticalAlignment := xlCenter
endwith

// now select our merged cell
oExcel.Range("A1").Select()

// and put in a page heading
with ( oExcel.ActiveCell )
   Formula := "Sales by District"
   font.name := "Times New Roman"
   font.size := 18
   font.bold := true
   Interior.ColorIndex := 53
   Font.ColorIndex := 2
endwith

// increase the row height of our title row
// this automatically sizes to fit the increased
// font size, but here we want it a little bigger
oExcel.Rows("1:1").select()
oExcel.Selection.RowHeight := 28

// now, let's turn off those ugly grid lines
oExcel.ActiveWindow.DisplayGridlines = False

// select our data
cRange := "A1:B" + ltrim( str( nRow + 2 ) )
oExcel.Range( cRange ).select()
// and put borders on all cells
with( oExcel.Selection.Borders )
   LineStyle := xlContinuous
   Weight := xlThin
   ColorIndex := xlAutomatic
endwith

// Now, let's create a chart
// start by selecting the data
cRange := "A3:B" + ltrim( str( nRow ) )
oExcel.Range( cRange ).Select()
//  create the chart
oExcel.Charts.Add()
// tell the chart where to get its data
oRange := oExcel.Sheets("Sheet1").Range( cRange )
oExcel.ActiveChart.SetSourceData( ;
   oRange, xlColumns )
// put the chart on the same sheet as the data
oExcel.ActiveChart.Location( ;
   xlLocationAsObject , "Sheet1" )

with ( oExcel.ActiveChart )
   // This will be a 3d pie chart
   ChartType := xl3DPie
   // Now let's put in a title
   HasTitle := True
   // give it some text
   ChartTitle.Text := "Sales by District"
   // pump up the font a little
   ChartTitle.Font.bold := true
   ChartTitle.Font.size := 24
   ChartTitle.Font.name := "Times New Roman"
   ChartTitle.Font.ColorIndex := 2
   // Now, lets give it a gradient fill
   ChartArea.Fill.OneColorGradient( ;
      msoGradientHorizontal,4,0.4)
   ChartArea.Fill.Visible := True
   ChartArea.Fill.ForeColor.SchemeColor := 53
   // Let's make the plot area trasparent
   PlotArea.Interior.ColorIndex := xlNone
   PlotArea.Border.LineStyle := xlNone
   // Make the legend font small enough to fit
   Legend.Font.Size := 8
   // and put a drop shadow on it
   Legend.Shadow := true
   // Default 3d elevation is 15 degrees. That's a
   // little flat for a pie chart, so we'll tip it
   // up a bit
   Elevation := 40
endwith

// In positioning the chart, the unit of
// measurement is points

// Move the chart because the default location will
// likely cover part of our data
nLeft := 0 - ;
   ( oExcel.ActiveSheet.shapes("Chart 1").left ) ;
   + 225
oExcel.ActiveSheet.Shapes("Chart 1" ;
   ).IncrementLeft( nLeft )

nTop := 0 - ;
   ( oExcel.ActiveSheet.shapes("Chart 1").top )
oExcel.ActiveSheet.Shapes("Chart 1";
   ).IncrementTop( nTop )

// now let's make it a bit larger
oExcel.ActiveSheet.Shapes("Chart 1").ScaleWidth( ;
   1.15, 0, 0 )
oExcel.ActiveSheet.Shapes("Chart 1").ScaleHeight( ;
   1.5, 0, 0 )

// put a copy of the chart in the clipboard so
// you can paste it somewhere if you want
oExcel.ActiveSheet.ChartObjects("Chart 1").copy()

// now we'll just hide the cursor behind the chart
oExcel.Range( "E2" ).select()

// finally we'll show Excel
oExcel.visible := true

// EOP Talk_XL.prg
 Finished result |
Now, you've seen how to address individual cells, place data, do formatting. Let's suppose you have a lot of data to move to a worksheet. The above method can be painfully slow. Fortunately, Steve Swanson found that using the Windows Clipboard was faster. After doing a little testing, I can attest that it is dramatically faster. So, how do you go about using this method? Funny you should ask because I was just about to get into that.
First, there are a two files you'll need. They are both included in this zip file. The files you'll need are Clipbord.cc, StringEx.cc. These tools are the works of a number of people, but primarily, you should thank Bowen Moursund and Vic McClung.
Now, there are a couple of different approaches you can use when transferring larger amounts of data to Excel. You can either read the entire set of records you want to transfer and place them in one long string, or you can do one record at a time. A string, in Visual dBASE 7 can be up to approximately 1 billion characters in length (providing you have sufficient virtual memory), so if your data does not exceed that, it would be faster to build one long string. Bear in mind that the string you build will have embedded tabs to separate fields and carraige returns to separate records. Or, you could use a combination of the two and copy groups of n records each.
Okay, let's get started. This example will build one long string and paste it at the end. It will use the same table created by the first example, so if you didn't try it, just use the code that created the table to create one for this. We won't bother with a lot of formatting, since we've already looked at that.
local oExcel, cText, q, r, i, nRow, nCount

#define MAX_ROWS 65536

// Create instances of our variables so we can use
// the assignment (:=) operator from here on out.
store 0 to oExcel, q, r, i, nRow

// Okay, now the program begins
// First generate a query object that will
// extract the totals by district.
q := new query()
q.sql := "select District, sum(SaleAmount) as Sales " + ;
"from transact group by District"
q.active := true

// get a reference to the rowset to shorten addressing
r := q.rowset
// make sure we start at the top of the table
r.first()

cText = ""   // initialize our string variable
nCount = 0
do while not r.endOfSet and nCount < MAX_ROWS
    for i = 1 to r.fields.size
        cText += ''+new string(''+r.fields[i].value) + chr(9)
    endfor
    // get the next record
    r.next()
    cText += chr(13)
    nCount ++
enddo

set procedure to clipbord.cc additive
_app.Clip = new TextClipboard() // create our clipboard object

_app.Clip.SetClipboardText( cText )  // place our string

// now we start Excel
oExcel := new oleAutoclient("excel.application")

// create a new workbook
oExcel.workbooks.add()

// since the field and record separators are embedded
// all we need to do is select the top left cell.
// of course you could stick column headings in here,
// but we won't bother in this example.
oExcel.ActiveSheet.cells( 1,1 ).select()

// now just call Excel's paste method
oExcel.ActiveSheet.paste()

// and size the columns to fit
oExcel.ActiveSheet.Columns.AutoFit()

// now we select A1 to un-select the range
oExcel.ActiveSheet.Range("A1").Select()

// and proudly show the result
oExcel.visible = true
That's all there is to it. Because you're using Excel's native language, nearly anything you can do in Excel, you can make Excel do without ever leaving Visual dBASE. Included with this document is Excel.zip which includes the above programs, the Excel header file and a nifty little progress form you can display while copying your data.
DISCLAIMER: the author is a member of dBVIPS. dBVIPS stands for dBASE Volunteer Internet Peer Support. It is a group of volunteers who provide technical support for dBASE, Inc. in the Visual dBASE newsgroups (news://news.dbase2000.com). If you have questions regarding this .HOW document, or about Visual dBASE, you can communicate directly with the author and other members of dBVIPS in the appropriate newsgroups on the internet. Technical support is not currently provided by private E-Mail by members of dBVIPS. dBVIPS members are NOT employees of dBASE, Inc., but are unpaid volunteers.
.HOW files are created as a free service by members of dBVIPS to help users learn to use Visual dBASE more effectively. This .HOW file MAY NOT BE POSTED ELSEWHERE without the explicit permission of the author, who retains all rights to the document.
Copyright 1999, Gary White. All rights reserved.
Information about dBASE, Inc. can be found at: http://www.dbase.com
The most current version of this document, along with other hopefully helpful files, may be found at the author's web site: http://www.apptools.com/dbase
Last modified: November 9, 1999