Note: This was written for Visual dBASE 7, but little has changed, and it should work for more recent versions of dBASE just fine.
Example files available in SampleIBApp.zip
Note that the InterBase server that ships with Visual dBASE and Inprise/Borland products has a five user license -- meaning you can only have a total of five users accessing the server at one time. This version is provided for modelling, creating, and testing an application. This is also the local InterBase server.
If you are going to actually use InterBase in a real-world situation with multiple users and such, you will need to contact InterBase about licensing -- they have a pretty fair licensing schedule that will allow "n" users at a good price. There is a remote database server as well -- see InterBase for details. They also have a special "Web" license if you wish to use InterBase as the database engine for an internet application. You can contact InterBase at http://www.interbase.com.
If you are writing a single-user system, you may not wish to spend the effort involved in using InterBase. While there are some useful functionality gains if you use InterBase, you can get most or all of the same functionality with .DBF tables, without the extra blood, sweat and tears involved in setting up an application to use the InterBase server, databases, and so on ...
In addition to this document, I heartily recommend the paper by Alan Katz on Upsizing from dBASE to InterBase presented at ICon 98 -- it covers some of what I will be covering here (I borrowed some ideas from Alan's paper and tried to expand on some of them here), and it also discusses things not covered here. Until Alan gets the paper on the dBASE, Inc. website, this paper can be found at http://www.interbase.com/downloads/dbase.pdf.
InterBase itself is a very powerful, small, and fast remote database server. However, if you are used to working only with local tables, like most dBASE developers, then moving to InterBase is going to be a bit of a leap.
Unfortunately, a lot of the documentation that ships with InterBase assumes that you will be using Delphi, JBuilder, or C++ Builder to work with InterBase, which is why this document is being written ...
One further note -- this document will NOT be covering every single detail of using InterBase databases and tables, as it is contained in the InterBase documentation, and this document is simply aimed at getting a dBASE developer up and running. For anything else you will have to spend some time with the InterBase manuals ... This is a very feature-rich database environment, and well worth getting into in more detail.
There is a lot of documentation that comes with InterBase in .PDF file format (Acrobat). There is also a version of the Acrobat reader on the CD (Visual dBASE, Delphi, etc.) that has InterBase. You should install that as well as the documentation (if you don't have a more recent version of the Acrobat Reader).
This document will attempt to explain the basics of creating a database, creating your BDE Alias to communicate with the database, and using InterBase tables with Visual dBASE. (Note: If you have later versions (5.x) of InterBase, the images shown here will not be 100% accurate, as there are now ToolBars on a lot more of the InterBase tool screens, but the functionality is pretty much the same.) Note that this document is not a tutorial, however, it is an attempt to put all the information you need to get started in one place.
This document makes some assumptions about you, the reader ... these are:
Note: To stop the InterBase server -- right click on the icon in the task tray and select the Shutdown option in the popup menu.
If you are not sure you have installed SQL Links or InterBase, or if you know you did not (or later removed them), you can install just those software elements.
Normally when you place the Visual dBASE 7 CD into the computer, it will "autostart" with a small front-end screen. If you do not see this, you can run it by going to the CD and running the start program from there.
For SQL Links, start the Visual dBASE install process, and when you get to the question about "Typical", "Custom" and "Compact", select "Custom", unselect Visual dBASE and the BDE (if VdBASE is working with your tables, then the BDE is installed ... no need to re-install it), and other options except for SQL Links -- i.e., just install the SQL Links.
To install the InterBase software, there is a separate installation option for InterBase from the dialog that starts up when you insert the CD into the drive. Select this option and install InterBase ...
NOTE: This document is assuming that you are running the InterBase server locally (on your own computer). There is documentation on running InterBase as a remote server (i.e., on another computer on the network), but we won't get into it here (see the InterBase documentation -- you will probably also require a different license to use this functionality).
"The InterBase server is a software process that executes on the node that hosts the storage space for databases. The server process is the only process on any node that can perform direct I/O to the database files." (InterBase Operations Guide)
So what's that mean in English? It means you have two applications running instead of one. One application runs where the data is located (InterBase) and one application runs where the user is located (Visual dBASE, or some other application, such as one you create using Visual dBASE ...).
For our purposes, you must also have the BDE (Borland Database Engine), which will normally, when you install it (from the Client/Server CD -- see above) include a SQL Link driver for InterBase (and some other major RDBMS engines), which is a native (to the BDE) driver created to interact with the InterBase server. The BDE is effectively the "middle-ware" mentioned earlier ...
When you are using local tables (.DBFs and .DBs) what you see when you look in a directory that contains your data is a whole bunch of files (tables, index files, other files depending on the table type). This directory would contain your database.
If you use an InterBase database, you will see a single file with a .GDB extension. This is the InterBase database file. It will contain your tables and indexes and all the data.
It is worth noting that, while .gdb is the traditional file extension and is what is set up in the registry, InterBase doesn't care about the file extension. It will happily use whatever file you give it, so long as it is the correct internal format. You could, for example, name an InterBase database DATA.TXT (a very bad idea) and InterBase would work with it, so long as it was an actual InterBase database.
If you use an InterBase database, you cannot ignore this feature at all. It is required (among other things, you must specify the type of database for the BDE so that it knows what to do ...).
If you set referential integrity rules in InterBase tables at the server (there are a variety of ways to do this, some are discussed here, everything is in the InterBase documentation), it is all handled through the InterBase Server, and the only way to access those tables is via the InterBase server -- which means that there is no way that users can get around the RI rules ... (note, however that if you do the RI rules in your code, that users will be able to get around them ...).
You can configure the InterBase server to start each time Windows starts, or to start manually. If you are going to run an application on a regular basis on a network, you probably want this to happen automatically. If you deploy InterBase for use with your application, you will probably want this to start automatically as well (you will need to see the InterBase documentation for this). The InterBase server does not take a lot of resources, so it is not hogging memory while it is running, and should not interfere with other applications. The chances are your client(s) may never even notice it is there.
In addition, under Windows NT you can have the InterBase server load as a service, rather than as an application. (If you don't know what this means, check your NT documentation -- I'm not getting into it here ...)
If you are using Windows 95/98 or NT 4.0, the InterBase server will appear when running, as an icon in the Task Tray of the Task Bar.
When the InterBase Server is running you can right click on it and a small popup menu will appear - if you select the Startup Configuration option, you can select the method for starting InterBase. If you do not wish it to start automatically, make sure you select "Manual" ...
The InterBase Server
If you have not started the InterBase Server already, double-click the icon
for this program (or if you are using the "Start" menu simply click on it).
You won't see much, if anything, happen -- but if you check your Task Tray in
the Task Bar, you should see a new icon ...
The InterBase Server must be running for you to do anything with databases, tables, etc. It is also necessary for the ISQL Window and Server Manager ...
InterBase Windows ISQL
This is a small program that handles InterBase SQL commands and sends them to
the InterBase Server. You can use this to create databases (see below), and
to create and manipulate tables in those databases.
We will only be using it here to create a database itself, as you cannot do this directly from dBASE. All of our table manipulation will be done from within dBASE either through the OODML, local SQL, or through a pass-through method of sending commands directly to the InterBase Server.
The InterBase Server
Manager
This program is designed to handle various aspects of the InterBase Server,
among them setting up userids. We will look at the userid aspect later in this
document.
In order to create a database, you must have a valid userid and password. InterBase has the default administrator userid "SYSDBA" and password "masterkey" (note -- the security functions for InterBase are case sensitive -- the password "masterkey" must be entered in lower case). If you wish to create new userids, you do this through the InterBase Server Manager -- we will discuss this later in this document. No matter what, you must have at least one valid id when you create the database. (NOTE: the InterBase documentation recommends that you change the password from "masterkey" to something else -- we will discuss how to do this later, but for now we'll use the default password for testing ...)
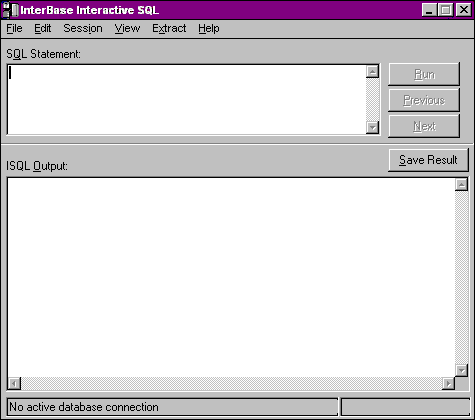
If you double click on the "InterBase ISQL Window" icon in the InterBase group, you should see:
Using the ISQL Window, you can create a database through the File menu, selecting the "Create Database ..." option. A dialog will appear that looks like:
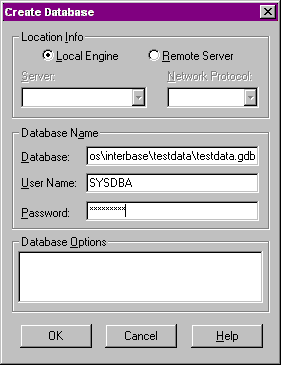
If you are creating the database locally (on the local machine), then all that is necesary is the full path to the location of the database. Remember that a database is a file with an extension ".GDB" -- if you leave this off, InterBase will still work with it, but it will not be automatically recognized by Windows as an InterBase database.
An example might be (the directory "c:\MyTest" must exist -- the ISQL window will not create the directory for you):
c:\MyTest\testdata.gdb
When starting out, you should leave the other options at the top of the dialog empty (they deal with remote InterBase servers) -- once you become more familiar with InterBase, you may want to explore these (and if you will be deploying to a network you will need to understand these).
Make sure you have a valid userid and password entered, and click the "OK" button.
The status line at the bottom of the ISQL window will show you the database you are currently connected to:
Database: c:\MyTest\testdata.gdb
(You could, from here, create tables, add data, and more -- but this requires a good knowledge of SQL -- one of the advantages to using dBASE is that you do not need to know a lot of SQL to get your work done ... that said, you will need to know some SQL to work with InterBase (and other remote databases).)
At this point, to use your InterBase database with dBASE, you do not need the ISQL Window running, so you can close it.
The next thing you need to do is to create a BDE Alias for your InterBase database. This is what you will use in dBASE to connect to the database, add tables, etc.
A BDE Alias is how you address the database from within your application -- you will assign a name to the alias, and when you reference the database in Visual dBASE, it will be by that name ... the BDE will handle the rest.
There are a couple of ways you can create a BDE Alias. The first is through the administrator, the other is programmatically (using a custom control (from the dUFLP library) that is included with this HOW TO document).
Create a BDE Alias Using the BDE Administrator
One method of doing this is using the BDE Administrator. This requires that you bring the BDE Administrator on screen (this is in the Visual dBASE 7 group or folder ...).
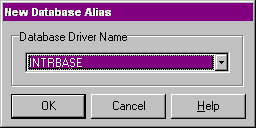
Right click on the left pane of the BDE Administrator, and select the "New" option. When the "New Database Alias" window comes up, make sure that you select the INTRBASE driver (it must be in all caps and say "INTRBASE" -- the Visigenic drivers are ODBC (non-native, therefore slower) and so far no one I know has gotten these to work properly).
NOTE: If you do not see "INTRBASE" in the combobox for the dialog, then you do not have the SQL Links installed -- see instructions given above ...
The screen should look like this:
Click "OK" and then, in the left pane of the BDE Administrator, type the name of the desired alias, "TestData". The BDE Administrator will now look like:
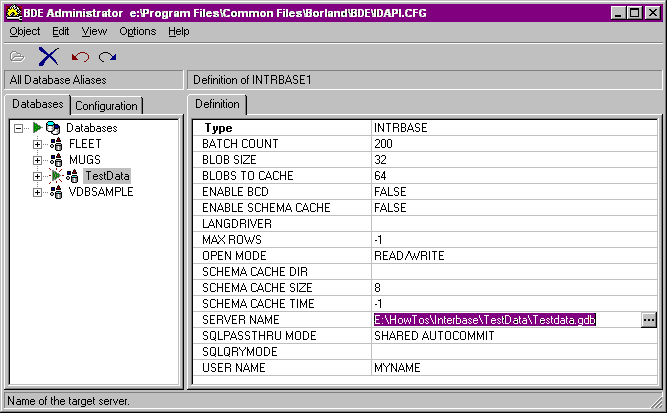
Next you'll need to set the "SERVER NAME" in the right pane of the BDE Administrator. This will be the complete path and file name of the database you just created. This has already been done in the above illustration. (If using remote servers this needs to have the server's name before the path to the database (i.e., MyServer:c:/MyTest/testdata.gdb)).
You may want to set the Language Driver ("'W Europe' ANSI" is a useful driver -- it handles most or all of the Windows character set quite well ...), and you may want to set the default user name (SYSDBA, for example).
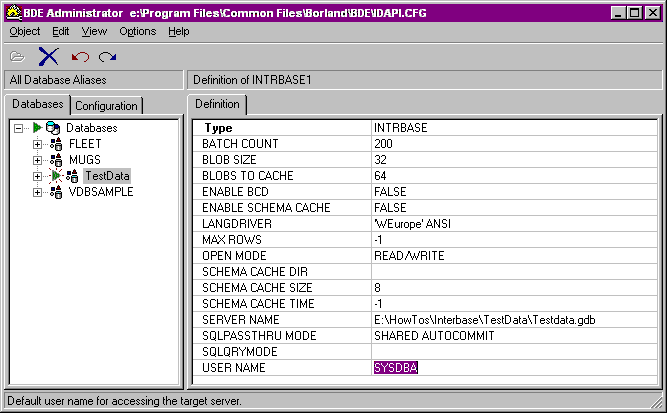
Once you have done this, make sure you apply your changes with either <Ctrl>+A or use the "Object" menu and select "Apply".
If you are not sure it worked, try double-clicking on the name of the database in the left pane. You will be prompted for a userid/password to log in (SYSDBA/masterkey) -- enter them, and you should find yourself logged in to the database. If not, an error will occur.
Create a BDE Alias for the Database Programmatically
Another method of creating your alias is programmatically. This can be useful if you have a need to create aliases on the fly, and so on. This is done with the use of a special custom class file: BDEALIAS.CC.
This file, which is a part of the dUFLP library (at the author's website), contains BDE API calls which can create a database for you, and more. There is a copy of this file included with this HOW TO document (but you should compare it against the version in the dUFLP library, as it may be updated periodically, either to enhance the already existing code, or to add functionality).
NOTE: For some reason, programmatically setting the language driver either does not work, or works intermittantly ... however, setting the language driver manually through the BDE Administrator does appear to work. There does not seem to be any rhyme or reason for why ... we are removing the "LANGDRIVER" option until a reason can be found for this not working and/or a fix can be found to make it work ...
To use this, you need to create an instance of the BDEALIAS object, and then use the methods that are coded into the class. We are going to use the "createAlias" method ...
NOTE: The actual database must exist already ...
   set procedure to BDEAlias.cc additive
   b = new BDEAlias()

   cIPath = "c:\MyTest;"+;
            "SERVER NAME:c:\MyTest\testdata.gdb;"+;
            "USER NAME:SYSDBA;"+;
            "SQLQRYMODE:SERVER;"+;
            "SQLPASSTHRU MODE:SHARED NOAUTOCOMMIT"

   // by using the ? command, we can see if the
   // method returns a true or false -- if true, we were
   // successful, if false, we were not.
   ? b.createAlias( "TESTDATA", cIPath, "INTRBASE" )

   // this is just to see if it worked -- you
   // would probably want to create an instance of
   // a database object and so on in your code ...
   // for a real application you wouldn't want these
   // two statements:
   open database "TESTDATA"
   close database "TESTDATA"
The last parameter in the createAlias() method is the SQL Link driver name. If you wanted to use this for a different database and you knew the name of the driver (as it appears in the BDE Administrator), you could just substitute the driver name here. The required parameters noted in the "cIPath" variable above are specific to the InterBase server. If you were working on a remote server you would need to preface the path in both places shown ("c:/MyTest") with the name of the server on the network ("someserver:c:/MyTest"). This parameter, if ignored, defaults to "DBASE".
There are other settings you might wish to use here ... you would want to check the BDE Administrator and any documentation for InterBase to be certain.
This custom control also has the ability to delete a BDE alias, and provide some pretty specific information about the alias. See the internal documentation (at the beginning of the .CC file) ...
You can create tables in several ways in Visual dBASE -- you can use the design surfaces, you can use local SQL, or you can use the OODML objects and their methods. Some SQL commands need to be passed directly to the InterBase Server, however ... (using the database object's executeSQL() method, or the SQLExec() function).
It is necessary, if using either the design surface or local SQL to create tables, to activate the database in the IDE. There are two ways to do this. The first is to click on the "Tables" tab in the navigator, and in the "Look In" combobox, you will see a Database icon, with the name of your database (this assumes you have created the BDE Alias noted elsewhere in this document). The other is to type in the command window:
OPEN DATABASE yourbdealiasname
In either case, doing so will ask for userid and password to login to the database.
It is a good idea, once the database is open, particularly if you use the "OPEN DATABASE" command, to also use the "SET DATABASE" command to point to your alias -- if you do this, then you do not need a database reference for your table when using local SQL to open the tables.
Once the database is open, any table you create will default to being in that database, and in that database format.
VERY IMPORTANT NOTE: If you exit dBASE without closing the database, the next time you start dBASE up it will attempt to open the database again (and in the case of InterBase, it will ask for a username/password). Before you exit, you should close the database (in the command window: CLOSE DATABASE).
At this point, you can create a table using the design surface in the usual manner -- either by using the "Tables" tab of the Navigator and double-clicking the "Untitled" table icon (note that the appearance of the icon is a bit different than it is when using local tables), or by entering in the Command Window the command:
CREATE tablename
When you do this, the table designer will come up, but notice that the possible field types are different from what you are used to, and if you look at the Inspector, the options allowed are different. (See discussion on field types below.)
Note that while you can create indexes here, for whatever reason, they will not appear in the Index column like they do with local DBF and DB tables.
You can also use local SQL commands to create and modify tables. For example, to create a table called "Employees", you could type the following in the Command Window:
    OPEN DATABASE testdata
    SET DATABASE TO testdata
    CREATE TABLE employee ( EmpNo INTEGER( 4 ), ;
       LastName VARCHAR( 25 ), FirstName VARCHAR( 20 ), Department CHAR( 20 ), ;
       PRIMARY KEY (EmpNo) )
The CREATE TABLE statement would be typed as one line with the semicolon at the end of each line removed ...
By using the SET DATABASE command, dBASE will assume that all work done until told otherwise will be in the database specified. This can make things a bit easier as you won't have to specify the database as part of the command each time ... Note that all local SQL commands will respect this setting (ALTER TABLE, etc.). If you leave this command out, you would have to add to your table references the database reference, i.e., CREATE TABLE :testdata:employee ...
Other SQL commands will work as well, such as ALTER TABLE, UPDATE, INSERT INTO, SELECT and so on ...
To Create a Table Using OODML Objects
In a program, you can use the local SQL commands as shown above, or you can use the database object and the executeSQL() method. An example of creating a table using the database object is given below.
First create an instance of a database object:
   d = new Database()
   d.databaseName := "BDEALIAS" // whatever your alias is, i.e., "testdata"
   d.loginString  := "SYSDBA/masterkey"
   d.share        := 1 // All -- this is discussed later
   d.active       := true
(Note: you do not have to use the loginString property -- but doing so means that the login screen does not come up -- it is a simple way to bypass it ... for your users you may or may not wish to use this property, depending on your application design. You may need your users to log in ...)
To create a table, you could try to stuff a huge long "create table" string into a call to the method, or you could build the string (as below) into a memory variable, and pass the variable to the method -- this is probably easier to see, at least programmatically (but it works fine either way):
   cTable = "CREATE TABLE employee (   " +;
            " EmpNo INTEGER( 4 ),      " +;
            " LastName VARCHAR( 25 ),  " +;
            " FirstName VARCHAR( 20 ), " +;
            " Department CHAR( 20 ),   " +;
            " PRIMARY KEY (EmpNo) )"
To actually create the table, now that you have your string, you would use:
d.executeSQL( cTable )
How do you know it worked? Look in the Navigator -- you should see your new table under the "Tables" tab. If not, make sure the Navigator has focus, and go to the "View" menu, and select "Refresh".
If the table does not appear, something is wrong. If you did not get an error message, something is very wrong ...
You may want to note that the icon in the Navigator for the table is different than it is for local tables ...
|
.DBF
Field
|
InterBase
Field
|
|---|---|
|
Character
|
CHAR/VARCHAR
|
|
Numeric
|
NUMERIC/DECIMAL
|
|
Memo
|
TEXT
BLOB
|
|
Logical
|
NUMERIC,
CHAR or VARCHAR
|
|
Date
|
DATE
|
|
TimeStamp
|
DATE
|
|
Float
|
FLOAT
|
|
OLE
|
BLOB
|
|
Binary
|
BLOB
|
|
Long
|
INTEGER
|
|
Double
|
DOUBLE
|
|
AutoIncrement
|
INTEGER
with GENERATOR/TRIGGER (see below)
|
And going the other direction ...
|
InterBase
Field
|
.DBF
Field
|
|---|---|
|
INTEGER
|
Long
|
|
SMALLINT
|
Long
|
|
FLOAT
|
Float
|
|
DOUBLE(precision,scale)
|
Double(n,n2)
|
|
DECIMAL(precision,scale)
|
Numeric(n,n2)
|
|
NUMERIC(precision,scale)
|
Numeric(n,n2)
|
|
CHAR(n)
|
Character(n)
|
|
VARCHAR(n)
|
Character(n)
|
|
DATE
|
TimeStamp
|
|
BLOB
|
Binary
|
|
TEXT
BLOB
|
Memo
|
Note that there appears to be a bug in the table designer, in that it shows "LONG" as a valid field type, but InterBase actually uses "INTEGER". If you use the table designer, it will allow you to create a field with a "LONG" field type. Viewing the table MetaData in ISQL, it correctly shows as an "INTEGER" type.
Notes on field types:
Field Options
When creating tables there are some features you may wish to use:
NOT NULL
This ensures that a field is not empty -- if you attempt to save a row into
a table that has a field marked as "NOT NULL" in the definition, an error will
occur and you will not be allowed to save the row until the field contains a
value other than NULL.
Example:
    CREATE TABLE :testdata:employee ( ;
       EmpNo SMALLINT( 4 ) NOT NULL PRIMARY KEY, ;
       LastName VARCHAR( 25 ) NOT NULL, ;
       FirstName VARCHAR( 20 ) NOT NULL, ;
       Department CHAR( 20 ) NOT NULL )
DEFAULT
The default option can be used to set default values for fields in a table.
You can use the following, for example:
| NUMERIC | any numeric value, such as zero |
| CHAR/VARCHAR | any character value, including "" |
| DATE | any literal date --
as a character string, in US date format: "04/15/1999" = April 26, 1999 |
Example:
   CREATE TABLE :testdata:Employees ( EmpNo INTEGER,;
               LastName VARCHAR(25) DEFAULT "" NOT NULL,;
               FirstName VARCHAR(20) DEFAULT "" NOT NULL )
Lookups and Relationships
Lookups can be done using the FOREIGN KEY option. See InterBase's online help
for details on this. (You can also use the lookupSQL feature in dBASE, but using
the FOREIGN KEY option gives the advantage that it is defined at the server,
and if accessed from another software package it will still work ...) Note that
using FOREIGN KEY causes the InterBase server to enforce referential integrity
-- you cannot add a child row without a corresponding parent, and you cannot
delete a parent row that has child records, etc. Also in order to use a FOREIGN
KEY you will need a PRIMARY KEY in the child table.
Primary Key
It is suggested you always define a Primary Key for your tables. This ensures
that you have a unique value that can be used to find a specific row. This unique
key can be defined with a generator (see elsewhere in this document) or some
other value ...
Indexes
Indexes in InterBase do not work the same as they do with DBF7 tables. You can
combine fields into an index expression, but you cannot use dBASE functions
to affect your index expressions, as the InterBase server doesn't know what
these functions are. In addition, you cannot use InterBase functions in your
index expressions either.
NOTE: If you are used to using SEEKER.CC (which ships with Visual dBASE 7), it appears that in order to use it, you will have to do some extra work. The reason is that you cannot have case-insensitive indexes in InterBase without this extra work.See below -- section on case-insensitive indexes.
There are also some SQL commands for working with indexes, such as CREATE INDEX, ALTER INDEX, and DROP INDEX that you can use. If you wish to use these, check the TUTORIAL help file that ships with InterBase.
In addition, there is an undocumented index class that can be used to create indexes in any table format, combined with the createIndex() method of the database class. Details on this can be found in the paper on Undocumented Features at the author's website.
In addition to the indexes however, you may want to remember that you can use ORDER BY (and have an updateable query with InterBase tables, which you can't with local .DBF or .DB tables), which allows you to effectively index "on the fly" ...
Case-Insensitive Indexes
It is possible to create case-insensitive indexes. This information comes from
a knowledgebase document from the MERS website (www.mers.com).
This technique uses what might be called a "shadow field" (the term comes from Ken Chan) -- it is a shadow of the original field, and the user never sees the contents of it. It is used programmatically only (this is a hint -- you could let your users edit it, but that would defeat the purpose!).
For the purposes of a case-insensitive index, you would need a shadow field that was the same type and size as the field being shadowed. For example, if you wanted a case-insensitive index on the last name field, you would have a shadow field that matched the size and type of the last name field.
You would then need to create two triggers (there is more on triggers in the discussion on autoincrement fields) -- (one set for "BEFORE INSERT" for new rows, and one set for "BEFORE UPDATE" when updating rows) that store the upper case of the first field into the shadow field. Then you can create an index for the shadow field.
Code for this would look like:
   // this assumes your database object is established
   // the table exists, and the shadow field (LastShadow) has been
   // added to the table (ALTER TABLE) ...
   // This first trigger fires for a new row in the table:
   cTrigger1 = "CREATE TRIGGER FOR mytable BEFORE INSERT AS "+;
               "BEGIN new.LastShadow = UPPER(new.lastname); END"
   d.executeSQL( cTrigger1 )
   // The second trigger fires when updating the table ...
   cTrigger2 = "CREATE TRIGGER FOR mytable BEFORE UPDATE AS "+;
               "BEGIN new.LastShadow = UPPER(new.lastname); END"
   d.executeSQL( cTrigger2 )
   // This creates the index ... (undocumented feature of dBASE --
   // see paper at author's website on undocumented features)
   // if you examine the index object in the inspector you will
   // see the "caseSensitive" property -- this will be ignored
   // for InterBase tables ...
   i = new Index()
   i.indexName  := "LastShadow"  // name of the index
   i.fields     := "LastShadow"  // field name(s)
   d.createIndex( "myTable", i ) // create it
Of course, if you needed your index to be on multiple fields, this would be a way to do that as well (you can combine fields in InterBase indexes, but not using the UPPER() function or other string functions). You would need to be sure that your shadow field was big enough for the largest possible combination of the fields (i.e., last name and first name), and in the trigger you could combine "upper( new.lastname ) + upper( new.firstname )".
A Thought: Come to think of it, while there is the tradeoff mentioned below, this may be a solution to many concerns about complex indexes that can be created in .DBFs ... You could do things with dates to ensure that they sorted the way you needed, numerics, other calculations and such ... by using "Shadow Fields" and indexes on these Shadow fields.I imagine, however, that if you have a LOT of triggers in your table to generate these, that you may be slowing down the InterBase server a bit ...
The biggest drawback here of course is the size of your table -- you are adding a new field that will be containing data that exists in another field, duplicating data. However, if you need to have case insensitive searches (something many dBASE developers and their users have gotten quite used to ...), then you may just have to trade-off the disk space for this new field.
AutoIncrement Fields
with Generators and Triggers
To create a unique number generator in the database (i.e., an autoincrement
field), use the CREATE GENERATOR statement. CREATE GENERATOR declares a generator
to the database and sets its starting value to zero (the default). If you want
to set the starting value for the generator to a number other than zero, use
SET GENERATOR to specify the new value. (Note that this is part one -- see
discussion below on Triggers as well - creating the generator does not cause
it to automatically increment ...)
Local SQL does not understand the commands to create generators and/or modify them, so you will need to pass them on through the dBASE SQLExec() function (or the database object's executeSQL() method) -- this function (or method) passes SQL statements directly to the database server, in this case, the InterBase server, bypassing the Borland Database Engine (BDE) and local SQL. (The other way to do this is to use the InterBase ISQL Window.)
   // assumes "OPEN DATABASE databaseName" has occurred
   SQLExec( "CREATE GENERATOR EMPNO_GEN" )
In addition, as noted previously, there is a SET GENERATOR command that can be used to set the "current" value for the generator (i.e., if you want the next value to be 10, you would use SET GENERATOR >generatorname< TO 9 ). Note that generators default to starting at zero (the first number generated would then be 1).
Once you have created a generator, you then need to have a way to call the GEN_ID() function in InterBase, which will actually increment the value.
A trigger is used to define an event similar to an OODML event, which will fire at a specific point, such as before a new row is added to a table (BEFORE INSERT). (There is a lot more detail in the InterBase documentation on these ...)
An example would be to create a trigger to actually increment the generator EMPNO_GEN:
   // assumes "OPEN DATABASE databaseName" has occurred
   // and that the generator "empno_gen" has been created
   // "create_empno" is the trigger
   // "employees" is the table
   // "new.empno" refers to the empno field in a new row
   // "empno_gen" is the generator created with
   //    the CREATE GENERATOR command.
   // (code sample courtesy of Bowen Moursund)
   SQLExec( "CREATE TRIGGER create_empno FOR employees "+;
            "ACTIVE BEFORE INSERT POSITION 0 "+;
            "AS BEGIN new.empno = GEN_ID(empno_gen, 1); END" )
You can also create the generator and trigger using a database object. The following will create a customer table, a generator (default at zero, which would mean the first value will be '1'), and a trigger, all using a database object:
   d = new Database()
   d.databaseName := "TESTDATA"
   d.loginString  := "SYSDBA/masterkey"
   d.share        := 1 // All
   d.active       := true

   // define table in a character variable
   cTableCreate = "CREATE TABLE Customer("+;
                  "CustNo INTEGER NOT NULL PRIMARY KEY,"+;
                  "LastName varChar(20) NOT NULL, "+;
                  "FirstName varChar(20) NOT NULL)"
   // execute command defined in character variable
   d.executeSQL( cTableCreate )

   // create a generator in the same fasion
   cGenCreate = "CREATE GENERATOR next_cust"
   d.executeSQL( cGenCreate )

   // this is where you could set the generator
   // to a larger value than the default:
   // cGenSet = "SET GENERATOR next_cust TO 150" // next value would be 151
   // d.executeSQL( cGenSet )

   // create trigger for generator
   cTriggerCreate = "CREATE TRIGGER create_cust FOR Customer "+;
            "ACTIVE BEFORE INSERT POSITION 0 "+;
            "AS BEGIN new.CustNo = GEN_ID(next_cust, 1); END"
   d.executeSQL( cTriggerCreate )

   // deactivate database object
   d.active := false
   release object d
A trigger created with "BEFORE INSERT" for a generator will act just like the autoincrement field does in dBASE -- the value will not appear on a form (if you have an entryfield datalinked to it) until the row is saved to the table.
An important note: The field type for a Generator is (usually) an INTEGER and, as such, is an editable field. If you have not defined the field as a primary key, or a unique key in an index, you can get duplicate values and no error will be generated. It is strongly recommended that you NEVER allow users to edit the field.Development philosophies will differ. One says that the user should never even know that this value exists, so you wouldn't even display it on a form. Another says you can display it, but as noted they shouldn't be able to edit it ...
Using the form objects, you can disable an entryfield if you must allow the user to see the value, and you can probably disallow the user from accessing the data in other ways (note that the DBFField object's readOnly property is not a property of the FIELD object nor the SQLFIELD object, so it is not available in this situation ...).
Caveat
If you have a set of relational tables, i.e., parent/child, etc., normally you
cannot save a parent row without a child row -- however, to do this you must
have a value to link the child row to the parent -- you will find yourself in
a logical bind here:
Pretty nasty prediciment ... one solution is to use a Stored Procedure instead of the trigger. The Stored Procedure would be called in such a way that when you go to save the parent row, a child row is created, the value of the generator is grabbed and stuffed into the child row's linking field, as well as into the parent row's linking field, and both rows are saved ... I do not have an example of this handy, but perhaps someone out there will provide something at some point in the future ...
Another way around this would be to do all the code locally using the canSave event of the parent rowset to do the same sort of thing, except that you would not be using the generator, but your own local code to simulate an autoincrement field. Of course, this has the disadvantage that the autoincrementing will not occur if someone uses the tables from a different software package, rather than your application ... (there is an example of this kind of code in the HOW TO document MISCCODE.ZIP -- see the section on adding a parent to a parent/child relationship ...).
You should consider using datamodules, as they will simplify matters quite a bit.
You must have a database object. If you are using local .DBFs or .DB tables in dBASE, it is not required that you use a database object (or a BDE Alias) although it is recommended, now you must use one.
Suggestions:
After you have your datamodules set up, you can use these like you normally would. Place the datamodule on a form in the form designer (or a report ...) and there is your table (or tables).
There are, of course, some differences. Due to the nature of remote databases (or perhaps due to the nature of DBF7 tables), certain functionality in the rowset object does not work with remote tables (this functionality was designed for DBF7 tables in most cases ...):
Using the query object's masterSource is pretty easy -- assume the following (this is based on Alan Katz' paper):
parent rowset, Customer has a "CustNo" field
child rowset, Invoices, has a "CustomerNumber" field
The two tables are linked on these fields.
In the child rowset, set the following (this assumes you are using the datamodule or form/report designer and are working with the inspector, and both queries are on the design surface):
With these settings, each time the row pointer moves in the customer (parent) query, the child (invoices) query will substitute the value of the customer's "CustNo" into the parameter (:CustNo) in the SQL statement, and you will get a new set of rows to match. The rest of the processing is completely automatic.
There are some advantages to using InterBase:
Upscaling An Existing Visual dBASE Application to InterBase
There are some rules you need to apply when doing this. See also the section below on moving data from local tables ...
If you do wish to require a login, then you may wish to examine some of the code in the sample application that comes with this HOW TO -- it allows the current user to change their own password, and also has some administrator functionality (add, delete, modify users, groups ...).
Note: if your table contains images in a binary field, these will not translate across in any of the methods shown below. Of course, if someone can show me a way to make it work, I'd appreciate it, but to date, neither Gary White or I have been able to get this to work ...
UPDATESET
The UpdateSet class in Visual dBASE 7 allows you to, among other capabilities, copy data from one table format to another.
Let's assume that you want to copy the FISH table (a .DBF) from the SAMPLES database to an InterBase table in a TESTDATA database.
The code to do this would look like:
   dSample = new Database()
   dSample.databaseName := "VDBSAMPLE"
   dSample.active       := true
   qFish   = new Query()
   qFish.database       := dSample
   qFish.sql            := "select * from fish"
   qFish.active         := true

   OPEN DATABASE TESTDATA
   // requires you to login ...

   u = new UpdateSet()
   u.source := qFish.rowset
   u.destination := ":TESTDATA:Fish"
   u.copy()

   // cleanup
   close database testdata
   qFish.active   := false
   dSample.active := false
   release object dSample, qFish, u
The UpdateSet object in the sample code shown would attempt to create the new table, matching field types as best it can. One drawback is that the UpdateSet object will not copy any indexes that may be defined in the original table to the new location. You could use the (undocumented) tableDef class to get information about indexes, and then recreate them using local SQL commands (CREATE INDEX).
Another option would be to create the table with indexes in the InterBase database, and rather than using the copy() method, you could use the append() method -- this would attempt to store the data into the fields -- note that the fields must be in the same sequence in both tables, or you may end up with incorrect data in some of the fields, or worse, incorrect data (this is worse because it may, at first, look correct) ... NOTE: There may be a bug in the updateset object's append() method, where three rows do not get appended to the copy ...
More details on the UpdateSet class can be found in MISCCODE.ZIP and X2OODML.ZIP at the author's website.
CopyTable.PRG
A program created by Gary White, this program attempts to copy a table, its indexes, etc., from one table format to another. This program is based on earlier work by Ken Mayer, but is more flexible and powerful ... Check the dBASE Users Function Library Project (dUFLP) at the author's website for this program.
DATAPUMP
The Client/Server edition of Visual dBASE ships with a handy program that is stored with the BDE.
The program shows up in the BDE folder as the "Data Migration Wizard", but it was originally called the "Data Pump". The purpose is to move tables from one format to another.
It is pretty fast, and very smooth. It will handle most conversions with little effort on your part. You may want to experiment with it.
One caveat is that the Data Pump program wants to translate AutoIncrement fields in a .DBF to SMALLINT types in an InterBase table. If you try to change this to an INTEGER, the Data Pump will apparently show this as a LONG field type and then throw an exception (i.e., it stops working). (Gary White discovered this ...) In addition, as you need a generator and a trigger to make the autoincrement to work in an InterBase table, and the Data Pump won't create those for you. You will need to go back and add them yourself. What you may want to do in this case is:
Not a perfect solution, but certainly do-able.
The default username is: SYSDBA with a default password of "masterkey". The manual recommends changing this password as soon as possible ... (see below on modifying a user).
The SYSDBA account is the database administrator account, and is the only user who can authorize new users, delete users, or modify user configurations.
You can create individual users, or you may wish to create a single user that would be used for a group of people (a department) or just an application-wide userid ...
The user table requires a user name and password, but you can also add a group id, or a full name for the user (as well as their user name ...).
When you add users, you must grant privileges to those users to modify or even to view data within a database (this must be done for specific databases). This must be done explicitly. However, you can use the PUBLIC user to grant default privileges to all users.
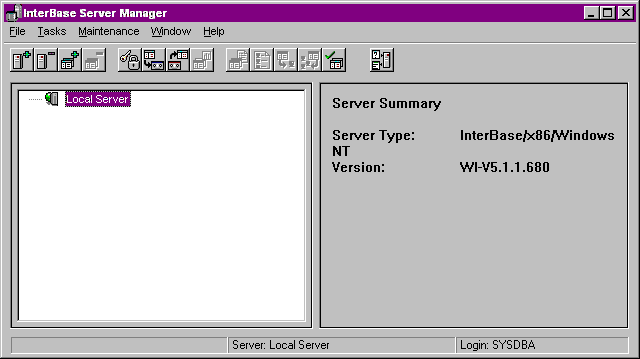
To use the Server Manager, the InterBase Server must be running. If it is not, double-click on the icon "InterBase Server" in the InterBase group.
Once you have the InterBase Server running, you can then run the "InterBase Server Manager".
You need to log in by using either the toolbutton for this, or the file menu. Enter the SYSDBA userid with the "masterkey" password.
Once you do that, the server manager should look like:
To add users, use the "Tasks" menu, and "User Security". This will give a screen like:
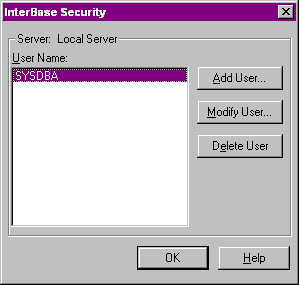
Selecting the option to add or modify a user will give a screen like:
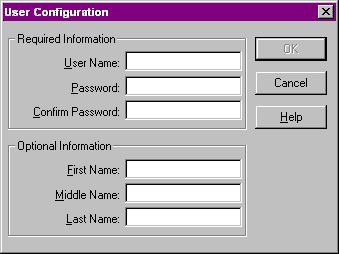
Enter the required information (the password must be entered twice), and the optional only if you wish to. This is how you change a password, and (as noted elsewhere) you should change the default password for SYSDBA.
There is undoubtedly more that can be done. I did some attempts to deal with creating a programmatic interface to the userid database, but it appears that InterBase encrypts the password (understandably) but as I don't know the algorithm used, the password cannot be deciphered, or created, from a dBASE front-end ...
Not having a full license myself (only the 5-user license that comes with the version on the Visual dBASE CD), I have not been able to determine how this works.
If a reader does find this out, I'd appreciate hearing about it. (In detail, so that instructions can be provided to others ...)
It is completely possible that you may just need to deploy using an InterBase designed deployer ... this may be able to give you some control over startup options and such as well.
INTERBAS.INI
In the Windows directory (or folder, if you prefer) there is a .INI file used
by the InterBase ISQL Window. This stores a list of the InterBase databases
you have created. Even if you drop a database (delete it), the database will
still be listed here. If you are trying to work with databases using the ISQL
Window and look in the drop-down list of available databases, you will see all
previous databases even if they do not exist any longer.
You may wish to open this file up in Notepad or WordPad (or even the Visual dBASE Source Editor) and remove any references to databases you do not actually have on your system ...
Deleting a Generator
According to the InterBase specifications, once defined, a generator cannot
be deleted. However, Gary White has discovered, "Actually, you can delete
a generator. You just have to cheat a little. <g> If you go to "Desktop
Properties" in VdB and check to display system tables, you'll see a bunch of
tables with "RDB$
To see it in action, simply run the START program.
As a further explanation, the author, and others who helped with this document, learned how to do all this "on the fly", while writing and testing, and experimenting to find out how it all worked, in order to explain it to you, the reader. What this means is, none of us are experts here -- there may be "better (faster, more efficient, etc.) ways" to do some of what is shown. However, what is shown does work ...
There is quite a bit of documentation for InterBase that gets installed when you install InterBase itself. In the InterBase "BIN" directory you will find "tutorial.hlp" -- a standard Windows Help file (you should be able to double-click it to get it to start), and there are other documents in .PDF (Acrobat Reader) file format that you can read, or print (although some of these are very large).
In addition, InterBase has a set of newsgroups (MERS) that can be accessed at: news.mers.com -- information can be found on these newsgroups at http://www.mers.com/newsgroups.html. If you post a question, be sure to provide information about which version of InterBase, which version of the BDE, and the fact that you're using Visual dBASE to communicate with it.
InterBase also has a knowledgebase at their web site: http://www.interbase.com.
In addition to the InterBase manuals, a good resource on SQL is this book (it is not cheap, but few computer references are these days): Understanding the New SQL: A Complete Guide, by Jim Melton and Alan R. Simon, Morgan Kaufmann Publishers, San Francisco, 1993, ISBN: 1-55860-245-3. The examples are refreshingly clear and easy to understand, and the writing style is good.
As usual, many thanks go to Gary White (also a member of dBVIPS) for editing and helping me find information ... this was a major learning experience for both of us ... I'm surprised either of us has an hair left. <grin>
DISCLAIMER: the author is a member of dBVIPS (dBASE Volunteer Internet Peer Support) -- a group of volunteers who provide technical support for dBASE, Inc. on the Visual dBASE newsgroups (news.dbase2000.com). If you have questions regarding this .HOW document, or about Visual dBASE you can communicate directly with the author and dBVIPS in the appropriate newsgroups on the internet. Technical support is not currently provided by private E-Mail by members of dBVIPS..HOW files are created as a free service by members of dBVIPS to help users learn to use Visual dBASE more effectively. They are edited by both dBVIPS members and dBASE, Inc. Technical Support (to ensure quality). This .HOW file MAY NOT BE POSTED ELSEWHERE without the explicit permission of the author, who retains all rights to the document.
Copyright 1999, Kenneth J. Mayer. All rights reserved.
Information about dBASE, Inc. can be found at:
http://www.dbase.com
EoHT: InterBase.HTM -- April 26, 1999 -- KJM