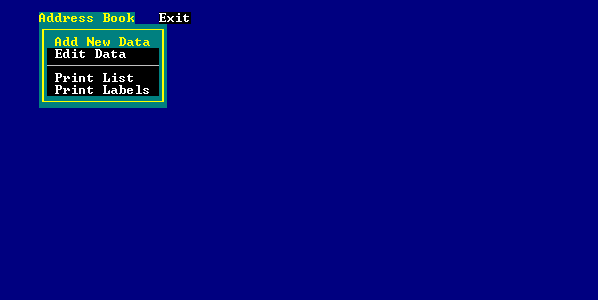
Figure 1: A simple dBASE IV menu
NOTE: This document was originally created for conversion from dBASE IV applications to dBASE 5.0 for Windows. It was presented at a Borland Conference (BDC 6, August, 1995) ... Since then the author basically forgot all about it until recently. It has been dug up, dusted off, and some very minor changes made throughout, including converting it to HTML, and changing references from dBASE for Windows to Visual dBASE. Code and data used in this document's examples is found in Code.Zip.
Overview
One of the more common questions that comes up when providing technical
assistance to new users of Visual dBASE is: "I have an application written in dBASE IV,
and want to convert it to Visual dBASE -- how do I do this?" The most basic answer is,
"You can run your application 'as is', but it will look and act like a DOS application
running in a Window." Any answer beyond that requires a lot more detail.
The purpose of this paper is to address some of those details, and to assist users and developers of dBASE/DOS applications in the process of converting an application to the Visual dBASE (and the Windows) world. It is not possible in one single paper to cover every single aspect of conversion (and of course, the more complicated the original application is, the more details will be involved in conversion). The Windows world is a completely new and, in some ways, frightening world to a DOS developer (of any software). There are a lot of new concepts to learn, and frankly, to really do a proper conversion, some concepts to unlearn.
This article will examine a pretty basic application -- an address list (one of the more common applications for any database software) written in dBASE IV, and how to make the same application run properly in Visual dBASE. (The examples of dBASE IV code shown are meant as very basic examples!)
Disclaimer
There are a lot of spiffy programming techniques that will be ignored in this article,
due to space constraints. The idea of this paper is to make a basic dBASE IV application
run pretty much the same in Windows as it does in DOS, but also to make it look
like a Windows application. This can then be a stepping stone to moving into the
Windows-based application world. This is what might be called "Single Document
Interface" (SDI).
Terminology
Visual dBASE uses some new terminology. These new terms will be defined in boxes
scattered throughout this paper.
As stated previously, this paper will discuss an actual conversion of a dBASE IV application. I will start with the basics, and examine the processing I took to do the conversion of this system.
| Sessions: Briefly, Sessions allow you to open a table (or query) in multiple instances -- this is really spiffy -- as a dBASE/DOS developer, it's also very confusing, and until you're more familiar with Visual dBASE, turn it off (in the Properties menu for Visual dBASE)! |
The following is a suggested sequence to follow in performing a conversion of this nature:
For a simple table, most systems will need to be able to:
All-in-all, a pretty basic system.
The Menu
Any normal, "user-friendly" application includes a menu, so we will assume a menu using the dBASE IV menu commands. For an application this simple, I might create a menu like that shown in figure 1:
To create a menu in Visual dBASE, we must call up the menu generator. Menus are attached to forms, which will make life a bit more interesting as well. In Visual dBASE's Command Window, you can create a menu by typing:
CREATE MENU MAIN
| Form: A form is sort of like a dBASE IV �screen� or �window�. It is the main interface object used to display data, create dialog boxes, and so on. |
The "Menu Designer" form is where you will layout the actual menu. The Menu Designer form allows you to enter the prompts that will appear in the actual menu. Figure 2 contains a partially completed menu.
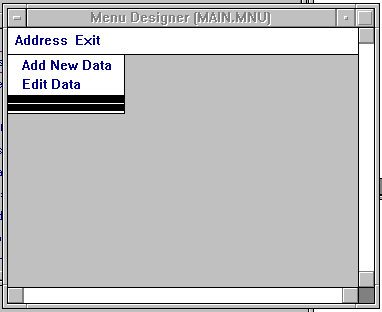
To add menu items to the right of your first menu, press the <tab> key, to move back and forth (left and right) in the menu here, use the <tab> and <shift>+<Tab> keys. To enter text, just type in the appropriate location. (For example, to type the word "Exit" in the appropriate location, use the <tab> key to move right, and type "Exit".)
To add menu items under a menu, use the down (and up) arrow keys, and type the description you wish to appear for the menu item.
In this figure, you can see a few of the items placed under the address menu. Note the separator line. To do this, we need to examine the Inspector dialog (figure 3).
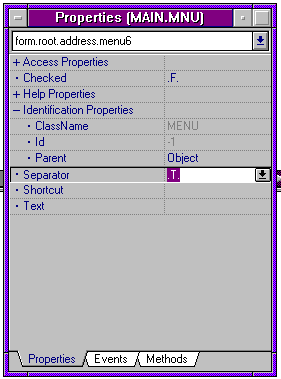
Notice that the separator property for this menu item is set to ".T." -- at this point, most of the other properties are simply ignored. (A separator line breaks parts of the menu up.)
The menu can be saved, when done, to a file (<Ctrl>+<End> works great to save it and exit). To add the code to execute specific routines when the user clicks on a menu item, you can edit the menu (MODI MENU MAIN) or actually directly edit the code (MODIFY COMMAND MENU.MNU) -- in either case, Visual dBASE can handle the changes (this is called "two-way code").
| Event: An event is triggered by an action associated with an object. The event may be something such as clicking the mouse on an object (OnGotFocus), or double-clicking the left mouse button on the form (OnLeftDblClick), or changing a value of an entryfield (OnChange). Often the event will cause a procedure of code to execute, or perhaps a codeblock. |
The code created by the menu generator, looks like the that contained in the file "MENU.WFM" on the code disk (this is the complete menu, except that the "OnClick" events have not been set for any of the menu items yet).
To make this useful, I need to attach it to a form -- this form will be a full-screen (or maximized) form, and anything else we do (including the data entry/edit form) will be placed on top of it. I will also wish to add calls to the OnClick event for each of the menu items -- but to do that, I need to know how we will call them, so I will come back to this.
One method to ensure that this menu will be the main menu for our system, is to use a program as a "front-end" that defines a simple form (one with nothing on it) and maximizes the form (so it covers the screen). This may or may not be the best method, but it is the one I'm using here (Code Sample 1).
Code Sample 1
*---------------------------------------------------
*-- Program...: MAIN.PRG
*---------------------------------------------------
*-- save the environment and reset it
cTalk = set("TALK")
set talk off
cStat = set("STATUS")
set stat off
cBell = set("BELL")
set bell off
cDel  = set("DELETED")
set deleted on

*-- define the form:
fMain = new form()              && create a new form
fMain.Left        = 1           && left at 1
fMain.Top         = 0           && top at 0
fMain.Text        = "Ken's Address Book"
fMain.MenuFile    = "MAIN.MNU"  && menu we created
fMain.MDI         = .f.    && not "Multiple Document
                           && Interface" form
fMain.OnOpen      = {;fMain.WindowState = 2}
                           && When we open, maximize
                           && the form! Note the use
                           && of a codeblock ...
fMain.ReadModal()          && open form and suspend
                           && this program until
                           && it's closed.

*-- when the form closes, we will continue here:
set talk &cTalk.
set stat &cStat.
set bell &cBell.
set deleted &cDel.

*---------------------------------------------------
*-- End of Program: MAIN.PRG
*---------------------------------------------------
Running this program will give me the following figure (figure 4) -- since no code is attached to the menu, the only way to close the form is to use the system-menu box in the upper left corner, and either double-click on it with the mouse, or select the "Close" menu item:
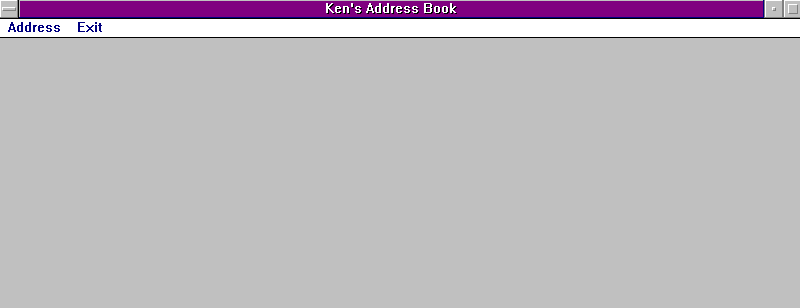
This screen appears to display a maximized form in Visual dBASE that overlays the dBASE screen. (This is not exactly what's happening, appearances can be deceiving.) I will come back to the menu once I have determined how we will call the screen and reports.
Screen Form
The dBASE IV system being converted uses a simple screen generated with the dBASE IV built-in generator. This is what is sometimes called a "format file". For the purposes of this article, this was kept simple, and looks like what is shown in figure 5 (this shows the form being called in APPEND mode):
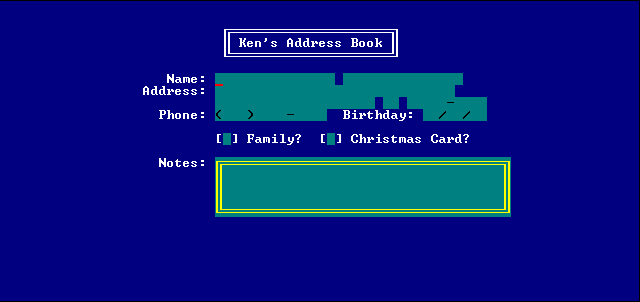
A couple of quick notes -- the phone field uses a picture clause of "@R (999) 999-9999" - which means that the phone is stored in the table without the literals (the parenthesis, space, and dash). The Zip code uses a similar layout (the dash doesn't get stored as part of the number), and the memo field "Notes" is shown using a memo window. All the rest of this is very basic.
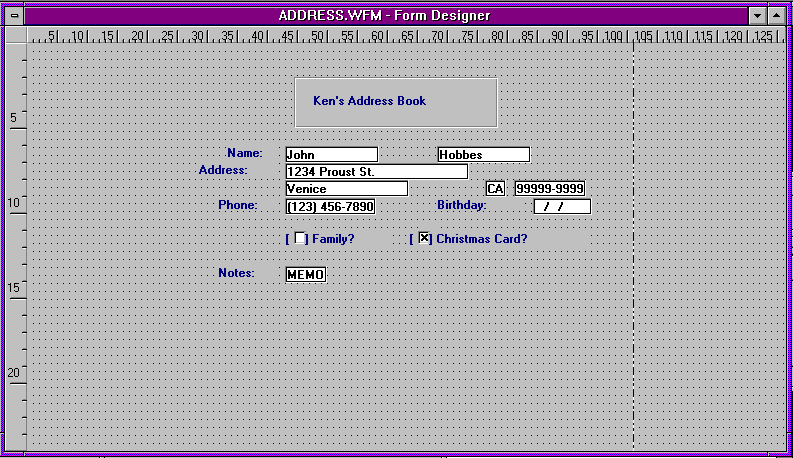
To convert an application, a special program has been provided, called "The Component Builder" -- while not perfect, it can make the basic translation easier. I used this to convert this form (ADDRESS.FMT) to a Visual dBASE form (ADDRESS.WFM).
To call the Component Builder, load Visual dBASE, and execute the command (by typing the following in the command window):
DO \VISUALDB\UTILS\CB
(If you installed Visual dBASE in a different location, make sure you use the correct path!)
This will start up the Component Builder. To actually execute a translation, select the File menu. The first option in the File menu is "FMT to WFM ...". When you select this, you will get a series of prompts/screens -- select the format file you wish to convert (in this case I used ADDRESS.FMT), open the appropriate table when asked (again, ADDRESS.DBF), and you will be asked for the name of the .WFM to generate -- I used ADDRESS.WFM (keeping to the theme, as it were).
The form that appears has various values showing what is happening in the conversion process. The numbers will update, and when it is completed, the button changes text to "Ok". Selecting the "Ok" button will take you back to the Component Builder. If you shut down the CB (File | Exit), you can then bring up the new form (ADDRESS.WFM) in the form designer, and see what I got (figure 6).
(To get to the modify mode for a form, there are several ways -- I generally simply type in the Command Window: MODIFY FORM formname -- so to get this, I typed: MODIFY FORM ADDRESS. You can also click (once) on the icon for "Forms" in the navigator window, and then click (once) on the form you wish, and either right-click with the mouse and select "Modify" from the menu that appears, or use the modify button on the button bar at the top of the screen.)
A couple of things to note -- the border I placed in the original screen (around the text "Ken's Address Book") was duplicated in a more Windows like fashion (using a rectangle object), the fields were all placed on the form using "EntryFields", except for the logicals, which were placed on the form using "CheckBoxes", and note that the memo "Notes" is not showing a window. We can tinker a lot with the form -- the forms designer in Visual dBASE allows you to drag-and-drop objects anywhere you want, and sometimes it's a good idea to clean the objects up. The following is a step-by-step of what I did to get the form shown in figure 7:
| Object: An object is a single entity that can be referenced in several different fashions. An object may be a text object on a form, a menu object in a menu, and so on. Each object may have a variety of properties and events, depending on what kind of object it is. In reality, dBASE IV actually uses objects (although they certainly aren't objects in the same fashion as those in Visual dBASE) -- if you consider a POPUP (in dBASE IV), for example, it is an object, with a set of properties (the BARS, it's location on the screen, and so on), and some events (ON SELECTION POPUP ...). |
| Property: Properties are the method used to define an object or to define the object's behavior. Some properties include coordinates on a form (top, left, height, width), some define the appearance of the object (colornormal, font) others include behavior of the object (enabled). |
A bit more tinkering (moving things here and there) and it was done. I finally ended up with a screen like that in figure 7:
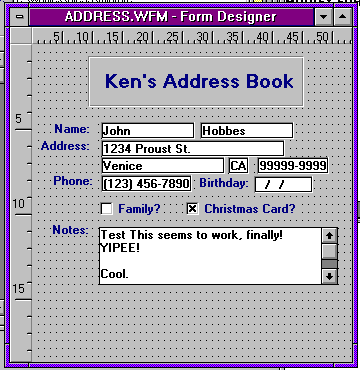
Of course, I'm not really done with this, but if you look at it, you'll see that it's a lot cleaner and neater looking than the original created by the CB, and it wasn't all that difficult. Also notice that you're seeing the data "as is" for the first record in the table. This is really handy -- as you add fields or modify their appearance and such in the forms designer, you're seeing the data as it will appear in the form when it's running!
In addition, Visual dBASE's Forms Designer uses what is called "Two-Way Tools" -- what this means is that dBASE generates a file called ADDRESS.WFM -- this is a dBASE program. If you make changes in the form file, the changes are reflected in the Forms Designer! This is a vast improvement over the way this works in dBASE IV -- if you change the .FMT file, dBASE IV does not reflect those changes in the forms generator, because the actual description of the form is not in the .FMT, but in a different file altogether.
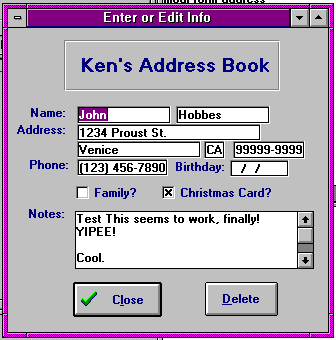
I'm going to add a couple of buttons to this form, just to make it a bit more useful (while still keeping the DOS feel to the form, in general).
CUSTOM CONTROLS
| Class: A �class� is a sort of super-object. A class may contain many objects. A menu is a class, as is a form. A menu may contain menu objects. A form may contain a variety of objects, from Text objects, to RadioButton objects (which are also classes, in and of themselves, predefined in Visual dBASE for you). Each of these may also include procedures and functions. Classes can use or �call� other classes as well. |
Visual dBASE allows you to design your own custom controls, such as special buttons, and even comes with some built-in (BUTTONS.CC is a "Custom Class" file, containing some pre-designed buttons that you can use with a form -- we will use some of those on this form).
The button I really need to have is one that allows the user to say "I'm done", so I want a "Close" button. I could have a "Cancel" button, but I'll leave that to you (in order to deal with a Cancel button, I would need to make some changes in processing that get too involved for this paper). And I'll add a delete button, but this isn't in the Custom Controls, so I will need to create it myself.
| Codeblock: A very small procedure executed by an event, placed in braces (i.e., {;form.close()}). |
To use the custom controls that come with Visual dBASE, all I had to do is go to the Control Palette while modifying the form, and click on the tab at the bottom that says "Custom". Double-clicking on a button will drop it on the form, and I can then move it, or resize it, as needed. The "Close" button has an event attached to it as part of the definition of the button, which will close the form that the button is attached to. Click on the EVENT tab in the property inspector. The first event in the list is "OnClick". You should see the following code block:
{;form.Close()}
To add a button that is not in the custom tab, I need to go back to the regular objects tab, and note that there is a "Pushbutton" object. Double-click on that. When we have this button on the form, and moved to where I want it (next to the OK button), changes are made through the property inspector. The text of the button needs to be changed to "Delete". I need to add some code for the OnClick event, but this one is more complicated than that of the Close Button above.
I need to ask the user if they really want to delete the current record. So, in the Event part of the property inspector, click on the "OnClick" event, and then click on the tool-button. This will open a window to enter (and edit) the procedure. Enter the following:
   if msgbox("Do you really want to delete this record?",;
             "Please Confirm!",36) = 6
      delete
      skip -1
      if bof()
         go top
      endif
   endif
The MsgBox() function, built in to Visual dBASE, calls a dialog box, and by passing it the right information in the third parameter, you can get a lot of combinations (you can find out more about this function, by typing (in the command window): HELP MSGBOX() ). In this case, I'm telling it to give us a "Yes/No" dialog box, with a question mark graphic on the left side. The value "6" is the number associated with the "Yes" button. If the user clicks on the "Yes" button, the code inside the IF...ENDIF will be executed. If not, nothing will happen, and the user will return to the form. (The rest of the code deals with moving the record pointer off the deleted record, and dealing with accidentally hitting the "beginning of file" mark.)
Now that I have the form, I can actually run it in a couple of ways. The first is to simply click on the button at the top of the screen that looks like a lightning bolt -- this is the "Run" button. The second is to save the form (<Ctrl>+<End>) and then type (in the command window): DO ADDRESS.WFM
In either case, we should see something like what is shown in figure 8.
It is quite possible to add other buttons (such as previous/next, and so on), but that is beyond the scope of this article.
There are a few more things I really ought to do, to make this function more like the program in dBASE IV. In the edit/modify mode for the form, I made the following changes:
The header is code that is placed above the line that says:
** End Header -- do not remove this line
local f
f = new addressform()
f.readmodal()
RETURN
| Modal: This refers to the way a form is opened on screen -- a Modal form
is one that requires that you deal with it before you can do any other processing -- this is pretty much the way
a dBASE IV application works -- you process a screen, or a dialog box, and only when you�re done do you
move on. We will be using Modal forms in this article, to simulate this behavior. Modeless: A Modeless form is much more of a �Windows� style form, in that you can work on one form, and jump to another, and come back to the original (a great example is using a Windows word processor, and having more than one document open at a time -- and being able to move back and forth between the two documents). The differences in coding between a Modal and a Modeless form are: the form's property of MDI (which defaults to True) is set to false for a modeless form, and the actual method of opening a form is different -- a Modeless form is opened with: formname.Open(). A Modal form is opened with: formname.ReadModal(). |
Finally, one more change to the form needs to be made. This is necessary to make the programs work the way I want them to (like a DOS program).
In the form designer, in the Inspector for the form, are a couple of properties you can set, which will make it all easier. (See figure 9.) The first attaches to the form a DesignView property, which means that as a developer, if you need to modify the form, you can, without any problems if the form's VIEW is blank (which is necessary for the programs to work properly ...).

Keystrokes to Move Around In the Form
In dBASE IV, moving from one field to another can be done with the <Enter> key, the <Tab> and <Shift><Tab> keys, and with the arrow keys (as well as the mouse). In Visual dBASE, the default behavior is similar, except for the <Enter> key. In most windows programs, pressing <Enter> selects the default pushbutton on a form, rather than accepting entry to a field.
In order to get Visual dBASE to act like dBASE IV in this way, I would need to add to my MAIN.PRG the commands:
cCUA = set("CUAENTER")
set CUAEnter OFF
And at the end (to reset this):
set CUAEnter &cCUA.
(CUA stands for Common User Access, an industry standard for interface design.)
The <Tab> and <Shift><Tab> keys, as well as the arrow and mouse, should work, in most cases. Using the <Enter> key (if CUAEnter is on) on a radiobutton or checkbox will select (or de-select in the case of checkboxes) the object that is active, the <Spacebar> will select/deselect that object if CUAENTER is set to "OFF". In an EDITOR object, once the editor becomes active, you can <Tab>/<Shift><Tab> or use the mouse to exit, but the <Enter> key will insert a CHR(13) into the text.
Now that I have a working form, I need to figure out how I want to call this form from the menu.
Adding a Record
The most simple method to add data is to create a simple program. This program
will allow me to enter new records to the table. The program will append a blank
record to the table, and call the form for me. When done, I will simply return to
the menu (the code could easily be placed inside a loop -- see the code later
in the article on editing). The program looks like the following:
Code Sample number 2
*---------------------------------------------------
*-- Program...: ADDNEW.PRG
*---------------------------------------------------
   use address
   append blank
   do address.wfm
   *-- is this a blank record?
   if isblank(address->first) .and. ;
      isblank(address->last)
      delete
   endif
   use
RETURN
This program simply opens the table, adds a blank record, and then runs the form. When I leave the form, the code after the statement "do address.wfm" is executed, in this case, checking for a blank record, and if blank, deleting it. Finally, I close the table and return to the menu.
This could, of course, be more complex (and the more you work with the software, the more complex your program is likely to end up ...).
Editing a Record
The program to edit a record actually gets a bit more complicated. The problem is in
handling a search routine. The best method to actually process a search, is to
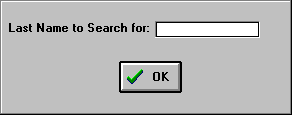
create a simple form that asks for a key field in the table, such as, in this case,
the last name of someone in the address book. Once I have moved the record pointer,
I can then edit the record by simply calling the screen.
This means we need to create a new form, with code to handle a search. Rather than go into all the details, the form is shown in figure 10. The form simply uses a memory variable (cSearch), and accepts the input -- the program (EDITREC.PRG) performs the search, and calls the SEARCH.WFM. If a match is found, the program then calls the address form. If the value of "cSearch" is blank (using the IsBlank() function in dBASE), we simply RETURN.
The program EDITREC.PRG (on the code disk) actually does all the work for the search. I could have coded the search routine into the SEARCH.WFM, but sometimes it's easier to do the coding in a calling program.
As mentioned at the beginning of the article, this is pretty basic. I might want to allow the user to navigate through a table, and so on -- that's discussion for another article.
Other Methods to Create Forms
While I used the Component Builder to build a Windows version of our .FMT file,
there are a couple of other ways I could have done this. The first is to use
the Visual dBASE expert to generate the form. If you type in the command window:
CREATE FORM MyForm an expert will appear. The advantage to this is that the
expert can do a lot of the layout for you. The disadvantage is that you may get
colors and objects you didn't expect (although the expert allows a lot of
customization ...).
The other method is to create your own form from scratch. This can be done the same way as using the expert (CREATE FORM MyForm) but instead of allowing the expert to kick in (the first screen when you create a form) you can tell it to create a blank form. From there, it's all up to you. This can be a lot of fun.
When working with the forms designer, there are a few things you should be aware of -- these can be quite confusing at first.
You can place code in the HEADER of a form, but the code will not be seen when using the Forms Designer. You can place code inside the CLASS/ENDCLASS construct, but be careful -- it should probably be outside of all of the DEFINE statements -- otherwise it might get erased when the Forms Designer re-writes the code.
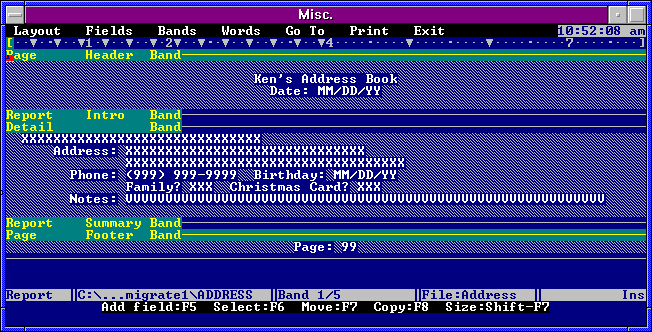
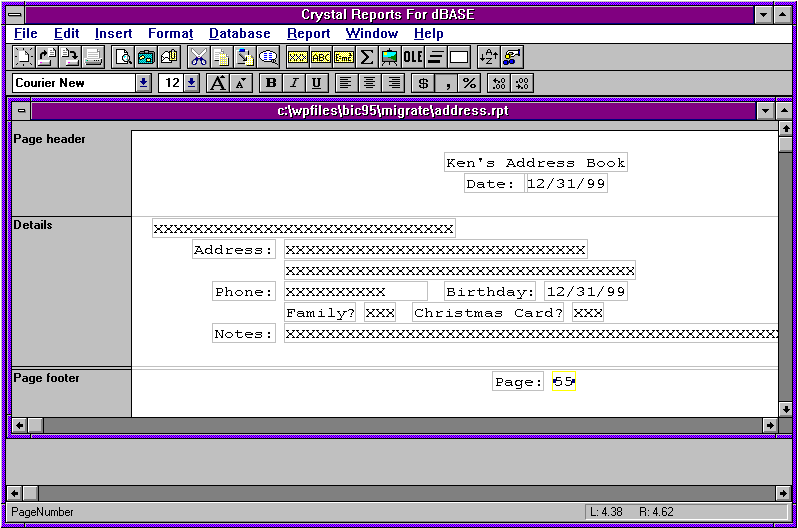
Report/Labels
In dBASE IV, there is a report designer, and a label designer, built-in --
these are native to dBASE. However, in Visual dBASE, we use a third-party program
called Crystal Reports. The version that ships with dBASE has been modified a
little, so that it can use the Visual dBASE expression builder. Crystal Reports can
do pretty much everything that the dBASE IV report and label generators can, but
sometimes the way of doing it may seem a little strange at first. (However -- the same learning curve applied when moving from dBASE III+ to dBASE IV! I remember being
overwhelmed when I saw how "complicated" the report designer was in dBASE IV the
first time -- after I got used to it, it was no big deal -- the same goes for
Crystal Reports.)
We can use the Component Builder to convert a report or a label design to Crystal Reports, which gives us a jumping off place. As you will see, I needed to do some work with these to make them look right.
Figure 11 shows the report designer in dBASE IV with the report: ADDRESS laid out. Figure 12 shows the Crystal Reports version after using the Component Builder to generate it.
The changes necessary after the Component Builder generated the report were similar to those in the form. Below are any changes that were different. I changed the font from "Courier" to "Times New Roman" for all objects.
Detail Band: The Picture Clauses needed work. In the dBASE IV report generator, you can assign picture codes to things like the phone number, basically duplicating what is used in the data entry screen. In Crystal Reports we need to use a function (that's been in dBASE for a long time) called TRANSFORM(). This function will allow us to literally change the contents of a field's appearance. To do this, we make these calculated fields as well (delete the phone field on the report):
Phone: transform(phone,"@R (999) 999-9999")
Calculated Fields: The Component Builder managed to convert most of the formulas in the report properly, using the TRANSFORM() function to ensure that the output was similar to the DOS code, so except for the Phone number above, it translated things pretty well.
Finally, I went to the "Format" menu, selected "Section", selected "Details", and clicked on the box for "Keep Section Together", so that when the report gets close to the bottom of a page, my detail band will not get spread out over two pages (unfortunately, this doesn't work for memos). There are some other cool things here, such as "Suppress Blank Lines" -- something we have wanted in dBASE IV reports for a long time!
If I wish the data to show up using the .MDX tag I created (NAME), there's one more thing I need to do -- that is to create a QUERY. Crystal Reports doesn't always recognize the dBASE .MDX tags directly, so in order to ensure that the data is sorted just right, I need to use the Query designer. What I will do is pretty quick, but it's gotta be done:
Database | File Location...
Click on the Location button, and select from the file list given (you may have to tell Crystal to show you "all files") BYNAME.QBE.
If you are planning on distributing your report, or moving it from the place you are designing your application, you will want to perform the following steps, because Crystal Reports stores the path to your table (or query) in the report, unless you tell it not to. This means that if you try to run it from a different location, you will get an error! To solve this problem:
When you save your report, the full path will not be saved as part of it.
To actually send the output to the printer, I would need to issue the command (either in the Command Window, a program, or even from the menu):
REPORT FORM ADDRESS TO PRINTER
Crystal Reports will bring up the report and send it to the printer. If I leave off the words "to Printer" I will basically get a preview screen, which is handy to see what it looks like. Crystal will automatically open the table or query and generate the report (NOTE: this has confused a lot of new developers who had their table open, typed REPORT FORM <reportname> and found that their table was closed when they came back).
Labels -- Crystal Report is also used to generate labels. The software works much the same, and the Component Builder can read your dBASE IV .LBL file and generate a Crystal Report .RPL file.
Labels are generated the same way they are in dBASE IV:
LABEL FORM ADDRESS FOR XMASCARD TO PRINTER
Putting it All Together (into the Menu!)
Well, it's time to go back to that menu we looked at very early in this article. I
need to tell dBASE what to do when a user selects one of the menu items. To do that,
I need to modify the menu, so in the Command Window of dBASE, typing:
MODIFY MENU MAIN
This will bring up the menu as it last appeared. I need to select the first item in the "Address" menu, and make a change -- this change will be done in the property inspector dialog. I must go to the Events tab of this dialog, and click on "OnClick". This allows me to tell dBASE what to do when the user Clicks the mouse (or selects the option with the <Enter> key).
This is very easy -- I want to place codeblocks in the OnClick event for the following menu items:
I then saved the menu (<Ctrl>+<End>).
When I issue the command in the Command Window:
DO MAIN
I should see the main form pop up, with the menu, and selecting options from the menu should do what I expected it to.
That seems like a lot of work! Well, yes. It is, but it's less work than rebuilding the application from scratch!
Summary
As mentioned in the Disclaimer at the beginning of this article, this is a simple
system. There is much more that can be done with the use of all the new
features of Visual dBASE, howev er, it would take a book or two to really cover
it all. Once you have your dBASE IV application converted to a Visual dBASE
5.x application, and you have ensured that it all works, then you can (and should)
take the time to delve in and learn more about this incredible software package!
You can get help on the dBASE, Inc. newsgroups (see the dBASE, Inc. website at: http://www.dbase.com/Docs/Newsgrps.htm for details), and if you wish to examine some completed systems written in Visual dBASE, you should visit the various websites noted at the dBASE, Inc. website's links page: http://www.dbase.com/Docs/Links.htm.