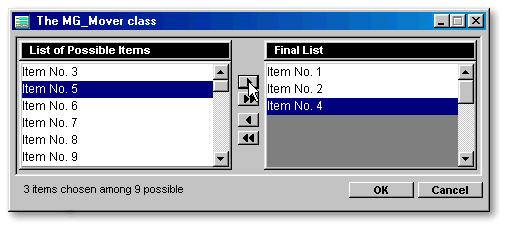
A mover is collection of objects that allows you to select some items from a list. We call it mover because the user can move items from one place to another. In other words, from a list of available choices to a list of selected items. dBASE developers have been widely exposed to movers in recent years. In the March/April 1995 issue of the dBASE Advisor, Ken Mayer presented the first Mover form that I can recall. His dBASE User’s Function Library Project (dUFLP) contains a Mover.cc dated from October 1998. In July 1998, Dan Howard made an ItemMover class, and in May 1999, Gary White published a Mover Form in the dBASE Programming newsgroup. The Custom class to be discussed is based on the latter Mover form in which Gary White made the code and I designed the interface.

Introduction
The main purpose of this article is to introduce dBASE developers with a new Mover class through its main components. These are: making custom classes, creating and transforming arrays, showing examples of real-world programming, and challenging our programming habits on the behavior of controls in forms. The overall scope of the article is very broad since it covers a variety of subjects of interest to anybody wanting to understand the intricacies of dBASE.
How to make a custom class
A custom class can be created in three steps. First, open an empty form in the Form Designer, drop a container and add the various objects needed. Secondly, connect the code to the controls so that your form will behave the way you want. The last step would be to transform your form into a custom container class. To do this, open the Form Designer again, select your container (yes, only your container) and from the File menu, select Save as Custom…
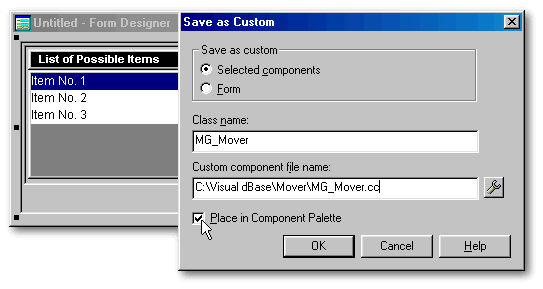
Sometimes the result is not as
expected. Therefore, I will use a more complicated way to create this custom
class to prevent unexpected results. The first two steps are similar, except
that we won’t create a container. The objects will be dropped directly
on the form. In our case, this base form is called
Ancestor.wfm. The third
step would be to transform this form into a custom
container
class. To do this, load your form’s code into the Editor using the Command
window (modify command Ancestor.wfm)
and delete the lines similar to these ones…
|
** END HEADER -- do not remove this line // // Generated on 15/06/1999 // parameter bModal local f f = new AncestorForm() if (bModal) f.mdi = false //ensure not MDI f.readModal() else f.open() endif class AncestorForm of FORM
... and replace them with these two lines: CLASS MG_Mover(ParentObj) of CONTAINER(ParentObj)
CUSTOM
|
|
Also take out from the (ex-) Ancestor form constructor code any property that can’t apply to a container (autocenter, left, maximize, metric, top and so on) but keep at least the two ones that must apply (height and width). Save the code under a name that ends with the suffix .cc (e.g., my_class.cc) and you’ve just created a new custom class.
If you make a custom class including a Grid, don’t place the grid inside a container in a custom class: dBASE will become unstable, probably because of a bug in the Grid class. In this case, it would be wiser to make a custom form class. The form should have a container holding all the other objects except the grid. This procedure is valid for VdB 7.01, but could be superfluous in future versions of dBASE.
What’s your name?
Coming back to the specific cc I am doing, we now face a problem: how to call the objects in this cc once it is dropped on a form. In the original form, the first listbox was called Form.Listbox1. When the first MG_Mover is dropped on a form, this listbox becomes Form.MG_Mover1.Listbox1. If we drop another copy of this cc, the equivalent listbox will be named Form.MG_Mover2.Listbox1. This presents a problem when we want dBASE to move an item from one listbox to the other. How can the code be written when we don’t even know how these objects are called? The answer? With the help of two magic words : This and Parent.
For example,
if we click a pushbutton, in its
onClick() function,
this designates
the button, this.parent means
the container, listbox1 is called
this.parent.listbox1,
and the form is this.parent.parent
(or
simply form).
On the other hand, in the onOpen()
function
of the cc itself, this becomes
the container, any object inside the container will be called
this.object_name and
the form is still called form.
|
|
||||||||||||
|
|
|
|||||||||||
|
|
|
|||||||||||
|
|
|
|
|
|
|
|
|
|
|
|
|
|
As one can be someone’s parent and someone else’s son or daughter, the same object could be called this, this.parent or something else, according to the context.
A few precautions
Once every object is named properly, we will add few details to the custom class. First, this cc was conceived in pixels. If you drop this on a form whose metric is Char, the MG_Mover becomes huge. So we added at line 003 (this numbering system refers to the one in the MG_Mover code on-line) parent.metric := 6 // Pixels to change on the fly the form.metric. The developer will still be able to change it back to anything else after, without affecting the MG_Mover already on the form.
Secondly,
the listbox.dataSource needs
to be populated by an array. Without it, the MG_Mover is dead.
In case the developer forgot to create that array, two precautions were
taken. At design time, when the cc is dropped on the form in the
Form designer, the listbox1 will be populated with three items — refer
to line 027 in the source code: dataSource
:= 'ARRAY {"Item No. 1","Item No. 2","Item No. 3"}' (in
the listbox1 constructor code). Also, when the form is opened, the
onOpen() method
will check if the array exists: if not, nine items will be created on the
fly by default. This job is handled by the following code:
|
247 if type("this.a_Items") # "A" // if the array doesn't exist 248 this.a_Items=new array() // create it 249 For i = 1 to 9 250 this.a_Items.add("Item No. " + i) // populate it 251 Next 252 else 253 this.a_items.sort() // if the array exists, sort it 254 endif 255 this.available = new array( this.a_Items.size ) // create another array the same size as a_Items 256 acopy( this.a_Items, this.available ) // copy a_Items' elements in it |
|
Thirdly, the container has a border in the Form designer (line 004), to show its limits clearly. When the form is run, this border will disappear (line 246) and the mover will harmoniously be a part of your form. Also, the cc will move to the bottom left corner of your form (line 007). I am not sure if that it is such a good idea. You can always change this anchor property to whatever you like (change it in the cc to change the default, or in the form to affect that form only).
The Assignment-only operator
Some of you may want to know why I used := instead of = in most of the places in the mover code. This operator is particularly useful when assigning values to properties. If you inadvertently misspell the name of the property with the = operator, a new property is created; your code will run without error, but it will not behave as you intended. In order to prevent the creation of a variable or property if it doesn’t exist, it is recommended to use the assignment-only := operator. By using the := operator, if the property (or variable) does not exist, an error occurs (this paragraph is taken from the dBASE on-line help).
Welcome to the world of arrays
The MG_Mover
uses arrays. An array is an ordered group of memory variables called elements.
Each element can store one value of any valid data type. In the
onOpen() function
of our custom container object, three arrays are created. The first one,
a_Items
contains
the original data. It will be copied to available:
selected items will be subtracted from this second array. If the user wants
to reset the choices available, a_Items
will
still hold the original information and be able to pass it to
available.
The third array, chosen,
is the list of the selected items.
|
248 this.a_Items=new array() 255 this.available = new array( this.a_Items.size ) 259 this.chosen = new array() |
|
If you look carefully, we are not creating Whatever=new array(), but THIS.whatever=new array(). This means that these arrays are created as a property of an object, where this is the container. Inside the form, with the help of the words this and parent, these arrays can be accessed from anywhere as if they were public variables. They can’t be modified by anyone else but you if you are on a network; so they don’t have the drawbacks of public variables. Moreover, you don’t have to release these arrays when you don’t need them anymore. dBASE will release all its objects and their properties when the form will be released, automatically!
To create arrays
There are
three ways to create arrays. Line 027 is showing the first way. In
the constructor code, dataSource
:= 'ARRAY {"Item No. 1","Item No. 2","Item No. 3"}'
creates
a single dimension array. In this case, the three elements are separated
by commas inside the braces.
|
160 this.chosen=new array() |
|
Another way to create an array
is with the “new” operator. Line 160 creates
a new instance of the array class called
chosen (we
would write declare this.chosen[0]
in
VdB 5). When an array already exists, we can create another array
by making a copy of the first one, for example this.available
= this.a_Items.
Here, the array available
is
created from a_Items.
The third way to create an array is by combining the following two
instructions:
|
158 this.available = new array( this.a_Items.size ) 159 acopy( this.a_Items, this.available ) |
|
In this case, the new operator creates a new instance of the array class, the same size as this.a_Items (the same number of elements). If you could see the value of each element in the listbox just after this line is executed, dBASE would display false: in fact, no value was assigned to them. These values are attributed next by aCopy(). Right now, aCopy() is not a method of the array class; it is a function. Its first parameter is the source array (this.a_Items) and its second parameter is the destination array (this.available). Since the first is exactly the same size as the second, all its elements will bear the same value as the elements in the second.
To
add elements to an array
|
248 this.a_Items=new array() 249 For i = 1 to 9 250 this.a_Items.add("Item No. " + i) 251 Next |
|
When an array
already exists, we can add elements to it through its
add() method.
This is precisely what line 250 is doing. Here we made a loop (For/Next)
to create nine elements. Each time dBASE meets
Next,
it bounces back to line 249 and increment the value of
i until
it reaches 10 and
gets out of the loop. Actually, the line 250 is doing two things at the
same time: it adds a new element, and gives it a value. This value is obtained
by concatenation of a string (“Item No. ”) and a number (the value of
i in
the loop), for example “Item No. 7”. Here dBASE does the automatic
type conversion which makes the expression simpler. So we don’t have to
write:
|
this.a_Items.add("Item No. " + ltrim(str(i))) |
|
There is no need to sort the elements since they are created in alphabetic order. If we just added an element to an existing array, then we would have to sort the array with the array.sort() method, as in line 198 and 203.
To
delete elements from an array
|
199 this.available.delete( this.available.scan( aItem[i] )) 200 this.available.size -- |
|
The add() method adds an element to an array; the delete() method erases an element. However, the size of the array will stay the same. In other words, dBASE deletes the element, moves all the other ones up to fill the gap but leaves an empty value in the last element. To take it off, you have to resize the array (line 200). We could have written this.available.resize( this.available.size -1 ), but we’ve chosen this.available.size -- instead, which is shorter and faster. The decrement operator –– takes a variable or property and decreases its value by one (on the contrary, the increment operator ++ increases the value by one — as in line 212— where oTo.cursel ++ means that the cursor is moved to the next item in the listbox).
The dataSource property
Now we have to remember that listboxes are only dataSourced to arrays, not dataLinked. That means that listboxes don’t display live data but only a picture of the array the last time the listbox was dataSourced. Each time the user wants to move an item, dBASE needs to know which items were selected, find them in the array, delete the elements, resize the array, add them to the other array, sort it and datasource the two listboxes anew to display the changes. Thanks God, dBASE does that at blazing speed!
The code executed when the user
click the button to move an item from left to right is this one:
|
077 onClick := {;this.parent.MoveItem(this.parent.listbox1.selected(),true)} |
|
For the pushbutton,
This.parent is
the container. So when we push this button, we invoke the container’s
MoveItem() function.
This function needs two parameters (denoted by two strings separated by
a comma inside the parenthesis). The first of these parameters is
this.parent.listbox1.selected(),
and the second is true.
We will use the latter to inform dBASE from which listbox to which listbox
it has to move the item. When the multiple
property of the listbox
is true (it
is so), listbox1.selected() returns
an array containing the currently selected items, one element per selection.
We will need that array in the
MoveItem() function:
|
191 Function MoveItem( aItem, bAdd ) // if you allow multiple selection 192 if not empty( aItem) 193 oFrom = iif( bAdd, this.listbox1, this.listbox2 ) 194 oTo = iif( bAdd, this.listbox2, this.listbox1 ) 195 for i = 1 to aItem.size 196 if bAdd 197 this.chosen.add( aItem[i] ) 198 this.chosen.sort() 199 this.available.delete( this.available.scan( aItem[i] )) 200 this.available.size -- 201 else 202 this.available.add( aItem[i] ) 203 this.available.sort() 204 this.chosen.delete( this.chosen.scan( aItem[i] )) 205 this.chosen.size -- 206 endif 207 endfor 208 oFrom.datasource := oFrom.datasource 209 oTo.datasource := oTo.datasource 210 oTo.cursel := 1 211 do while oTo.value # aItem[aItem.size] 212 oTo.cursel ++ 213 enddo 214 this.countItems() 215 endif 216 return |
|
If you look in the MG_Mover code, two versions of this function are provided: one if you just have to click once on an item to move it, and the second version, reproduced here, where a multiple selection is allowed. These two parameters are called aItem and bAdd: the first one corresponds to the mover's listbox1.selected(), while the second to true . If the array listbox1.selected() is not empty (line 192), and when bAdd is true (lines 193 and 194, oFrom is the container’s listbox1 and oTo is the container's listbox2. Since this is the case, only lines 197 to 200 will be executed in the For/Next loop.
In this loop, for the number of items selected (or for aItem.size), we will add each element of the array returned by listbox1.selected() to another array called chosen (from which listbox2 was dataSourced). The chosen array is then sorted at line 197 and the listbox2 is dataSourced anew at line 209.
Meanwhile, we have to do some maintenance. If the selected item(s) are already added to chosen array, they are not taken off the available array (from which listbox1 was dataSourced). To find where the selected items are in the latter array, we will use the array.scan() method (line 199): its only parameter, aItem[i] means the “i”th item (for example the 7th item) in the array returned by listbox1.selected(). So scan() will find that exact element and once found, it will then be deleted in the available array (line 199 also). This array will then be resized (line 200) and this change will be reflected in listbox1 (line 208).
The Custom class behavior
One of the buzzwords of the eighties was “artificial intelligence”. The concept went nowhere because at the time desktop computers didn’t have the processing power to analyze very complex algorithms quickly. Now that personal computers can do millions of instructions per seconds, our programs should be expected to behave more intelligently. For example if the user should not make a choice, why this choice should still seem to be available to him/her?
In the MG_Mover, buttons are enabled/disabled according to the context. When the final list is empty, the OK button is disabled, so are any button whose purpose is to take out an item from it. Moreover, the MG_Mover counts the number of choices selected, which is handy when a lot of them are available.
All the objects’ complex behaviour
is imposed by just seven lines of code in the
CountItems() function:
|
226 this.P_Minus.enabled := this.Listbox2.count() > 0 227 this.Listbox2.mousePointer := iif(this.P_Minus.enabled = true, 13, 12) 228 this.P_None.enabled := this.Listbox2.count() > 0 229 this.P_OK.enabled := this.Listbox2.count() > 0 230 this.P_Plus.enabled := this.Listbox1.count() > 0 231 this.Listbox1.mousePointer := iif(this.P_Plus.enabled = true, 13, 12) 232 this.P_All.enabled := this.Listbox1.count() > 0 |
|
Line 226 says: when the container’s listbox is not empty (when this.Listbox2.count()>0 is true), the button P_Minus is enabled. The next line uses the IIF shortcut to the if/else/endif programming construct. It means: if this.P_Minus.enabled=true then this.Listbox2.mousePointer := 13 // an hand or else this pointer :=12 // a "No" circle.
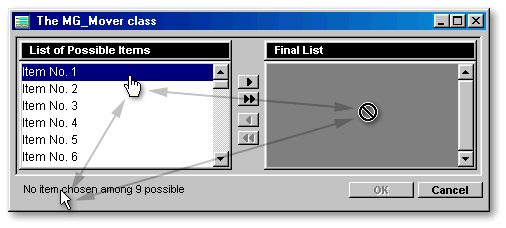
When the cursor is placed over a listbox, it changes from an arrow to a “No” circle (on an empty listbox) or to an hand (over a filled listbox, as if the cursor would be over an URL). As the Internet is getting more and more popular, it influences our paradigms and challenges our habits as developers. One of them is the double-clicking.
While Gary White was creating the code for this custom class, he and I had the following discussion about this. I asked him:
— Why should the user click on
one or more items to build a list, then click a button to move them when
it would be so easy to move each item as soon as it is single-clicked?
— Experienced Windows users
expect certain behaviors to be consistent. If changes improve the
application and make it easier to use, users will gladly accept those changes.
If they are confusing and make using the app more difficult, they will
not. The single click move and the inability to select multiple items are
not things that would make me happy if I were the user of the application.
— Gary, double-clicking was a
necessity when the user had to select an item first, then apply a command
to it. Today, this double procedure is often useless. It was imposed
on us when we learned how to use computers and now we, as developers, are
imposing that on our own users. We are like battered children who,
when they become adults, can’t escape but beat our own children.
— Jean-Pierre, lets be pragmatics.
Assume you have a list of 50 items and the user wants the first 40 of them.
With multiple=false,
then can either click 40 times, or they can select all and then click 10
times on the other direction. With
multiple=true, they
click the first one, scroll down to the 40th one, shift-click and click
the button.
— Well, yes but if there is few
choices in the listbox, it is easier to use a single-click moving.
— How do you know in advance
that the listbox will offer few choices?
— Err, well, I don’t know but…
— ...and if you use single-click
moving, the use of double-clicking to move everything the other side becomes
risky as a double-click can be interpreted as two consecutive single clicks.
— We just have to right-click
to move all. Anyway, I must say that I am not as convinced as I was
about the opportunity of single-click moving.
— Then why not giving the choice
to developers? You may want to include a note in your code about that.
— Good idea. That is what I will
do. Thanks.
So the MG_Mover allows multiple selection by default. If you want single-click moving, the header provide the instructions to allow it.
A new tool in your toolbox
If you forgot to check the checkbox shown in the first illustration of this article (“Place in Component Palette”), or if you used the more complicated way to create a custom class, you may want to make the custom class available each time you design a new form. If so, follow these steps. First open the Form designer. From the File menu, select Set Up Custom Components…
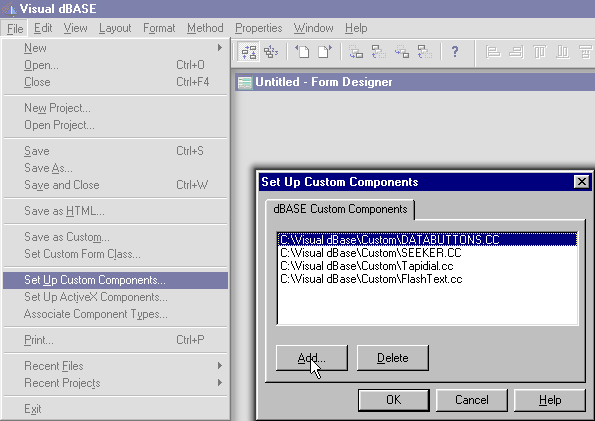
Then click the Add button, go in the directory where you put the MG_Mover, select it and click the Open button: you then come back to the same dialog box as above. This time push the OK button. That’s all. From now on you just have to right-click on any form to open the Component Palette (below), and drag’n drop the MG_Mover on a form. All its objects will appear instantly on your form.
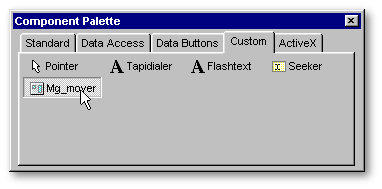
The only thing left for you to do is to write an onClick() function for the OK pushbutton. In the code you will make, it will be important to transfer the data displayed in listbox2 (from the pushbutton point of view, it will be the elements in this.parent.chosen array) to your application before closing the form since once the form is released from memory, this array is destroyed automatically.
Shortcomings
When this Custom class is dropped
on a form, the Form designer will stream a bunch of unnecessary code for
each of the pushbuttons. For example:
|
with (this.MG_MOVER1.P_PLUS) value = false endwith |
|
That can be safely removed.
Secondly, lines 22 and 38 were inactivated at the last moment before publication because of a bug discovered by our proof-reader, Mr. Fabian Cevallos (thanks).
Third, a listbox is limited to display about 4096 items. So if your planning to use the MG_Mover to invite all your ex-girlfriends to your wedding, you could have problems, at least with dBASE.
Moreover, for items whose names contain an ampersand, these names will be displayed in any listbox with an underline instead of the ampersand. For example, “TopDrug Sinus & Cold” will become “TopDrug Sinus _Cold”. The solution could be to use “and” instead of an ampersand. If you modify the code of the MG_Mover to dataSource one listbox to a field (instead of an array), another solution (discovered by David Sanderson) would be to enclose the field in single quotes instead of double quotes. For example: dataSource = form.rowset.fields['FIELD_NAME']. A third solution (not very practical) is to replace any “&” with “&&”: they will be displayed as single ampersand in your listboxes but if you use this information elsewhere, it will display “&&” in entryfields and grids.
Lastly, when you drop a MG_Mover on a form, the form.metric is changed to pixels. Personally, I prefer this metric for anything but reports (where centimeters is my favorite). But there is a known bug with pixels: if you want to place a grid that have a column dedicated to a logical field, the checkmarks (ü) will not be visible unless the form.metric is char (this is a bug reported by Todd Kreuter). Frankly, to place a mover and a grid on the same form seems to me a wee bit heavy but if you want to mix them anyway, don’t forget to set back the form.metric to char if the grid displays a logical field.
Conclusion
This article discussed four major subjects:
Acknowledgements
Finally, I would like to thank Gary White for his generosity since he wrote more than 80% of the code. Moreover I would like to thank Dan Howard for his guidance and his suggestions about this text.
To download the code of
the MG_Mover, click here
(it’s a 5Kb zipped file)