What's a Seeker?
A Seeker is a custom control class that was written by Ken Chan a few years ago. You can put a Seeker control (an object of the Seeker class) on any form. It looks like an entryfield, but it's not for data entry. This control lets the user do incremental searching in a rowset or table.
Seeker.CC is distributed with Visual dBASE 7, and an earlier version of Seeker.CC is available for VdB 5.x in Ken Mayer's dUFLP5 library.
What's incremental searching?
Suppose you have a grid showing different types of fruit in alphabetical order - Apples, Bananas, Blueberries, Cherries, and so on. The idea is that if you type a B, the row pointer moves to Bananas, then you type an L and the pointer moves to Blueberries - because Blueberries is the first row that matches BL.
It's not hard to imagine how such a mechanism could be extremely useful or even vital if, for example, you had to find Rorlick, Peter in a very long list of names. All you'd need to do would be to type RORL and you'd probably already be pointing at the row you were looking for. That's much more efficient than using a scrollbar (particularly the VdB7 grid's scrollbar!) to find a precise location amongst thousands of rows.
How can I use a Seeker?
Let's create a sample form right now that employs a Seeker. First, in the Command window, type:
set procedure to "C:\Program Files\Borland\Visual dBASE\custom\seeker.cc" additive
This will tell dBASE where to find the source code that's needed for this custom control. It also loads the custom class definition into memory and ensures that the Seeker will appear on the component palette in the Form Designer.
Next, we'll prepare the data for our sample form. Again in the Command window, type:
cd "C:\Program Files\Borland\Visual dBASE\Samples\Mugs\Tables"
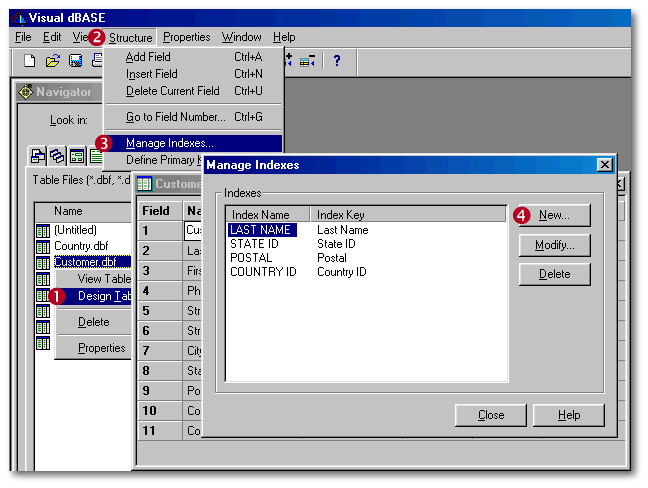
In the Navigator, click on the Tables tab, right-click on Customer.dbf, and select the Design Table menu option. Now click on the Structure menu, and select the Manage Indexes option.
We're going to add a new index tag to the table, so click on the New button. Click on the Specify with expression radio button, and in the Index key expression field, type in:
left(upper(trim(Customer->"Last Name")+','+Customer->"First Name")+space(20),40)
In the Index name field, type in: UpperName. Click on the OK button. Click the Close button. Click the X button to close the Table Designer, and click on Yes to save the changes.
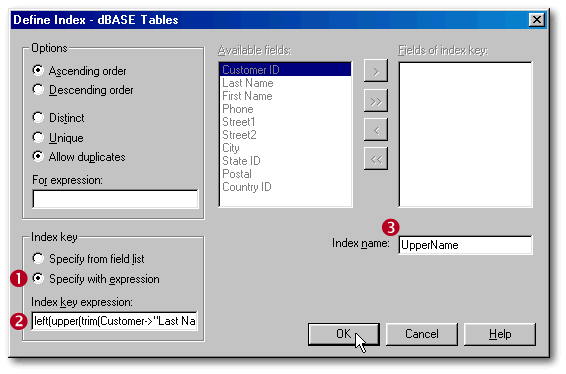
Why did we bother to create a new index tag? For two reasons: First, so that we'll be able to work with the customer names in true alphabetical order. And second, the Seeker requires that the active index must be upper-case. Note that we use the LEFT() function to ensure that every index key value is exactly the same length, otherwise the index will not behave properly.
Now let's start designing a new form. Click on File...New...Form, then click on Designer. Drag Customer.dbf from the Navigator onto the form design surface. Click on the SQL icon that just appeared on the form. At this point the Inspector should be showing you the properties of the Customer1 query. If you don't see the inspector, press F11 and click on the Properties tab. In the Inspector, click on the word Object that's shown for the Rowset property. Now click on the I-button, which drills down to inspect the properties of the rowset. Set the indexName property to UPPERNAME.
From the Standard tab of the component palette, drag a Grid onto the form. Resize the grid (you can drag its bottom right corner) to make it bigger. In the inspector, set the grid's Datalink property to Customer1. Now click on the Custom tab of the component palette, and drag a Seeker onto the form. You might want to resize the form, and move and resize the objects on it so that they look something like this:
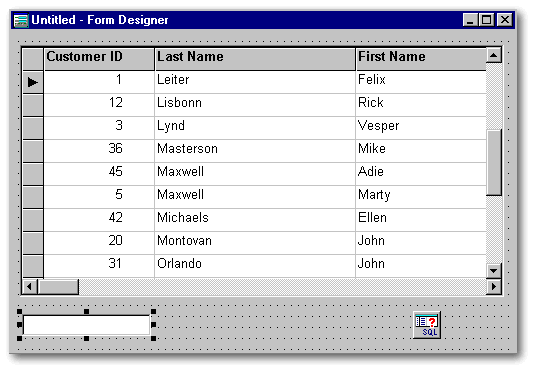
Press F2 to save and run the form. You'll have to give it a name, so save it as SeekerTest.wfm. Type some stuff into the Seeker, and see how it behaves. Type in MAXWELL,M and watch what happens to the row pointer as you type each key.
How does it work?
The Seeker class inherits from the native EntryField class, and it has a Key event handler that intercepts all non-navigational keystrokes while the entryfield has focus. Every keystroke that is typed into the entryfield is processed through the Key method, which performs a seek in the appropriate table or rowset. In truth, it's not important to know how Seeker works. But if you're really interested in understanding what's under the hood, add the line SET STEP ON at the start of the Key method in Seeker.CC, and run SeekerTest.wfm again. When you type anything into the Seeker, the debugger will be invoked, and you can step through the lines as they get executed.
Things to remember
At the end of this article, there is a link to download the ZSeeker.CC, written by this author. ZSeeker enhances Ken Chan's original Seeker, by adding a few improvements: