Building
a Web Application
with
the Web Classes
by Michael Nuwer
Introduction
dBASE evolved very quickly over
the previous twelve months. In January 2000, this Magazine printed an article
I wrote called A Simple Web Application. The contents of that article
were based on Visual dBASE 7.01. Since January, Visual dBASE 7.5 was released
and, by the time you read this, you may be using dB2K. These releases have
added a number of important advances that lead me to revisit my simple
web application. One of the more important advances that are found in Visual
dBASE 7.5 is the inclusion of StdIn and StdOut as part of the base file
class. StdIn and StdOut are streams of data that can be identified and
grabbed with a file handle. You've used them many, many times, writes
A.A. Katz though perhaps unwittingly. When you TYPE a file in DOS, you're
streaming its contents to the screen using StdOut. Every time you type
on a keyboard, a character is sent to the computer through StdIn. StdIn
and StdOut are also the means by which Web servers communicate with Visual
dBASE web applications.
Another important advance that
is found in Visual dBASE 7.5 is the custom class called WebClass.cc.
This class is derived from the Associative Array class. It's very versatile
and offers significant power for developing web applications, much of which
I will explore in this article. WebClass.cc
is also a part of dBASE's new open-source project. With the release of
dB2K, you will find additional custom classes adding features to WebClass.
One of these subclassed tools is ParseHTML.cc,
which will be reviewed later in this article. In the present paper I will
explore the structure of a web application and revisit the methods used
for remote data editing.
The
Basic Template
All my web applications use the
same basic template. Web Example One is the template I use. It is derived
from the program file created by the Visual dBASE 7.5 Web Wizards. This
simple program file highlights the main parts of the Web application template:
| |
////////////////////////////////////////////////////
// Web Example One
// Example1.exe
////////////////////////////////////////////////////
1: Set talk OFF // turn off interactive mode
2: Set century ON // Y2K
3:
4: Try // Error trap entire CGI applet.
5:
6: ////// Create new instance of the Web Class
7: Set proc to WebClass.cc additive
8: oCGI = new CGISession ()
9:
10: ////// Connect to the Web Server (StdIn/StdOut)
11: oCGI.Connect()
12:
13: oCGI.StreamHeader("Greeting Page")
14: oCGI.StreamBody("Greetings from dBASE" )
15: oCGI.StreamFooter()
16:
17: catch (exception e)
18:
19: oCGI.errorPage(e)
20:
21: endtry
22:
23: /// cleanup
24: oCGI = null
25:
26: ////// all done
27: Quit
////// End //////
|
The first thing to note about this
program is that the entire application is enclosed in a Try/Catch/Endtry
structure. You will find that using this technique is very helpful for
catching program errors and redirecting them to your browser. A web application
is executed by a web server and, consequently, there is no user interface.
Thus the standard error message that pops up when you are working on a
desktop application, will not necessarily show itself when you're working
on a web application. By using the try/catch
structure, however, most error messages will be redirected to the web browser.
Next lines 7 and 8 in Web Example
One creates a new CGI object from WebClass.cc.
This object is given the name oCGI
and it is the reference used for calling the functions contained in WebClass.cc.
On line 11 the application calls
oCGI.Connect().
This is a very important function and you should always call it (or its
equivalent if your subclass WebClass.cc)
immediately after the oCGI
object is created. This function establishes a connection to the Web Server
via a StdIn port and captures the incoming data stream sent from the HTML
form. Web browsers send their data in ANSI format that must be converted
to dBASE OEM Format before it can be used. oCGI.Connect()
does this conversion for you. Web Example One does not take advantage of
this captured data, but we will be using it later in the article.
oCGI.Connect()
also opens a StdOut port which is an outgoing data stream back to the your
web server. It is important to bare in mind when developing for the web
that each CGI application must return a response page. The browser is waiting
for this response and will become confused if that page does not arrive
in a timely fashion. This is something that may takes awhile to get used
to.
The next three lines in Web Example
One (Lines 13-15) create the response page. WebClass.cc
partitions a web page into three units. They are called respectively, Header,
Body, and Footer. Calling each function sequentially, and passing a message
to StreamBody(),
will create a response page containing your message. Because oCGI.Connect()
has opened the StdOut port, this page is sent to the web browser automatically.
When you take a closer look at the StreamBody()
function, notice that it also accepts arrays. This feature is really slick
and means you can pass quit a lot of information.
The next lines (17-21) form the
error catcher. If there is an error in your program, the error information
is passed to
errorPage()
which, in turn, streams this information in your browser window. This is
a very nice feature. Web applications are particularly difficult to debug.
Other Web development tools, like Perl, send error messages to StdErr,
i.e. the Standard Error port. The web server receives this information
and writes it into an error log. The developer then must open the error
log to view the error message. This can be cumbersome and time consuming,
especially if one make as many errors as I do. But Visual dBASE 7.5 is
able to trap errors and stream them to the browser. Very nice!
The final lines of Web Example
One (24 and 27) null out the CGI object and quits the application.
Building
and Running the exe
Now that the code has been written,
your program must be built into an executable file. You can do this by
creating a new project and building the exe the same way you would build
a desktop application. What I do, however, is create a buildit.prg
with the following three lines:
| |
compile myapp.prg
compile webclass.cc
build myapp.pro, webclass.co to myapp.exe
|
If WebClass.cc
is not in the current folder, you need add the full path to its location.
Finally you need to call this application
from your web browser. Although there are different ways to accomplish
this, I will start with the command line equivalent, called a GET
Method in CGI. In your browser's location bar enter the full URL to the
folder where your application is located. A working version of Web Example
One is assessable using the following URL: http://www.nuwermj.potsdam.edu/bulletin/Example1.exe
A
few comments about CGI applications
One of the more important pieces
of a CGI application is the Name/Value pair.
The above URL includes the full path to the application and the name of
the application. Most web applications also involve the web browser sending
data and the application receiving that data. Because CGI applications
work with different web browsers and different web servers there are industry
standards for sending data to a CGI application. When data is sent from
a web browser, it is organized into what are called Name/Value pairs. These
pairs might look something like this:
firstname=Michael&lastname=Nuwer
The name of the pair is on the
left, the value is on the right, and the pairs are separated by the ampersand
(&). All information in these name/value pairs is text, so if your
application uses data in numeric, date or boolean formats, it's your job
to convert it.
The preferred method of passing
data from a web browser to a dBASE application is from within an HTML form.
The following is a simple HTML form.
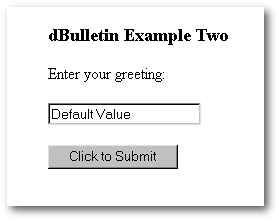 |
|
<HTML>
<HEAD>
<TITLE> dBulletin Example Two </TITLE>
</HEAD>
<BODY BGCOLOR="#FFFFFF">
<H3>dBulletin Example Two</H3>
<FORM METHOD=POST ACTION="EXAMPLE2.exe"
ENCTYPE="application/x-www-form-urlencoded">
<P>Enter your greeting:
<P><INPUT TYPE="text" NAME="greeting" VALUE="Default
Value">
<P><INPUT TYPE="submit" NAME="submit" VALUE="Click
to Submit">
</FORM>
</BODY>
</HTML>
|
There are a few key features in
the <FORM></FORM>
that need to be considered. First, the METHOD
property is set to POST.
This is the preferred choice for sending HTML form data. Your other choice
would be GET,
but this method of sending form data has more limitations and should be
avoided. Also, notice the ACTION
property of the FORM
tag. This is where you enter the URL and file name for your CGI program.
This is essentially your internet command line. Now consider the INPUT
tag. The example form has two input tags, one is a text field and the other
is a submit button. Notice that both INPUT
tags have a NAME and VALUE property. Indeed all HTML form elements have
a name/value pair. When the submit button is pushed, the tag names and
the values that the user entered, are sent to your Web application. For
the above example the data that is sent to your CGI application looks like
this:
greeting=Default Value&submit=Click
to Submit
Processing
CGI data with Visual dBASE 7.5
Since an HTML page sends data to
your dBASE application packaged in name/value pairs, you will need a program
that can make this data useful. Web Example Two is a program file that
receives information from a web form (a message in this case) and returns
that message to the browser in a response page.
| |
/////////////////////////////////////////////////////////
// Web Example Two: Passing data over the web.
// Example2.exe
// Online version of Web Example Two:
// http://www.nuwermj.potsdam.edu/bulletin/Example2.html
/////////////////////////////////////////////////////////
Set talk OFF // turn off interactive mode
Set century ON // Y2K
Try // Error trap entire CGI applet.
////// Create new instance of the Web Class
Set proc to WebClass.cc additive
oCGI = new CGISession ()
////// Connect to the Web Server (StdIn/StdOut)
oCGI.Connect()
if oCGI.isKey('greeting')
cGreeting
= oCGI['greeting']
endif
oCGI.StreamHeader("Greeting Page")
oCGI.StreamBody( '<H2>'
+ cGreeting + '</H2>' )
oCGI.StreamFooter()
catch (exception e)
oCGI.errorPage(e)
endtry
/// cleanup our mess
oCGI = null
////// all done
Quit
////// End //////
|
Web Example Two is essentially
the same as Web Example One. The lines that are new or that are modified
are marked in red. This application is expecting data from the HTML form.
As you saw earlier, that form has an INPUT
tag which looks like this:
<INPUT TYPE="text" NAME="greeting"
VALUE="">
When this data is sent to your
application, oCGI.Connect()
loads this name/value pair into the oCGI
array. Indeed, oCGI.Connect()
will load all the name/value pairs passed to your application. This includes
field data and any other name/value pair that are passed. For example,
the name and value of the submit button is loaded. Also the names and values
of any hidden field in your HTML form are loaded into the oCGI
array. What makes this procedure so useful is that you can pass both field
data and other forms of data. Moreover, any of the CGI pair can be retrieved
from the array anywhere in your program. This is a great advance over the
techniques available in Visual dBASE 7.01. In Web Example Two I retrieve
the value of greeting with the following three lines:
| |
if oCGI.isKey('greeting')
cGreeting = oCGI['greeting']
endif
|
Then the variable cGreeting
is passed to oCGI.StreamBody()
which sends the greeting back to the browser in the response page.
Remote
Data Entry
Thus far I have discussed the basic
parts of a web application using WebClass.cc,
the methods used to send data from a web browser to your CGI application,
and finally, the procedures whereby your Web application receives remote
data for processing. One of the more common uses of a web application is
for remote users to enter data into a database. Web Example Three below
demonstrates how remote data entry works using WebClass.cc.
This example application adds two elements to the previous examples. First
a query object is added and, second, the function called loadFieldsFromArray()
is used. This example application is very similar to the Web Application
created by the Visual dBASE 7.5 Remote Data Entry Web Wizard.
| |
///////////////////////////////////////////////////////////
// Web Example Three: Remote Data Entry.
// Example3.exe
// Online version of Web Example Three:
// http://www.nuwermj.potsdam.edu/bulletin/Example3.html
///////////////////////////////////////////////////////////
Set talk OFF // turn off interactive mode
Set century ON // Y2K
Try // Error trap entire CGI applet.
////// Create new instance of the Web Class
Set proc to WebClass.cc additive
oCGI = new CGISession ()
////// Connect to the Web Server (StdIn/StdOut)
oCGI.Connect()
////// Open Query or Data Module
cTable = "USERS.DBF"
q = new query()
q.sql = [Select * from "] + cTable + ["]
q.active = true
q.rowset.indexName = "userID"
if oCGI.isKey('userid')
cUserid = oCGI['userid']
endif
oCGI.loadFieldsFromArray(q.rowset.fields, true)
/// Print a response page
cMsg = "<h2>Your information has been added to
the database.</h2>"
oCGI.StreamHeader("Information added")
oCGI.StreamBody( cMsg )
oCGI.StreamFooter()
catch (exception e)
oCGI.errorPage(e)
endtry
/// cleanup our mess
oCGI = null
////// all done
Quit
////// End //////
|
WebClass.cc
includes three very useful database functions. One of these functions is
loadFieldFromArray().
This function can be used to append or update field data in your tables
with information passed by the CGI data stream. All three of the data functions
are based on name matching. That is, the HTML NAME sent from the web page
must be an identical match to the name of the field in your table, including
the case. You will recall that Connect()
stuffs all the name/value pairs into an associative array. The WebClass.cc
data functions attempt to match the element names in the CGI array with
the field names in your table. Elements in the CGI array that do not match
a table field are skipped. Thus the CGI Associative Array can contain both
table data and other name/value pairs, but only the data intended for the
table is actually added.
loadFieldFromArray()
works for one rowset at a time. The function's first argument is the rowset's
field array. You can, however, call this function over and over, each time
passing a different rowset. Be careful, however. If you run this function
for more than one rowset, it will update each and every matching field.
This could be a problem if any of your fields share the same name in more
than one table. For this reason WebClass.cc
includes loadDatamoduleFromArray()
which loads data from the CGI array into the rowset.fields[]
of a datamodule. This function does discriminate with regards to which
rowset should be used to append the data. For this function to work properly,
the NAMEs for your HTML name/value must include the rowset name. The syntax
is RowSet*@FieldName
and an INPUT
tag in your HTML page will look something like this:
<Input type="text" size="15" name="USERS1*@lastname">
loadDatamoduleFromArray()
will split this CGI name into a rowset name and a corresponding field name.
This way the function can append the field data to the desired rowset.
It must be noted however, that if you use the RowSet*@FieldName
convention with loadFieldFromArray(),
the CGI NAME string will never match a rowset field. (RowSet*@FieldName
<> FieldName)
The third and final data function
inverts the loadFieldFromArray()
function. LoadArrayFromFields()
loads the existing associative array with data from fields in a rowset.
To use this function, you must first create the elements in the oCGI
array. Then using the name-matching convention, loadArrayFromFields()
will assign values to the elements.
In summary then, WebClass.cc
makes remote data entry very easy. You simply need to pass your data from
a web browser to your CGI application. In your application you create your
query object (or objects) and then call loadFieldFromArray().
The example applications that I
am discussing in this article are derived from a working application used
to manage College courses. In that working application my remote data entry
routine is a bit more complicated than the above example. The most important
complication is a check for duplicate records. In fact, I use something
a bit more like the following snippet of code. When a web user requests
that data be appended to the file of users, I will first check to see if
the UserID (which in my case is a Student's College ID number) is already
in the table.
| |
/// check to see if the ID is already on file
if q.rowset.findkey(cUserid)
/// If the ID is on file, send a response
page stating that fact.
cMsg = "<h2>Your User ID is already on file.</h2><h2>
Use the Edit User
Account form to
update information.</h2>"
oCGI.StreamHeader("Duplicate ID")
oCGI.StreamBody( cMsg )
oCGI.StreamFooter()
else
/// otherwise append the data to the table.
oCGI.loadFieldsFromArray(q.rowset.fields, true)
/// Print a response page
cMsg = "<h2>Your information has been added to
the class database.</h2>
<h2>You may now enter the course web sites below.</h2>"
oCGI.StreamHeader("Information added")
oCGI.StreamBody( cMsg )
oCGI.StreamFooter()
endif
|
Remote
Data Editing
Now that you can provide your user
with a means to enter data into a database, you may also need to let them
edit that data. Web Example 4 is an application that enables a user to
edit the data entered in Web Example 3. There are two steps to the process
of editing data. First you must find the record that the user wishes to
modify and put that data into a web form. The web form must include a hidden
field that uniquely identifies the record being edited. This is because
when the modified data is returned to the web server, your application
terminates. Therefore you need a means to find the record being modified
when the data is returned your application.
| |
///////////////////////////////////////////////////////////
// Web Example Four: Remote Data Editing
// Example4.exe
// Online version of Web Example Four:
// http://www.nuwermj.potsdam.edu/bulletin/Example4.html
///////////////////////////////////////////////////////////
Set talk OFF // turn off interactive mode
Set century ON // Y2K
Try // Error trap entire CGI applet.
////// Create new instance of the Web Class
Set proc to WebClass.cc additive
oCGI = new CGISession ()
////// Connect to the Web Server (StdIn/StdOut)
oCGI.Connect()
////// Open Query
cTable = "USERS.DBF"
q = new query()
q.sql = [Select * from "] + cTable + ["]
q.active = true
q.rowset.indexName = "userID"
if oCGI.isKey('userID ')
cUserID = oCGI['userID ']
endif
// there are two essential procedures in this application
// First we must look up the record that is to be edited.
The user passes
// some information necessary to find the record.
do case
case oCGI.isKey("finduser")
/// locate the record to be modified
if q.rowset.findKey( cUserID )
if oCGI["password"] == q.rowset.fields["password"].value
PrintUserInfo()
else
cMsg = "<h2>The
password you entered is not valid. Please reenter.</h2>"
oCGI.StreamHeader()
oCGI.StreamBody(
cMsg )
oCGI.StreamFooter()
endif
else
cMsg = "<h2>" + cUserID + " is
not on file. Please open a new account.</h2>"
oCGI.StreamHeader()
oCGI.StreamBody( cMsg )
oCGI.StreamFooter()
endif
case oCGI.isKey("modifyuser")
/// Update the user information in the table
q.rowset.indexname := "tableid"
nPlace = val(oCGI["place"])
q.rowset.findKey( nPlace )
oCGI.loadFieldsFromArray(q.rowset.fields, false)
/// Print a response page
cMsg = "<h2>Your information has been modified.</h2>"
oCGI.StreamHeader()
oCGI.StreamBody( cMsg )
oCGI.StreamFooter()
otherwise
cMsg = "<h2>Click here to start this application.</h2>"
oCGI.StreamHeader()
oCGI.StreamBody( cMsg )
oCGI.StreamFooter()
catch (exception e)
oCGI.errorPage(e)
endtry
/// cleanup our mess
oCGI = null
////// all done
Quit
////// End //////
|
There are two main procedures in
this application. First the application must look up the record that is
going to be edited. In Web Example 4, the Web user is requesting to make
a modification to their account information. On the HTML page this user
must enter a user ID and a password. When the form is submitted, the information
entered in the two text fields and the name/value pair of the submit button,
are passes to the application. The name of this submit button is finduser.
That name (and it's value) are added to the CGI array when oCGI.Connect()
is called. Thus the first case statement in Example 4 will return true
and the subsequent code will execute. In this code the user's Id is looked
up, and, if it is found, the user's password is validated. After the user
is validated, PrintUserInfo()
is called. The rowset's record pointer has already been moved to the correct
record. So this function will produce a web page that contains the user's
record. The function is included in Appendix One at the end of this article.
As we are here walking through
the sequence of step the web user will follow, it is important to note
that when the user gets a web page full of data, the web application has
terminated, and the data tables are closed. This means that the web user
does not lock the record. But it also means that we can not simply save()
the rowset after the data is modified. Consequently, you need a means to
find the modified record when the user returns the data to the application.
For this reason, I include a hidden field in the response page. This field
is not visible and can not be changed. I use the value of an AutoIncremented
field as my record marker. So when the browser re-submits the web form,
my web application seeks this value in the data table, and thereby returns
to the correct record for updating. The important point here is that there
must be at least one field in the table that users can not modify. Otherwise
there will be no way to know which record needs to be updated.
Your web user can now edit the
information that is presented in the web page and resubmit the data back
to your application. The web server, then, executes Example4.exe a second
time. But now, the HTML NAME of the submit button is modifyuser
so the second case statement in Web Example 4 is true. The rowset's index
order is changed to the table's key field (i.e., the autoincremented field)
and the record being updated is sought in the rowset. After moving the
record pointer to the desired record, the example calls loadFieldsFromArray(q.rowset.fields,
false).
This is the same function that
was called when a new record was added (see Web Example 3). Note, however,
that the second parameter passed to the function is set to false. The second
parameter is named bAppend,
and controls whether the data is appended to the rowset (bAppend=true)
or the data is updated (bAppend=false).
When bAppend
is true, WebClass.cc
calls rowset.beginAppend()
and the data is added to the bottom the data table. When bAppend
is false, however, WebClass.cc
updates the current record. Consequently in order to update the correct
record it is important that the rowset's record point be moved to the record
before loadFieldsFromArray()
is called.
Using
ParseHTML.cc
With the release of dB2k, you will
find some new web classes. One of these new classes is ParseHTML.cc.
The purpose of ParseHTML.cc
is to read an HTML file and replace specially formatted field codes with
data. This custom class was developed by Ed Hoskins and myself, and is
distributed with dB2k as part of the new Open-Source project. Web Example
5 is an alternative method for creating an edit data web form.
| |
///////////////////////////////////////////////////////////
// Web Example Five: Using ParseHTML.cc
// Example5.exe
// Online version of Web Example Five:
// http://www.nuwermj.potsdam.edu/bulletin/Example5.html
///////////////////////////////////////////////////////////
Set talk OFF // turn off interactive mode
Set century ON // Y2K
Try // Error trap entire CGI applet.
////// Create new instance of the Web Class
///// ParseHTML.cc is subclassed from WebClass.cc
/////////////////////////////////////////////////////
// Note that this is a subclass of WebClass.cc
// and therefore, you have access to all the
// functions in WebClass.
/////////////////////////////////////////////////////
Set proc to ParseHTML.cc additive
oCGI = new ParseHTML()
////// Connect to the Web Server (StdIn/StdOut)
oCGI.Connect()
////// Open Query
cTable = "Users.DBF"
q = new query()
q.sql = [Select * from "] + cTable + ["]
q.active = true
q.rowset.indexName = "userID"
if oCGI.isKey('userID ')
cUserID = oCGI['userID ']
endif
/// locate the record to be modified
if q.rowset.findKey( cUserID )
if oCGI["password"] == q.rowset.fields["password"].value
////////////////////////////////////////////////////////
// Set the name of the page template that will be
// displayed. This can be set as a fixed page:
// cHTMLFile = "c:\webdocs\loader\edituser.html"
// Or the page name can be passed in the the HTML form:
// cHTMLFile = oCGI['pagename']
////////////////////////////////////////////////////////
cHTMLFile = oCGI['pagename']
////////////////////////////////////////////////////////////
// At this point the record pointer of the rowset should
// be at the record you want to edit. You can now call
// DisplayHTML()
////////////////////////////////////////////////////////////
oCGI.DisplayHTML(q.rowset.fields,cHTMLFile)
else
cMsg = "<h2>The
password you entered is not valid. Please reenter.</h2>"
oCGI.StreamHeader()
oCGI.StreamBody(
cMsg )
oCGI.StreamFooter()
endif
else
cMsg = "<h2>" + cUserID + " is
not on file. Please open a new account.</h2>"
oCGI.StreamHeader()
oCGI.StreamBody( cMsg )
oCGI.StreamFooter()
endif
catch (exception e)
oCGI.errorPage(e)
endtry
/// cleanup our mess
oCGI = null
////// all done
Quit
////// End //////
|
The first thing to notice is that
ParseHTML.cc
is subclassed from WebClass.cc.
This means that ParseHTML.cc
includes its own functions as well as all the functions contained in WebClass.cc.
To use this class, create the oCGI
object with the following rather than with CGISession():
Set proc to ParseHTML.cc additive
oCGI = new ParseHTML()
The only function contained in
ParseHTML
is DisplayHTML().
Web Example 5 uses this function to display a Web page that contains the
EntryField your user wants to edit. It replaces PrintUserInfo()
in Web Example 4. You may find that using ParseHTML.cc
simplify the process of creating and editing HTML pages particularly if
you use a GUI HTML editor. With this class, the HTML codes are not embedded
in your program file as is the case with Web Example 4 and its PrintUserInfo()
function. Rather, the HTML page remains a separate file and is accessible
to your editor.
To use DisplayHTML(),
start by creating the HTML page that will contain the data your user needs
to edit. This page is often identical to the HTML page you use for Remote
Data Entry. You must make one modification to this file you must use
a special field code as the default value for each text field. Normally
the INPUT
tag used in an HTML form looks similar to this:
<INPUT TYPE="TEXT" NAME="fname">
To use ParseHTML,
add the VALUE
property and enter a field code as the default value. The INPUT
tag should now look like this:
<INPUT TYPE="TEXT" NAME="fname"
VALUE="<#fname>">
When you call DisplayHTML(),
it opens your HTML document and reads the file line-by-line. If the line
includes a field code, that code is replaced with a value from your rowset.
The INPUT
tag in your response page will then look something like this:
<INPUT TYPE="TEXT" NAME="FIRSTNAME"
VALUE="Michael">
DisplayHTML()
was designed to work very much like LoadFieldsFromArray().
That is, to display values from a rowset, you must create your query and
move the record pointer to the record that you want edited. This should
be done before DisplayHTML()
is called. Moreover, replacement of field codes is based on name matching.
So be sure that <#FieldName>
is identical to the rowset's field name. If the field code is not matched
with a rowset field, DisplayHTML()
will look for a matching value in the oCGI
array. This way you can pass additional values like session IDs or page
names or names for button tags. Finally notice that DisplayHTML()
requires the filename of the HTML disk file.
Conclusion
Visual dBASE 7.5 has added a number
of important features that facilitate the building of Web applications.
WebClass.cc
is a very useful set of tools. It greatly simplifies the primary tasks
involved in building a web application. In this article I reviewed some
of the more important elements in using WebClass.cc.
This article is based on an application I developed for managing access
to web sites used in the College courses I teach. That application is a
bit more complicated then the examples in this article. The complete application
is available at my Web Site. (http://www.nuwermj.potsdam.edu/cmpt/)
This link is to a sample version of the application and you are welcome
to interact with that site.
To download the Web applications featured
in this article, click here
(it's a 18 Kb zipped
file)
The
author would like to thank Greg Neid (my proof-reader) for his suggestions
and the improvements they brought to this text.
Appendix
One
| |
////////////////////////////////////////////////////
// Appendix One
// PrintUserInfo()
////////////////////////////////////////////////////
function PrintUserInfo
// Create a local instance of the rowset field array.
local f
f = q.rowset.fields
with ( oCGI.fOut )
puts('Content-type: text/html')
puts('')
puts([<HTML><HEAD>])
puts([<TITLE>Make User</TITLE>])
puts([</HEAD>])
puts([<BODY TEXT="#000000" BGCOLOR="#FFFFFF"
LINK="#0000EE" VLINK="#551A8B" ALINK="#FF0000">])
puts([<TABLE WIDTH="100%"> ])
puts([<TR>])
puts([<TD colspan=2><IMG SRC="Header1.gif"
HSPACE=20 BORDER=0></TD>])
puts([</TR>])
puts([<TR VALIGN=TOP>])
puts([<TD VALIGN=TOP WIDTH="20%">
])
puts([<IMG SRC="navig1.gif" HSPACE=20
BORDER=0>])
puts([</TD>])
puts([<TD WIDTH="80%">])
puts([<BR><B>Account Information</B>])
puts([<BR>])
puts([<FORM METHOD="POST" ACTION="makeuser.exe"
ENCTYPE="application/x-www-form-urlencoded">])
/// Add a hidden field with
a table's key value.
/// This is used to find
the record when the data
/// is resubmitted to the
server.
cRecno = str(q.rowset.fields["tableid"].value,3,0)
puts([<INPUT TYPE="HIDDEN" NAME="place"
VALUE="] + cRecno + [">])
puts([<FONT FACE="Arial,Helvetica"
SIZE=-1>Enter])
puts([your first name, last name,
and user ID number in the following field])
puts([boxs.</FONT>])
puts([<UL><TABLE>])
puts([<TR>])
puts([<TD Width="40%"><FONT
FACE="Arial,Helvetica" SIZE=-1>First Name:</FONT></TD>])
if not empty(f["fname"].value)
cValue = [ VALUE="]
+ trim(f["fname"].value) + ["]
else
cValue = ""
endif
puts([<TD><FONT FACE="Arial,Helvetica"
SIZE=-1><INPUT TYPE="TEXT" NAME="fname" MAXLENGTH="40"] ;
+ cValue + [></FONT></TD>])
puts([</TR>])
puts([<TR>])
puts([<TD Width="40%"><FONT
FACE="Arial,Helvetica" SIZE=-1>Last Name:</FONT></TD>])
if not empty(f["lname"].value)
cValue = [ VALUE="]
+ trim(f["lname"].value) + ["]
else
cValue = ""
endif
puts([<TD><FONT FACE="Arial,Helvetica"
SIZE=-1><INPUT TYPE="TEXT" NAME="lname" MAXLENGTH="40"] ;
+ cValue + [></FONT></TD>])
puts([</TR>])
puts([<TR>])
puts([<TD Width="40%"><FONT
FACE="Arial,Helvetica" SIZE=-1>User ID:</FONT></TD>])
if not empty(f["userid"].value)
cValue = [ VALUE="]
+ trim(f["userid"].value) + ["]
else
cValue = ""
endif
puts([<TD><FONT FACE="Arial,Helvetica"
SIZE=-1><INPUT TYPE="TEXT" NAME="userid" MAXLENGTH="11"] ;
+ cValue + [></FONT></TD>])
puts([</TR>])
puts([</TABLE></UL>])
puts([<UL><TABLE>])
puts([<TR>])
puts([<TD Width="40%"><FONT
FACE="Arial,Helvetica" SIZE=-1>eMail address:</FONT></TD>])
if not empty(f["email"].value)
cValue = [ VALUE="]
+ trim(f["email"].value) + ["]
else
cValue = ""
endif
puts([<TD><FONT FACE="Arial,Helvetica"
SIZE=-1><INPUT TYPE="TEXT" NAME="Email" MAXLENGTH="40"] ;
+ cValue + [></FONT></TD>])
puts([</TR>])
puts([<TR>])
puts([<TD Width="40%"><FONT
FACE="Arial,Helvetica" SIZE=-1>>Password:</FONT></TD>])
if not empty(f["password"].value)
cValue = [ VALUE="]
+ trim(f["password"].value) + ["]
else
cValue = ""
endif
puts([<TD<FONT FACE="Arial,Helvetica"
SIZE=-1><INPUT TYPE="PASSWORD" NAME="password" MAXLENGTH="15"] ;
+ cValue + [></FONT></TD>])
puts([</TR>])
puts([<TR>])
puts([<TD Width="40%"><FONT
FACE="Arial,Helvetica" SIZE=-1>Password (again):</FONT></TD>])
puts([ <TD<FONT FACE="Arial,Helvetica"
SIZE=-1><INPUT TYPE="PASSWORD" NAME="password2" MAXLENGTH="15"] ;
+ cValue + [></FONT></TD>])
puts([</TR>])
puts([</TABLE></UL>])
/// This is the submit button.
It's NAME is evaluated
/// by the application to control
the flow of executution.
puts([<INPUT TYPE="SUBMIT" NAME="modifyuser"
VALUE="Submit Information">])
puts([<INPUT TYPE="RESET" NAME="Reset"
VALUE="Reset Form">])
puts([</FORM></TD>])
puts([</TR>])
puts([</TABLE>])
puts([</BODY>])
puts([</HTML>])
quit
return
|