Figure 1

Figure 2
Overview
For the sake of simplicity, I will use the tables and applications described in the Guided Tour as a reference. This 2.2 Mb document (dB2KGuidedTour.Zip) is available at www.dbase.com. If you follow all the steps in the Guided Tour, you will be able to create an application without writing a line of code! The application works. However, there may be a need for some customization, specific to your individual needs. For instance, you can add the company logo, create more sophisticated reports, include lookup tables, or just modify the code as you normally would with a regular application.
To create an application using One-Click Windows, all you need to do is have a data model in mind and then create the tables, create a database, and place these in a datamodule. After that, the creation of the application is pretty much straightforward. Just select the One-Click Windows under the applications menu.
Files used by One-Click Windows
The following are the initial tables
to create One-Click Windows as described in the Guided
Tour. If you haven’t created these tables, you may wish to refer
to the Guided Tour and create them so you can perform the customization
and code tweaks described below.
|
Cust.DBF - Customer database Inv.MDX - Invoice Index Cust.MDX - Customer Index Inv.DBF - Inventory database |
|
The rest of the files needed to
run the application are created automatically.
| CUST_INV.DMD | Customer/Inventory module | |
| CUST_REP.REP | Customer Report | |
| CUST_INV.DMo | Compiled Customer/Inventory module | |
| CUST_REP.REo | Compiled Customer Report | |
| Cust_inv.wfm | Customer/Inventory Form | |
| Cust_inv.prg | Customer/Inventory Program | |
| CUST_INV.PRo | Compiled Customer/Inventory Program | |
| CUST_INV.WFo | Compiled Customer/Inventory Form | |
| qRtOneClickWin.cfo | Compiled qRtOneClickWin.cfm (located in the dQuery directory) | |
| qRtOneClickWin.co | Compiled qRtOneClickWin.cc (located in the dQuery directory) | |
| qRtOneClickWin.mno | Compiled qRtOneClickWin.mnu (located in the dQuery directory) | |
| qRtOneClickWin.poo | Compiled qRtOneClickWin.pop (located in the dQuery directory) | |
| qRtAboutOneClickWin.wfo | Compiled qRtAboutOneClickWin.wfm (located in the dQuery directory) | |
| qRtOneClickToolbar.co | Compiled qRtOneClickToolbar.cc (located in the dQuery directory) | |
| qDialog.co | Compiled qDialog.cc (located in the dQuery directory) | |
| qDialog.cfo | Compiled qDialog.cfm (located in the dQuery directory) | |
| qSkipRows.wfo | Compiled qSkipRows.wfm (located in the dQuery directory) | |
| qSqlFilt.wfo | Compiled qSqlFilt.wfm (located in the dQuery directory) | |
| nextarro.bmp | Graphic file (bmp format) | |
| dQueryWebLogo.bmp | Graphic file (bmp format) | |
| qRtReport.co | Compiled qRtReport.cc (located in the dQuery directory) | |
| Cust_inv.rsp | Creates Cust_inv.exe | |
| Cust_inv.exe | Executable file | |
| Cust_inv.ini | Tied to the executable file | |
Notice that some of the compiled files are referenced to the dQuery directory. Therefore, if you want to customize the application, you need to modify these files, compile them and replace the old files in the directory where you have your application. For instance, you may want to change the company logo (dQueryWebLogo.bmp), the menu, the dialog boxes, etc. Remember that dQuery is Open Source and can be modified to suit your needs.
Problems with the Form designer
It seems that the form created
by the One-Click Windows (Cust_inv.wfm) contains code that brings out a
bug in the Form designer. The original form has the following code:
|
** END HEADER -- do not remove this line // // Generated on 01/22/2001 09:28:41 PM by dQuery/Web // parameter bModal local f f = new Cust_invForm() if (bModal) f.mdi = false // ensure not MDI f.readModal() else f.open() endif class Cust_invForm of qRtOneClickWinForm
from qRtOneClickWin.cfm
this.cFileName = "CUST_INV.DMD" with (this)
|
|
However if you modify the form,
using the Form designer, and save the changes the code is changed to:
|
** END HEADER -- do not remove this line // // Generated on 02/25/2001 // parameter bModal local f f = new Cust_invForm() if (bModal) f.mdi = false // ensure not MDI f.readModal() else f.open() endif class Cust_invForm of QRTONECLICKWINFORM
from "qRtOneClickWin.cfm"
|
|
As you can see, the code is different and it will affect the functionality of your application. This has been reported as a potential bug in the newsgroups. Hopefully in the next update of dQuery this will have been fixed.
This problem relates to the form designer only. However, since the Source editor can be used to make changes to forms created by One-Click-Windows, we can use the Source editor to fix the problem caused by the Form designer. A simple work-around for this problem is thus to make a backup of the original form: for instance, Backup.wfm. Then, after the changes are made in the Form designer, open the backup form in the Source editor, select the new code shown in bold red in the changed constructor code above, and paste in the original code, thus replacing the existing (and incorrect) new code. Finally, since this is a DEO application and thus any edited component (form, menu, custom class, prg, etc.) needs to be recompiled before any change(s) will be “seen” by the application’s .exe file, you must re-compile the form before running the application. This can be done most easily by right-clicking the .wfm file in the Navigator, and choosing “Compile”.
The Datamodule
If you open the datamodule with the Source editor, you will notice that the views and reports are generated from here, as are the parent-child relationships. Adding or deleting reports is straightforward and it can be done directly from the datamodules. To add a report, just create a new report and add an additional line of code in the datamodule, such as: add("myreport.rep"). To delete a report, just delete the line of code in the datamodule. This is a great feature and it will save you a lot of time; the reports will appear in the application after the datamodule is compiled.
The views are also defined in the
datamodule. They show the fields that are being displayed in the
No-Click Report. However, to modify the views, you need to do it
in the form. An easy way to acomplish this is to use the Source editor
and modify the form.notebook1.viewgrid
shown
below. For instance, if you want to display the Balance Due rather
than the Amount, replace the fieldName
AMOUNT with the fieldName
BALANCEDUE in column3,
save the form, compile it, and run the application again to see the results.
As you will notice, this modifies both the View and the No-Click Report.
Similarly, you can delete or add columns to the viewgrid by inspecting
the code below. And if the fields you need don’t fit in the No-Click
Report, you can even change the width by adding one line of code, such
as: columns["COLUMN1"].width = 50
|
with (this.NOTEBOOK1.VIEWGRID) dataLink = form.dataModule1.INV1.rowset columns["COLUMN1"] = new GridColumn(form.NOTEBOOK1.VIEWGRID) columns["COLUMN1"].dataLink = form.dataModule1.INV1.rowset.fields["INVOICE ID"] columns["COLUMN2"] = new GridColumn(form.NOTEBOOK1.VIEWGRID) columns["COLUMN2"].dataLink = form.dataModule1.INV1.rowset.fields["CUSTOMER ID"] columns["COLUMN3"] = new GridColumn(form.NOTEBOOK1.VIEWGRID) columns["COLUMN3"].dataLink = form.dataModule1.INV1.rowset.fields["AMOUNT"] columns["COLUMN4"] = new GridColumn(form.NOTEBOOK1.VIEWGRID) columns["COLUMN4"].dataLink = form.dataModule1.CUST1.rowset.fields["LAST NAME"] endwith |
|
Re-establishing the parent-child relationship
When you create an application
where there is a parent-child relationship, as in the Guided Tour application,
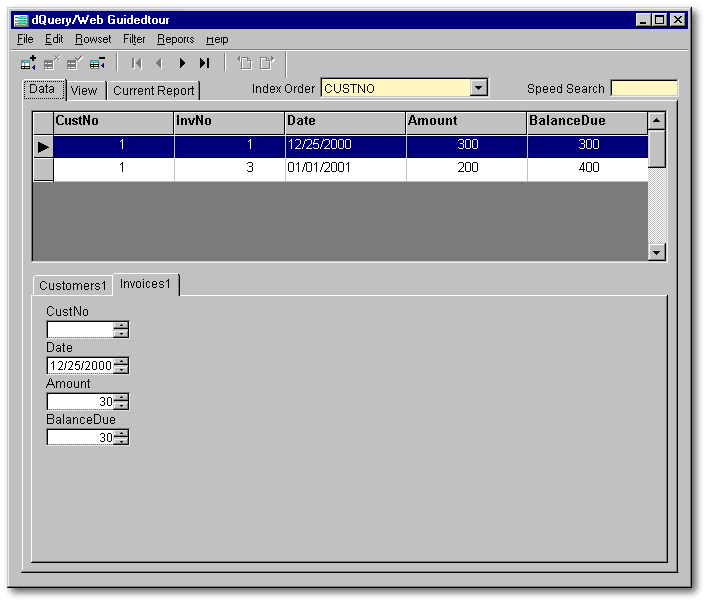
the relationship can be observed by switching to the Data tab. In Figure
1 below, you can see that the (original) index is set to
CUSTNO and all the invoices
correspond to a particular customer, i.e., CustNo is “1” for all displayed
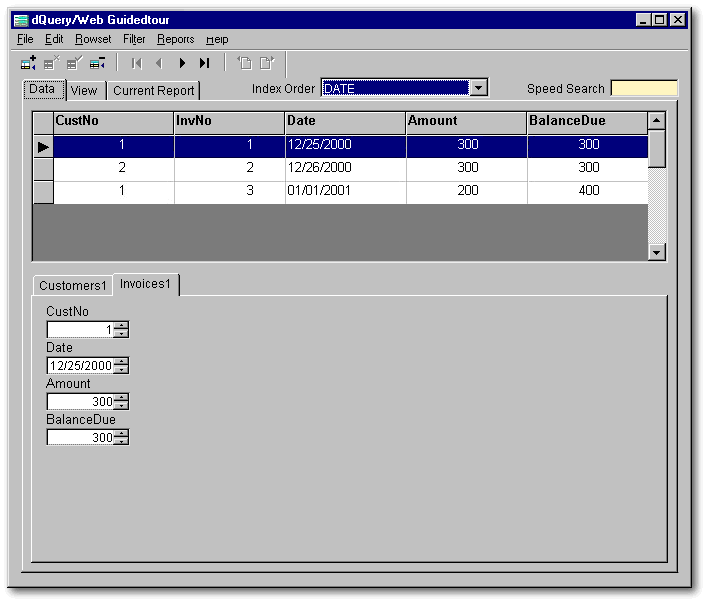
rows. However, if you change the index order for the invoices, this
will break the parent-child relationship, which is not desirable in most
cases. As depicted in Figure 2, in which the index has been changed
to DATE,
there are invoices corresponding to customer 2, even though customer 1
was selected. However, the parent-child relationship can be re-established
very easily by adding some code to the
canSelChange() event of
the notebook control (to which the tabs belong) , as shown below:
|
Function DATANOTEBOOK_canSelChange(nNewSel) // Abandon any changes/modes before switching to other mode if form.rowset.state > 1 form.rowset.abandon() endif if nNewSel = 2 // Re-set
parent-child when switching to the child rowset (Invoice Tab)
|
|

Figure 1

Figure 2
With this last small change to the app, it is now ready for deployment!
Conclusion
The customization of a One-Click Windows application can be performed just as you would for any other application. Knowing how and where you can make the code changes will make creating a powerful application a breeze. Most of the work is already done for you. And with minor adjustments to the original application, you and the users will be completely satisfied.
Using One-Click Windows as a base allows power-users and developers to create robust applications without having to start from scratch; the time savings are enormous. The benefit of using this new tool is tremendous and the only limit is your imagination.