Quick-Start: If you find
line-by-line instructions tedious, you may wish to just run the
included
form to see how it and its two sub-forms behave, then examine the code,
which is pretty extensively commented. If theres anything you dont understand,
come back here to read about it.
Ini
Introduction
Ini (initialization) files have been around since Windows 3.1. They are standard ASCII text files that contain data organized into categories called Sections. Their role, like that originally provided by the DOS files config.sys and autoexec.bat, is to remember configuration information used by both the system (win.ini, system.ini, etc.) and by individual applications (e.g., CorelDRAWs coreldrw.ini). The information in an applications ini file is mainly comprised of user-specifiable program settings, from recent files to onscreen window coordinates to the location of app-related data files.
Win95, a more complex system than Win3.1, introduced the Registry. It was intended to be a single central repository of settings for the operating system, hardware, and user applications as well, thus providing an alternative to the welter of app-related ini files on a hard drive. The Registry differs from all prior configuration files in that it is a binary database file rather than a simple text file, and is thus less directly accessible to users intent on mischief (e.g., finding a password). Furthermore, since it is hidden in the system folder, it is far less likely to be accidentally deleted. Although the Registry is extensively used by the Windows OS and is well-used by many applications, ini files are still with us. In fact, even win.ini is still with us and is regularly consulted and updated by the Windows OS. If you have any doubts about the continuing use of ini files, even in a clean-installed Win2K system, do a search for *.ini and watch the ListView control fill up.
On the other hand, heres what Microsoft has to say about the use of their GetPrivateProfileString(): This function is provided for compatibility with 16-bit Windows-based applications. Win32-based applications should store initialization information in the registry.
dBASEs use of ini files
In addition to its relatively few entries in the Registry, dBASE relies heavily on ini files. The dBASE executable itself uses DB2K.INI in preference to the Registry to store the wide variety of user preferences, and any application that you compile to an exe file in dBASE expects to have its own ini file, named after the applications exe file. So if your exe is called MyBigApp.exe, it will, sooner or later, have an ini file called MyBigApp.ini.
dBASE will generate an ini
file for your compiled application if there isnt one: If you do not provide the ini file, the
dBASE runtime will create one when the exe file is first run, just after
the form opens. It is possible to deduce the Moment of Creation by placing
ini file detection code to display a message in the command window such
as
|
? "Now in header section... is ini file present yet? " +file("Myini.ini") |
|
in the header section and in a custom Open() function, which always runs before the form is opened. The ini file is thus detectable in the forms onOpen() event (which follows the opening of the form), but not prior to it.
What is in the ini file of a compiled
dBASE app? Below is an auto-generated ini file for a compiled dBASE application:
|
[Toolbars] Standard=0 StandardFloat=0 StandardStyle=0 [Desktop]
[CommandWindow]
[Directories]
[Database]
|
|
Other than the location of the
default folder under [Directories],
there is nothing specific to this application in the auto-generated ini
file. And there need never be, if you do not wish to use the ini file any
further than this. However, the point of this article is to show you how
to make your application more useful to the user by letting it remember
user preferences, and restore them each time the program loads.
Dependencies
You will, of course, need a copy of INI.CC and its two support files. These three files are part of the dUFLP (dBASE Users Function Library Project) package. The version of INI.CC you have will depend on which version of the dUFLP you have. If you have an older version of the dUFLP, the files required are INI.CC, STRINGEX.CC and dUFLP.H. If you have either of the last couple of versions of the dUFLP, the files are INI.CC, STRINGEX.CC and SETPROC.PRG. If you do not have the dUFLP package, it is available at dbase.com . However, a set of the three ini-related files from the dUFLP is also included with the zipped demo forms via a link near the top of this article. Although the newest version of these files is set up to use Source Aliasing, I prefer to simply place a copy of these three files in the folder of the application I am working on, as this makes it easier to get them into the apps Project file when its time to compile and build the exe. Keep in mind that each of the sets of 3 files is a matched set, so do not use the INI.CC from one set and the SETPROC.PRG from another; the INI.CC in each set expects to find the correct versions of its dependency files. Although the newer INI.CC file suggests that you must have dUFLP Source Aliasing set up in order to use the ini-related files, it is not necessary just have a copy of each of the three files in your working folder and all will be well.
A general strategy for managing ini files
Since an ini files role is to store information and recall it, decisions must be made as to when, in the running of an app, these processes should occur, how the information should be stored while the app is running, and at what point new/changed preference data should be saved to the ini file. Programmers are likely to vary their approaches according to the amount and type of data that will be managed by the ini file, but heres a basic approach that will do the job:
In the header section of the
form:
1. Initialize app
properties, check for the existence of the ini file, generate it if needed
and establish default values
2. Extract values
from the ini file and store them in app properties
In a custom Open( ) function
of the form:
3. Update the
form and controls to reflect preferences
In the open form:
4. Provide a means
to specify preferences and update app properties and controls
5. Store preferences
in the ini file on program exit
A main form,
two sub-forms and an ini file accompany this article and are used in
the examples below.
Ini
file and INI.CC Basics
Before we proceed with examples of the use of INI.CC, lets look at the relevant ini file terminology, and also take a quick look at INI.CCs functions to see how they interact with ini file components.
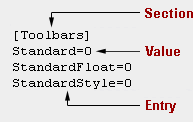
Below is a Section of an ini file,
grabbed from dBASEs auto-generated ini file shown above:
|
[Toolbars] is
referred to in ini-speak as a Section. A Section must be set in
square brackets. Standard or
StandardFloat or
StandardStyle is referred
to as an Entry. Each of the zeroes is referred to as a Value.
An Entry can have more than one Value, usually comma-separated.
Ini files only
store character data. You must always convert numeric and logical values
to character strings before storing them in an ini file.
|
||
Thats all there is to ini terminology. I will always capitalize the first letter of these terms in this article since the words are often used in other contexts, and I want it to be clear when I mean the ini versions. Now lets briefly look at the INI class.
Once an
INI
object is created
(instantiated) with a name such as oMyINI,
several ini-related functions (also called methods) become available.
My guess is that after glancing at the above terminology and recalling
the nature of the job at hand, you wont have much trouble figuring out
what most of these functions do:
| Functions | Description |
| SetValue(cSection,cEntry,cValue) | To create, as needed, the Section and Entry, then to set the specified Value |
| GetValue(cSection,cEntry) | To retrieve the Value from the specified Section/Entry |
| GetSection(cSection) | To retrieve all the Sections Entries and their Values into an array, with its object reference contained in oMyIni.SectionArray |
| SectionArrayParse2Arrays([cDelimiter])* | To parse the array returned by GetSection(); see INI.CC for instructions |
| DeleteSection(cSection)* | To delete the specified Section and all its Entries/Value(s) |
| DeleteEntry(cSection,cEntry)* | To delete the specified Entry and its Value(s) |
| Flush() | To force the ini file to be written to disk |
| SetIniFile(cIniFile)* | To create a new ini file of the specified name; this can also be accomplished when instantiating the INI object |
| Release() | To release the INI object |
| * = not used in the example in this article |
| Properties | Description |
| IniFile | The filename of the INI file |
| Section | The Section most recently read or written-to |
| Entry | The Entry most recently read or written-to |
| Default* | A programmer-provided default value for the GetValue() method, normally left blank (i.e., Value="") |
| SectionArray* | The last-read one-dimension array of Entries of a Section in this form: Entry=Value |
| EntriesArray* | The last-parsed Entries from SectionArray |
| ValuesArray* | The last-parsed Values from SectionArray |
| * = not used in the example in this article |
The form called DemoIni.wfm supplied with this article allows several kinds of user preferences to be stored in the INI file and then retrieved. Below is a screen shot of the main form and its modal sub-form opened by the Set Preferences button:
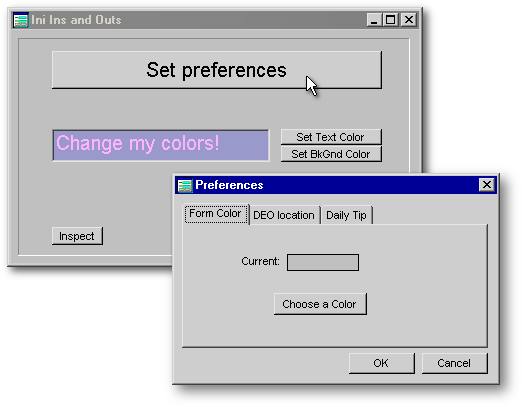
| DEO refers to a new feature
of dBASE called
Dynamic External Objects. Briefly, this feature
provides the option to maintain an application as a set of small object
(.wfo,
.mno,
.reo,
.dmo, etc.) files rather
than as a single large EXE file.
The advantage to DEO is that a modification to a program component requires
that only the single changed component be re-compiled and sent to users.
You are thus saved the time needed to regenerate a large EXE file, and
the upload time is short an object file is usually very small.
|
||
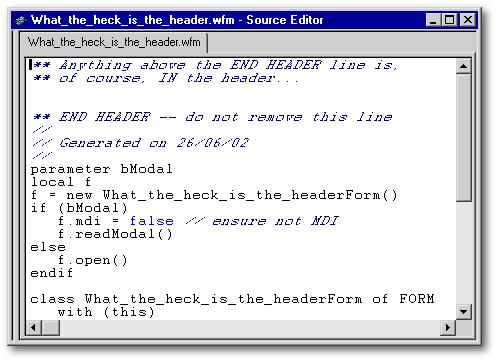
The form created for this article
has the first portion of ini-related code in its header section.
The header section, as shown in
the figure below, is the region above the line that says
Any code placed in this region
will be run before the form object is created (instantiated). Placement
of the ini-related code here is a matter of choice. Instead, it could be
associated with the forms onOpen() event
(although it might cause blinking or visible movement of the form), so
a better choice would be to place it in a custom
Open(
) function or in a custom Init(
) function. I am placing
it in the header section mainly out of habit.
|
||||||
Below is a screen shot of the Source Code Editor showing the header section.
We will use custom
_app properties to store
data extracted from the ini file.
| _app represents
the object which is the currently running instance of dBASE. So, like any
object, you can tack onto it, dot-style, any custom properties youd like,
as long as you steer clear of the built-in properties (see _app
in OLH for a list of property names to avoid).
I am using _app properties here because they are visible to the entire application, and are therefore suited to holding information which needs to be seen by the entire application. You may have read scornful comments
about the use of _app properties,
since they are functionally very similar to the much-maligned and spurned
public variables of the DOS dBASE versions. My advice: ignore those
comments and use _app properties
where they are useful.
|
||
Below is the beginning of
DemoIni.wfms header section
where it initializes the custom _app properties:
|
// Init the _app properties to be used to store ini data *---------------------- // Entryfield colors _app.EF1color = "" *----------------------
*----------------------
*----------------------
*----------------------
|
|
As you can see, an
_app property has been
initialized for an entryfield colorNormal
property, another for
the main forms ColorNormal
property,
another for the location of the DEO folder, another for the Daily Tip option,
and then four more to hold size/position coordinates for the main form.
Although you could initialize these properties at the time they are loaded
with ini data, I prefer having a nice orderly list at the top to remind me
what I'm working with.
Role
of the _app properties
The role of these properties is,
first, to hold their corresponding data when it is extracted from the ini
file. They will then be used to modify the corresponding form and object
properties before the form opens. If the user changes any of the values
while using the program, the _app properties
will be updated so they can be used to write the new values back to the
ini file when the user exits the program.
Use of
_app properties, or any
variables at all, to manage ini data is not a necessity its entirely
possible to achieve the same functionality without them. However, to do
without them, you would have to place your initial ini code in a custom
Open() or
Init() function because
you would need access to the properties of the instantiated form and its
objects, since it is these properties that you will be setting. Furthermore,
you would have to do this for any form in the app that has ini-settable
properties. More on this below.
|
||
The next chunk of code is where
the action starts:
|
// The ini file and its full path... cInihome = set("directory")+"\DemoIni.ini" *---------------------- // if we can't find ini-file... If not file(cInihome) msgbox("DemoIni.ini file is missing...so, we'll make one.","FYI",64) ... |
|
We first need to test for the existence of the ini file so well know which direction we have to take: either create it if it doesnt exist, or extract information from it if it already exists. Even though its safe to assume when running an app that the ini file will be there, we need to provide for either scenario.
As you can see in the above code,
we are a establishing a variable called
cInihome and assembling
contents to be placed in it. The dBL function
set("Directory") will
return the current drive and path, e.g.,
c:\dBASE\IniFileApp, and
we use the + sign to add (concatenate) the necessary backslash, followed
by the name of our ini file, to the drive:\path string.
cIniHome should then contain
a string of characters that looks something like this:
|
c:\dBASE\IniFileApp\DemoIni.ini |
|
| If you dont include the full
path to the ini file, it will not be automatically placed in the
current folder. Instead, if the ini creation code is run from a
.wfm file in the IDE,
the ini file will be placed in the folder where
dB2K.exe is located; or
if run from an .exe file,
it will be placed in the folder where dB2KRun.exe
is installed.
However, if you have no ini file and then allow it to be created
automatically when your compiled app is run, the newly created ini file
will be placed in the same folder as your exe file.
|
||
We then start an
If/Else/Endif to test
for the existence of the ini file. The first section of the
If structure assumes we
cannot find it, and we thus begin the code to create a new ini file. Incidentally,
the whole process will be encased within a nice safe
Try/EndTry
in case anything
goes terribly, tragically wrong.
Instantiate
an INI object
We start by using
set procedure to to tell
dBASE to open the INI.CC file,
and we then instantiate an object of the
INI class:
|
TRY set proc to ini.cc additive // create new INI object oMyIni = new Ini(cInihome) // Instantiation ... |
|
The last line above instantiates
the INI object
into a variable called oMyIni.
Notice that we are sending the name of the ini file (which is contained
in the variable cInihome)
as a parameter. The oMyIni object
will look for this file, and if it isnt there, will create it for us.
So, after that line of code has been processed, a new empty ini file of
the specified name will exist. We now need to add a Section and some Entries
and corresponding Values.
Set
Entries and Values
In the code below, we use the oMyIni function called SetValue()for the first time. It uses three parameters to specify the Section, Entry, and Value:
|
... // Use oMyIni.SetValue(cSection,cEntry,cValue) // to set values of the entryfield color oMyIni.SetValue("Preferences","EF1color","0xffb3ff/0xcc9999") // update _app property _app.EF1color := "0xffb3ff/0xcc9999" ... |
|
This first time the SetValue() function is used, oMyIni will notice that there is no [Preferences] Section, and will create it. It will then create an Entry called EF1color, add an = sign after it, then concatenate to that the Value, which is a colorNormal value of 0xffb3ff/0xcc9999
The last line in the code above also assigns the same colorNormal value to the corresponding _app property. Recall that this _app property is being used to transmit the corresponding ini Value to the form.
The result will be the following
two lines written to the ini file:
|
[Preferences] EF1color=0xffb3ff/0xcc9999 |
|
We now reiterate the
SetValue() function to
establish the rest of the Entries/Values that we wish to include in the
ini file, and we also set their corresponding
_app properties for later
use by the form:
|
... // Form color MyIni.SetValue("Preferences","formColor","BtnFace") // update _app property _app.formColor = "BtnFace" ********************************* // DEO folder location
********************************* // Daily tip
********************************* // Form position/size coordinates
(height,left,top,width)
|
|
You may have noticed, above, that the last Entry, fcoords, is composed of four comma-separated Values. Also notice that we are storing the individual values in their _app properties as character strings rather than as numeric values, e.g., _app.fheight = "10.6". This is an arbitrary decision. These four values must, at some point, be converted to numeric values since the forms size/position properties are numeric. I have chosen to keep all the _app properties as character to match the all-character ini Values, and to convert to numeric only as needed when setting object properties. You may choose to do it differently, of course.
We then use
oMyIni.Flush()
to force
the ini file to be written to the disk and we also release the
oMyIni object. The rest
of the Try/EndTry code
is shown here as well:
|
... // force a write of the new ini file to disk oMyIni.Flush() // release INI object
CATCH (Exception e)
|
|
If the ini file already exists
Still in the header section of the form, we now enter
the
Else branch of our
If/Else/Endif structure,
which covers the alternative scenario the ini file is already present.
Here, we will use the GetValue(cSection,cEntry)
function
to retrieve each Value and store it in its respective
oMyIni.Value property.
If GetValue() cannot
find either the Section or the Entry, or if the Value is blank, the
oMyIni.Value will be blank,
and we will use SetValue() to
create what was missing.
A
relevant property that were not using here oMyIni.Default
INI.CC makes use of a default Value feature of the GetValue() function: if you load the property called oMyIni.Default with the desired default contents of the Entrys Value, then call the GetValue() function, if GetValue() cannot find either the Section or the Entry, it will create them as needed, and will return the contents of the Default property to the oMyIni.Value property. However, it will not set the ini file Value with your specified default value. Instead, the Value in the ini file will be left blank. Moreover, if the Section and Entry are already present in the ini file but the existing Value is blank (i.e., un-set), the function assumes that the blank value is valid, and so the contents of oMyIni.Default will not be returned to the oMyIni.Value property; instead, a blank is returned. Thats OK if the desired default is a blank, but its not OK if you wish the default to be a string or numeric value.
So, you will have to decide whether to use the oMyIni.Default property or not. For this articles form, I do not use it at all. Instead, I just test for the GetValue()s return value (in the oMyIni.Value property), and if it is blank (meaning either no Section, no Entry, or a blank Value), I use SetValue() to create whats missing and to set the proper Value. The result is this: no blank values in any of the ini file Entries. Since you may desire a different outcome in your application, you can tailor your use of the GetValue() function as needed.
The
GetValue()
code is shown
below for all but the last ini Entry:
|
... // ini-file exists and we need to extract Values from it Else set proc to ini.cc additive oMyIni = new Ini(set("directory")+"\DemoIni.ini") // Instantiation // Check Entries if any
is missing, empty or wrong, fix it. Otherwise, get the Value.
*----------------------------
*----------------------------
*----------------------------
|
|
For the sake of illustration, I have used multiple Values for the last Entry (called fcoords). These four Values will specify the forms size and location on the screen (form.height,form.left, form.top, form.width). Although we could have set four separate ini Entries for these four coordinates, its more efficient and also pretty easy to stick them all in the same Entry. However, on retrieving them, we will parse them out to four separate _app properties not absolutely necessary, but easier to deal with in the form, I think.
GetValue() is
used in the same way as above. The only difference here is that if a Value
is present we assume it is a comma-separated string of four values and
then use the Tokenize() function
to place the values in an array called
aCoords.
| Tokenize() is
a very nice little function that I borrowed from Vic McClungs Printer Class. Its job is
to accept a character-separated (usually comma-separated) sequence of character strings
and parse the strings into an array. It takes two parameters: the string to be parsed, and
the separation character. Here, our list of form coordinates is comma-separated.
The Tokenize() function is included within the DemoIni.wfm file beneath the Form class so that it can be seen by code in the header section (remember that while were in the header section, the form has not yet been instantiated, so its methods are not yet available). Thus Tokenize() is not a method of the form, and so it can be called directly, i.e., Tokenize() rather than form.Tokenize(). This is shown below along with some TRY/CATCH error checking in case the coordinates have been fooled with we want to avoid seeing an invalid subscript reference error. Invalid subscript reference is
a common error which means the program has asked for a non-existent array
element. For example, if the code asks for
aMyArray[4] and there
are only 3 elements in the array, this error will occur. Unfortunately,
its not always easy to figure out which array is causing the problem.
|
||
|
(...) *---------------------------- oMyIni.GetValue("Preferences","fcoords") // Form size & position // no Value for this Entry if empty(oMyIni.value) // fix the Entry with defaults oMyIni.SetValue("Preferences","fcoords","10.6,22,6,58.3") // set default _app properties _app.fheight = "10.6" _app.fleft = "22" _app.ftop = "6" _app.fwidth = "58.3" // there is a value... else // use tokenize function to parse the string aCoords = tokenize(oMyIni.value,",") TRY // in case someone has fooled with the coord values // and we have fewer than 4 values... _app.fheight = aCoords[1] _app.fleft = aCoords[2] _app.ftop = aCoords[3] _app.fwidth = aCoords[4] CATCH (Exception e) // there was at least 1 missing coordinate...so set default values oMyIni.SetValue("Preferences","fcoords","10.6,22,6,58.3") _app.fheight = "10.6" _app.fleft = "22" _app.ftop = "6" _app.fwidth = "58.3" endif *---------------------------- |
|
Im sure you can see
that there are many opportunities for bad ini data to sabotage our process
here (such as nutty coordinates that put the form ½ mile off-screen)
so you will have to decide how much error-checking code you wish to write.
And, considering that it is mostly, if not all, in defense against users
meddling with the ini file, you can now see why the Registry (which is
relatively inaccessible) seemed like such a good idea to Microsoft. In fact, we could
just as easily perform this entire process using the Registry and
REGISTRY.PRG instead of
using the ini file and INI.CC.
Perhaps it will be the subject of a future dBulletin article.
|
||
To wrap up this header section
aspect of ini file management, we dump the
oMyIni object.
|
// release and null the oMyIni object oMyIni.Release() oMyIni = null Endif |
|
Lets assume the worst that we had to
re-create the ini file from scratch. It will now look like this:
|
[Preferences] EF1color=0xffb3ff/0xcc9999 formColor=BtnFace deoLoc=X:\DemoIni <your own current folder will show up here...> dailytip=true fcoords=10.59,22.00,2.00,58.29 |
|
You may be thinking Hey, where is the rest of the ini file contents?? All the stuff that dBASE puts in automatically? Not to worry when your app is compiled and run as an exe, those extra Sections/Entries will be added automatically. They are not added when the form is run in the IDE.
Ready to instantiate the form
Since we now have an ini file and have filled our
_app properties with data,
we are ready to instantiate the form. Well then use a custom
Open() function which
extracts the contents of the _app properties
and applies them to corresponding properties of the form and its controls.
Update
the form and controls to reflect preferences
[Top|General Strategy]
Now we move to the main form and
our custom function called Form.open().
| If you have not used a custom
form.open() function yet
in your coding, heres why it is useful: A custom
form.open() function is
called before the FORM classs built-in
Open() function. This
means that adjustments to the form occur before it is visible, thus eliminating
obvious screen flicker as properties are changing.
Theres one crucially important
aspect of using an Open() function:
you have to end it with this line:
which calls the Form classs own built-in Open() method. It is what actually opens the form. If you wish to do something analogous
with a modal and SDI dialog form opened with MyModalForm.readmodal(),
create a custom form.readmodal() function
in the dialog and use it to modify properties of the dialog form. It will
over-ride the built-in Readmodal() function
belonging to the Form class. Your custom
form.readmodal() function
must end with this line:
which, as in the previous example,
calls the Form classs own built-in Readmodal()
method.
|
||||||||||
So, things are now getting simpler
all we need to do here is use our _app
properties to change the
relevant form and object properties as shown below:
|
Function Open // Here is where we use the values of our custom // _app properties to set form and object properties. // We do it here (particularly the form's coordinates) // rather than in the form's onOpen() so that the form // doesn't do funny stuff, like jerk around and blink. // set the EF1 entryfield's
colorNormal
// set form's colorNormal
// set form's size/position
// Initialize a flag (as a
custom property of the form)
// this next line is how you
always
end a custom
|
|
We also initialize a custom property of the form (form.DoIniUpdate) that will be used as a flag to remind us if any changes are made to ini-related data.
Remember that numeric values are character in an ini file
At whatever point you grab numeric values from an ini file, always recall that if you wish to use them as numeric, you have to convert them by using the VAL() function. Here, since I chose to leave all the _app properties as character to match the ini file Values, we have to now do the conversion to numeric. You can see the four examples in the above code.
If you want to avoid using _app properties
As mentioned above, it is not necessary to use
_app properties at all
in this process. If we had decided to not use them, we could have left
the header region code-free and instead used our
form.open()
function.
That function is where we would instantiate the
oMyIni object and directly
alter the form and object properties, as shown (hypothetically!) below:
|
set proc to ini.cc additive oMyIni = new Ini(set("directory")+"\DemoIni.ini") // Instantiation if empty(oMyIni.Value) // no Value set, so set it oMyIni.SetValue("Preferences","EF1color","0xffb3ff/0xcc9999") form.EF1.colorNormal = "0xffb3ff/0xcc9999" else // otherwise, use the Value to set the object property contents form.EF1.colorNormal = oMyIni.Value endif |
|
Keep in mind that it would still be necessary to test for the existence of the ini file as we did in the header section. Using the direct method, we would save a fair bit of code by not having to initialize the _app properties and by avoiding the 6 lines of _app-to-object.property code in our Open() function. The other advantage to not using _app properties is that, if there are a lot of them, we save some RAM.
Check for Daily Tip
In
the first few milliseconds after the form opens we have to do our first
ini-specified task! We are going to use the forms
onOpen() event to check
whether the user wants to see the Daily Tip form. If so, well open that
form as well. Heres the forms onOpen()
code:
|
Function form_onOpen // make the code in these files available to use set proc to prefs.wfm additive set proc to dailytip.wfm additive // if we're supposed to display
the Daily Tip form
// instantiate
the form into the local variable
// establish
a communication "hot-line" back to the parent form
// open
the form "modal"...so, the code pauses until user
// now back
from the form...zap the obj. reference to main form
// release
dialog form...not really necessary for a local var,
// null
it too...now we're *really* beating a dead horse...
|
|
The above is pretty standard code
for opening a modal dialog box. We instantiate it into a local variable
dt, set up a means to
communicate with the parent via dt.oParent,
and run the form. The user has the choice in this dialog form of either
continuing to see a Daily Tip or not. If the user chooses to turn off the
feature, the dt form
tells the parent in this way:
|
// This is the only relevant code from the dialog form, // and is the onChange() event code for a checkbox that allows // the user to turn on or off the Daily Tip option. Function DAILYTIP_CB_onChange
// set this parental flag
to true so we update ini file on exit
|
|
Note: Here we must convert from the logical format of the checkbox value to the character format of the _app property hence the "true" and "false" rather than true and false.
And, if the
_app.dailytip
property
gets set to "false" and
is not changed back to "true" before
the program is exited, the ini file will be updated accordingly, and the
next time the program is run, the Daily Tip will not be displayed.
Provide
a means to specify preferences and update _app properties and controls
[Top|General Strategy]
Change
the entryfield colors
On the DemoIni form is a pair of pushbuttons which allow the user to specify the text color and background colors of an entryfield.

While you may not wish to provide
users with this particular option, the techniques described below can be
applied to any control with a foreground/background
colorNormal
property.
|
Function EFTXTCOL_PB_onClick // use the getcolor() function to return an RGB color triplet cColor = getcolor("Pick a color for the text") // if a color was picked by
the user
// change
the colorNormal property to the new text color
// grab
the entire colorNormal into its _app property
// set the
DoIniUpdate flag to true so we update the ini file on exit
Function EFBGCOL_PB_onClick
// a color was picked by the
user
// change
the colorNormal property to the existing text color
// grab
the entire colorNormal into its _app property
// set the
DoIniUpdate flag to true so we update the ini file on exit
|
|
| The function called
form.RGBtoHex() is a sweetheart
written by Jay Parsons years ago, and is included in the dUFLP collection
as part of Convert.cc
It is fed an RGB (RedGreenBlue) triplet such as 175,175,216 and returns the hex equivalent: 0xD8AFAF While were on the subject, the
0x is not part of the
hex numbers it merely specifies that it is followed by hex numbers.
|
||
The current coordinates of the
form change, of course, as the form is moved or sized by the user. What
we need to do is notice whether these changes occur. Below is the code
that checks whether movement and/or sizing has occurred. As you can see,
this is accomplished using codeblocks specified in the forms constructor
code. A codeblock runs if the form is moved or sized, and it sets our custom
property form.DoIniUpdate to
true:
|
class demoiniForm of FORM with (this) onMove = {;form.DoIniUpdate := true} onSize = {;form.DoIniUpdate := true} onOpen = class::FORM_ONOPEN onClose = class::FORM_ONCLOSE open = class::OPEN height = 10.6364 left = 22.2857 top = 5.9091 width = 58.2857 text = "Ini Ins and Outs" endwith |
|
If
form.DoIniUpdate
is true
at
exit time, the forms coordinates are extracted and saved to the
ini file.
The
Preferences Dialog Box
Another means by which our sample
form allows the user to specify two preferences is to use the standard
approach a Preferences
dialog box. The idea is simple temporarily
save any changed user preferences; then, if the OK pushbutton is clicked,
set the _app properties
accordingly and change any form or object properties specified by the user.
Specify
the main forms color
Run the Preferences form
from the main form to see how it behaves, then examine the code below which
gets the chosen form color from the user, translates the RGB to a more
usable format (via the RGBtoHex() function
located on the parent form), then stores it in an object property:
|
Function CHOOSECOL_PB_onClick // user can pick a color from the color chart cFormCol = getcolor("Pick a color for the form") // a color was picked (in
the RGB format, e.g., 175,175,216)
// switch
RGB result to hex format (call parent function
// change
the shape's color to display the new color
|
|
The chosen color (e.g.,
0xD8AFAF) is stored
as part of the colorNormal property
of a Shape object, which both illustrates the color for the user and saves
the color value in a format that we can use if the user accepts the changes.
Thus, the Shapes colorNormal property
might contain something like this: "black/0xD8AFAF"
Specify
the DEO folder
We allow the user to specify the
DEO folder as follows:
|
Function GETDEOFOLDER_PB_onClick // user chooses a folder cFolder = getdirectory() if not empty(cFolder) // set the folder name to the Entryfield value form.nb1.DEOFOLDER_EF.value = cFolder endif return |
|
dBASEs
getDirectory()
function
returns the drive:\path\folder name, so this is easy
and we save it
temporarily by displaying it in the entryfield as the entryfields
value
property.
Accept
or Cancel
As usual with a Preferences dialog, the user can either accept or cancel the changes. If changes are cancelled, we just close the form and thats it. But if the user accepts the changes, we have to do two things:
|
Function OK_PB_onClick // shorten the reference to the colorNormal property cn = form.nb1.FORMCOL_SHAPE.colorNormal // get the last section of
the Shape's colorNormal
// now go ahead and change
main form's color
// get the deo folder into
its _app property
// update the DoIniUpdate flag
// close the form
|
|
At this point, the forms color has been changed to reflect the users choice, and the DEO folder has been stored in its _app property, ready to update the ini file when the user exits.
For the non-_app users
Again, if you prefer to not use
_app properties, the above
code would need to include, in place of the
_app
updates, instantiation
of an oMyIni object
from INI.CC and
an update of the Values for deoLoc and
formColor via the
SetValue() function. The
code for this is in the section below.
Store
preferences in the ini file on program exit
[Top|General Strategy]
When the user exits the program,
we can take the opportunity to update the ini file if needed. Below is
the forms onClose() event
code where we first check our custom logical property
form.DoIniUpdate to
see if we need to update the ini file:
|
Function form_onClose // Write _app properties to the ini file if needed... if form.DoIniUpdate = true form.UpdateIni() endif return |
|
If we do need to update the ini
file, the function form.updateIni()
is
called. Its code is below:
|
Function UpdateIni // Here is where we update the ini file before // exiting the app. // create (instantiate) INI
object
// entryfield colorNormal
// Form color
// DEO folder location
// daily tip
// form position/size coordinates
oMyIni.SetValue("Preferences","fcoords",cAllcoords) // force a write of the ini
file to disk
// release INI object
|
|
At this point, youll probably be able to figure out most of whats going on in this function. We create a new INI object, then use the objects SetValue() function to update the Entries in the ini file. We get the Values directly from our _app properties.
The only slightly tricky aspect of this is to concatenate, in the correct sequence, all four of the main forms coordinates into a comma-separated string: were basically just adding a , between each coordinate. Notice that they do not have to be expressly converted to character dBASEs Automatic Type Conversion does that for us when we concatenate them to character elements (the commas). They are all thus saved as a string as the Value of the fcoords Entry.
Also notice in this UpdateIni() function that we are not testing any of our individual ini Values to see if they were changed. The approach here is basically this: if even one Value is changed during program execution, well update all of the Values, changed or not. The overhead is low, so why not?
Done!
Conclusion
[Top|General Strategy]
This article has presented a working approach to managing ini files by use of the custom class INI.CC and custom _app properties, and has also provided some direction in accomplishing the same ends without the use of _app properties. We thus have the capacity to create from scratch a new ini file with an appropriate Section and its component Entries and Values; to repair an ini file that is missing the Section or any of its components; to extract Values from an ini file on loading an app; and to save changed data back to the ini file on exit from the program.
I hope that the categories of ini-storable data used here are sufficient to cover most of the sorts of data a user might wish to retain: object colors, a data location, whether to show a daily tip, and form coordinates. These settings include character, logical, and numeric data.
Goodies in INI.CC that I didnt cover
Two of the functions, DeleteSection() and DeleteEntry() are very easy to figure out. The function called SetIniFile() can be used to create a new ini file, but we used the instantiation of the INI object to do the same thing. The pair of related functions called GetSection() and SectionArrayParse2Arrays() and their several related array properties are beyond the needs of most ordinary INI file management, but be sure to have a look at the descriptions of these functions in INI.CC so you can understand their potential.
Dont think only in terms of MyApp.ini
Please dont consider that the ini file named after an applications EXE file is the only one that is editable from within the application. Any of your applications can have as many ini files as it needs in order to store/retrieve information. The only one it must have is the one named after the exe file, and that one will be automatically generated. And, Win.ini or any other ini file on your system is now within your reach as well.
Dont think only in terms of ini files!
Heck, were database mavens! Were sitting on one of the most powerful desktop database packages in the world. Who needs ini files? We certainly dont we can easily create an encrypted Preferences table that would be sufficiently difficult to penetrate that it would make hacking the Registry look boringly simple. Still, ini files have their uses, and they are a part of the Windows universe. A programmer should possess as many tools as possible.
Finally, as mentioned previously, the Registry is made quite approachable by Registry.prg, and all of the ini-related data storage/retrieval described in this article can easily be replaced by analogous Registry actions. But thats another article.
Many thanks also to Barbara Coultry for her first-rate editing of this article which substantially improved its readability and sniffed out many errors. I would also like to mention that I have decided to not act on her correct advice about the placement of certain periods within quotation marks and instead retain a syntax that is, I think, both more rational and more appealing to a programmers mentality. So, when you see the incorrect
[Toolbars] is referred
to in ini-speak as a Section.
instead of the correct
[Toolbars] is referred to in ini-speak as a Section.
blame the error on me.