dBASE Plus has a number of powerful and easy-to-use tools for modeling data. With a dataModule you can define relationships among query objects, create calculated fields, add lookup rowsets and much more. When such a dataModule is added to a form object, the User Interface controls have instant access to all the data.
Connecting to data from a report is not quit as easy. The dBASE Report Designer works well with a single query object or with two queries that hold a parent-child relationship. However, it has difficulty with parent-child-grandchild relationships and with queries where the parent has two or more children.
There are different strategies used to deal with these limitations. Some developers use Vic McClungs Printer Class while others use Crystal Reports. Those how wish to use the dBASE Report Designer have found that using a temporary table is sometimes helpful. With this latter method the data to be printed is added to a temporary table based on the needs of the report and the selection criteria of the user. The report is then printed from this temporary table.
This article explores a custom query class designed specifically for creating and using temporary tables. Todd Kreuter is the author of this class, which can be found in the file named TmpQuery.cc.
Files refered to in this
article ![]()
The dBASE Query Class
Query objects are the center of
the dBASE data model. They are used to reference fields in an
individual
table, or a subset of fields from a table or fields from multiple
tables
joined by an sql statement. When a query is added to a form, a
dataModule
or a report, the Form Designer streams code similar to the
following:
| this.MYTABLE1 = new QUERY() this.MYTABLE1.parent = this with (this.MYTABLE1) left = 48 top = 13 database = form.database1 sql = "select * from MyTable.dbf" active = true endwith |
|
This code creates an instance of the query object and then assigns a few properties. When the active property is set true, the statement stored in the sql property is executed and dBASE creates a rowset.
There are two events that fire when a query objects active property is set true. First the canOpen() event fires. This event determines whether the query can be opened (or activated). The event handler assigned to this property must return a true or false to indicate whether the object is opened. The canOpen() event is also used to do something with the query, just before it opens. In this case, the canOpen() event handler would always return true. The TmpQuery class exploits this property of the query class.
The second event that fires when a query objects active property is set true is the onOpen() event. This event fires after the query is opened successfully. A return value is not required when an event handler is assigned. The onOpen()event is used to do something with the query, the rowset, or the fields array immediately after it is active. For example, the onOpen() event handler is often used to create a calculated field and add it to the rowset.
The TmpQuery Class
Todd Kreuters TmpQuery class is subclassed from the dBASE Query class. It thereby contains all the properties, methods, and events of that build-in class. In addition, Todd has added functionality to the class. The new class contains custom properties and methods designed to work with temporary tables. For example, this class contains a method to create a table, another to create an index, and another method to delete the table when the query is deactivated.
One advantage of this class is that a temporary table is created from code only when it is needed and deleted after it has been used. This feature reduces clutter. In addition, the temporary table is created on the users local hard drive, which is convenient in a multiple users system. If two users run the same report at the same time, each will have their own customized temporary table. In fact, a single user can run two instances of the same report and each will have its own temporary table.
The following HTML table
contains
a complete list of the custom properties and methods found in the
TmpQuery
class. It is taken from the header of
TmpQuery.cc. Some of
these
properties and methods are intended for use by the programmer while
others
are for internal use. Nevertheless, a complete list is useful in order
to understand how the TmpQuery class works.
Using TmpQuery.cc with Reports
The first two reporting examples discussed in this article are comprised of three elements. First, there is a dialog form in which a user selects some criteria. This form contains the TmpQuery object and creates a temporary table populated with data. The name of the temporary table and the name of the report to print are passed to the second element, which is the Preview form found in the dBASE User Function Library Project (dUFLP). The Preview form loads the third element, which is the report, into a reportViewer object and renders the data from the temporary table.
In the next few paragraphs we
will
discuss adding a TmpQuery object to a dialog form. To begin the
TmpQuery
class needs to be loaded into memory. Typing the following line in the
Command
Window does this:
| set procedure to tmpquery.cc additive |
|
Next a new form must be opened in the Form Designer. On the Custom tab of the Component Palette you should see an icon for the TmpQuery object. Drag this object onto the form. If you were creating a normal query object, you would set the sql property so the query could select data from the table and you would set the active property true. The TmpQuery object, however, is a bit different from the normal query object because there is no table that can be used in the sql property.
When using a TmpQuery object the table is created in the querys canOpen() event handler. Thus you should use the Inspector and add a canOpen() event handler for the TmpQuery1 object on your form. (You will be prompted with a message that asks whether you want to override the existing event handler. Click yes to the question.)
The code generated for the
resulting
form will look very similar to the following:
| class DemoForm of FORM set procedure to tmpquery.cc additive with (this) height = 16 left = 75.8571 top = 0.3182 width = 40 text = "" endwith this.TMPQUERY1 = new TMPQUERY() function tmpquery1_canOpen endclass |
|
The TmpQuery object should not reference a database object. The createTable() method in the TmpQuery class will ignore the database property if it is set. A database object can be used with other query objects, the ones that are selecting data from your permanent tables. But the temporary table is stored in the applications working folder or in the Windows temp folder. It is not stored in a database folder.
The canOpen() event handler is an important part of the TmpQuery class. This is where the fields are defined and the table is created. It is also where the sql property is set to point to the temporary table. This last step can be done manually or by calling the canOpen() event handler in the super class (the one you overrode above).
The following
canOpen() event
handler
is taken from one of the sample forms (ItemMover.wfm)
used in this article.
| Function TMPQUERY1_canOpen with (this.fields) add("Last Name C20") add("First Name C20") add("Street1 C40") add("City C30") endwith this.useTempPath = false this.dropOnClose = false this.createTable() return TMPQuery::canOpen() |
|
The fields array (this.fields) is one of the internal properties of the TmpQuery class. The developer adds fields to this array and the class adds them to the temporary table. I have found it most useful to use field names that match the field names in the corresponding permanent table. As we will see later, field name matching simplifies the task of moving data between tables. Notice that this array is a property of the query object, it shouldnt be confused with the fields array contained in a rowset. The syntax for adding a field to the TmpQuerys fields[] array is discussed below.
After fields are added to the fields[] array there are two custom properties, useTempPath and dropOnClose, which are set false. I set these to false while developing and debugging my code. I will then change these properties to true after all is working the way I want. The first custom property tells the TmpQuery class to create the temporary table in the current folder, rather than in the users Windows temp folder. While developing code, temporary tables are easier to find when they are in the current folder. The second property tells the TmpQuery class not to delete the temporary table when the query is deactivated. This too is useful while developing a form, because one can see what gets into (or doesnt get into) the table.
The last line in the above code
must return a call to the canOpen() method
contained in the super class. So you must be sure to replace
return true with
return TMPQuery::canOpen().
This is very important, because that method sets the
sql property.
If you need or want to
set the
sql property
manually,
this can be done by accessing the temporary table name with the
fullPath property. In
this case the canOpen() event
handler should not return a call to the super class. Instead, the
following
lines should be used.
|
||||||
The TmpQuery class lets you add
fields using a shorthand syntax or standard SQL syntax. The field
definition
is a string with the field name and the data type. Field names are
separated
from their data type with a space, no other delimiter is needed. Spaces
in field names are permitted. If you use standard SQL syntax the second
parameter in the add method must be
true.
The following table itemizes the short hand and standard SQL syntax for
each data type.
| Data Type | Short Hand | Standard SQL | |
| Character(n) | Cn | Char(n) | |
| Numeric | Nx,y | Numeric(x,y) | |
| Date | D | Date | |
| Logical | B | Boolean | |
| Autoincrement | A | AutoInc | |
| TimeStamp | T | TimeStamp | |
| Long Integer | L | Integer | |
| Small Integer | S | SmallInt | |
| Float | Fx,y | Float(x,y) | |
| Binary | On,t | BLOB(n,t) | |
When you have a large
number of
fields that need to be created in a temporary table, you may want to
use
the Command Window to display the field names and data types
from
the permanent table, and then edit the list. You can do this by typing
the following in the Command Window. Then copy the text in the
result
pane and paste it into the Source Code Editor.
Another technique is to
stream
the output directly to a text file using the following commands, and
then
open that text file in an editor:
|
||||||||||
The sample files that accompany this article include a form named ItemMover.wfm. This form contains a TmpQuery object that is identical to the one above. In addition this form inherits a set of controls from a custom form. I designed the sample this way so that the controls that are not a part of using TmpQuery are isolated in the custom form. This way I hope we can focus on the elements in the ItemMover.wfm and not get distracted (or confused) by the other elements.
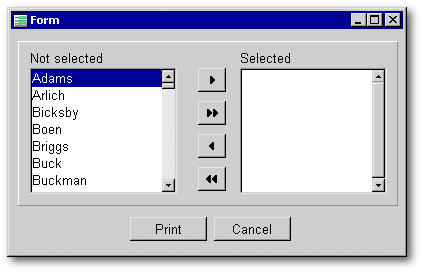
The general idea for this form is that a user will use the ItemMover control to choose customer names that they wish to print. When the Print pushbutton is pressed, the onClick() event handler finds the selected customers in the Customer1 rowset and adds their data to the TmpQuery1 rowset. I have tried to keep this first example as simple as possible. Therefore the data to be printed is drawn from only one table and only four fields are used.
When the ItemMover listbox is
populated
with customer names, the corresponding key field value (Customer
ID in this case) is
added
to the right of the string. The pseudo-code looks like this:
| Name + space(20) + ID |
|
With this technique the customer ID is not visible to the user, but it is available in listboxs datasource for later use.
The Print buttons onClick() event handler is responsible for appending the correct data to the TmpQuery object. The code below is used in that event handler. It is divided into four parts so that we can discuss each piece. Part one is used if the form is going to print a second instance of the report. If the temporary table has already been populated with data, this code empties the table so that new data can be added.
The code in part two loops through the array that contains the selected customer names. In each iteration, the customer ID is taken from the right end of the array element and used to seek the matching value in the Customer1 query. Then the TmpQuery1 rowset is placed into append mode.
Part Three of the code is the
inner
loop. This cycles through the TmpQuerys fields array. If the field
name
in the TmpQuery rowset matches the field name in the
Customer1 rowset,
then
that value is added. This is a very convenient loop, especially when
there
are a large number of fields in the temporary table. With it we do not
need to hard code each of the fieldnames. However, it works only when
the
field names in the permanent table are the same as the fieldnames in
the
temporary table.
| Function PBPRINT_onClick // Part one if form.tmpQuery1.rowset.first() form.tmpQuery1.EmptyTable() endif // Part two
//
Part
Three // Part four
|
|
Part four is one line, which creates an index tag in the temporary table. The first argument in this method is the tag name and the second argument is the index expression. In this example a generic index name is used. One reason to do this is that its easy to remember: all the reports that use a temporary table have the same index name. But perhaps more important, if your want to give your user the option to choose a sort order, you would do this by changing the index expression. However, the report object always looks for the generic tag name, which means that the controlling index is independent from the sort order of the data.
You might have noticed that the
index is being created after the table is loaded with data. An
alternative
approach would be to create the index in the querys
canOpen() method
immediately
after the table is created. In that case the index will be updated with
each row that is appended. By creating the index after the table is
loaded
with data, the index is updated only once. This approach can improve
the
applications performance particularly when a large amount of data is
being
added to the temporary table.
Normally a temporary
table that
is used in a report will have only one index. This means that the index
often needs to be based on a compound expression. The
createIndex() method
is
designed to create this type of index. The expression argument is a
literal
string and it is used internally to actually create the index.
Consequently,
the expression that you pass to the
createIndex() method
should be the same string as you would write in the Table Designer.
All of the following are valid index expressions. They are formatted as
literal strings for use in the
createIndex() method.
|
||||||
The only other element that
needs
to be added to our dialog form is a method to handle the form
onClose() event. In
this
event handler the TmpQuery1s
active property needs to be set false.
When this is done (and when the
dropOnClose
property
is false),
the TmpQuery class will delete the temporary table from the users hard
drive.
| Function form_onClose form.TmpQuery1.active = false return |
|
We now have a form that will create a temporary table and populated it with user selected data. We still need to pass this data to the report object that will print it, but before considering this feature lets look at another form, which also creates a temporary table.
The second example form presented in this article offers a bit more complexity than the earlier example. Like the ItemMover form, this form creates a temporary table and populates it with data that matches a user selected criteria. In this case the use selects a date range and a sort order for the report. The table that is created by this dialog form is sometimes called a flat file because it contains data from two tables that hold a parent-child relationship. This means that when a parent record has more than one child, the parent data will be duplicated in the temporary table.
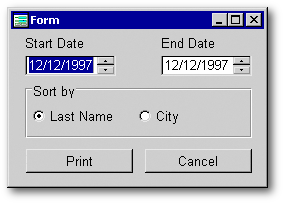
The forms user interface is a simple get dates dialog. Its purpose is to get the date range from the user and print a report filtered for that range. Additionally, the user can choose a field to sort the output.
Although this form is similar to the ItemMover form it is coded a bit different. My objective is to show some of the variation that is possible with the TmpQuery class. In this form, the TmpQuery object is created in the Print pushbuttons onClick() event handler and the temporary table is populated in the TmpQuerys onOpen() event handler.
The code below executes when
the
Print
button
is clicked. The temp table is created here rather than in the forms
Constructor
code.
| Function PBPRINT_onClick // Part One set procedure to tmpquery.cc additive if type("form.qTmp") == "O" form.qTmp.active = false endif // Part Two
// Part Three
|
|
Part one in this code tests whether the form already contains a TmpQuery object and, if it does, sets the active property false. The temporary table will thereby be deleted. This is necessary because the form is designed to let the user create multiple reports without closing the dialog form.
The second part of the event handler creates an instance of the TmpQuery object and assigns methods to the canOpen() and the onOpen() events. When the active property is set true, these events fire and the methods are called.
The
qTmp_canOpen() method
is substantially the same as the
canOpen()
method
in our first example. It defines the fields and creates the table.
| Function qTmp_canOpen with (this.fields) // Fields in parent table add("Last Name C20") add("First Name C20") add("City C30") // Fields in Child table add("Invoice ID S") add("Order Date D") add("Pay Type C3") endwith this.useTempPath = false this.dropOnClose = false this.createTable() return TMPQuery::canOpen() |
|
The actual query is executed
after
this code runs and then the onOpen() event
fires. For the current example, we put the code to populate the
temporary
table in the onOpen() event handler.
| Function qTmp_onOpen local dStatDate,dStopDate,oForm dStartDate = oForm.spinboxStart.value dStopDate = oForm.spinboxStop.value oForm = this.parent oForm.invoice1.rowset.setRange(dStartDate,dStopDate) oForm.invoice1.rowset.first() do oForm.appendRow() until not oForm.invoice1.rowset.next() return |
|
This code begins by filtering the child table from the user defined date range. The rowsets setRange() method is used because the table is indexed on the invoice date, but you can alternatively use the filter property or the canGetRow() event or you can loop through the entire table and skip rows that dont meet the condition.
When I create a flat file from a parent child relationship, I always loop throw the child table. When a record is found that meets the condition, an appendRow() method is called. This method actually appends the row to the temporary table. In the current example every row is added to the temporary table because the filter restricts the data. However, this is not always the case. I have loops that contain some elaborate case statements for selecting data.
The
appendRow() method
begins
by appending, into the temporary table, data from the child table. It
then
seeks the parent record in the master table and adds those fields to
the
temporary table. Field matching is again used to simplify the coding.
| Function appendRow local rTemp,fTemp,i,cLookFor,rParent,fParent private fChild ,cFieldName fChild = form.Invoice1.rowset.fields rTemp.beginAppend() // Lookup
Parent Record |
|
The final part of the code in the Print buttons onClick() event handler creates an index based on the user selected sort order. This is a bit more complicated than it appears. The query must be deactivated (and the table closed) to create the index. The TmpQuery class handles this task, and then, after the index is created, it reactivates the query object. When this happens the canOpen() and onOpen() event fire, which can cause all kinds of problems. A second temporary table can be created and the data can be added a second time.
To avoid these problems, the TmpQuery class breaks the link between the canOpen() event and its event handler before creating the index. The class does not, however, break the link between the onOpen() event and its event handler. This is why we set the onOpen property null in the code. Other table operations that require exclusive use must be handled the same way. These include the EmptyTable() and PackTable() methods.
Before turning our attention to
the report, we need to add an
onClose()
method
to the form. This method needs to deactivate the TmpQuery object so
that
the temporary table is deleted.
| Function form_onClose if type("form.qTmp") == "O" form.qTmp.active = false endif return |
|
Thats about it. Creating a temporary table with the TmpQuery class is really quit easy.
At this point in our discussion the ItemMover and GetDates forms have created a temporary table and populated it with the data that will be used in the report. The next part of the discussion focuses on creating the report and linking the report to the form.
Before turning to the report, this would be a good time to clean up some of the undeleted temporary tables. Be sure all the dialog forms are closed and use Windows explorer (or the dBASE Navigator) to delete all of the temporary tables. The file names will begin with _tmp (unless you modified the skeleton property). These files should be in the current folder (the folder in the dBASE Navigators Look in field) if the useTempPath is false and if the TmpQuery object does not have a database property.
Creating a report based on a temporary table is problematic to say the least. After all, the table doesnt exist until the dialog form opens and it is deleted when the form closes. The way I deal with this issue is to make a working table that I can use for designing or modifying the report. There is no substantial difference in the procedure used to create the ItemMover report or the GetDates reports so for expository purpose I will discuss creating the report used with the GetDates form.
Run the GetDates form, enter a
date range, and click the Print button. This will create a
temporary
table and an index file. Without closing the form, use the Command
Window
to
make of a copy of this file. The following commands, adjusted for the
name
of the temporary file, will create that copy. (Use the Navigator
to
find the actual file name. There should be only one temporary file if
you
deleted all the temporary table before running this form.)
| use _tmp7990 copy to tmpGetDates with production |
|
Now
tmpGetDates.dbf can
be
used to layout the report, which can be done just like you would if you
were using a permanent table. After the report is designed to your
satisfaction,
there are two methods that need to be added. The first method is an
overridden
render() event and
the
second is a query canOpen() event.
| Function form_render return GETDATESREPORT::render() Function tmpgetdates1_canOpen |
|
We are designing this reporting
system so that the report is rendered with the dUFLPs Preview form.
(In
the next section we will design a system that uses its own previewer.)
When using this form the standard technique for passing parameters to a
report is to use its render() event.
The basic idea is that our dialog form will create an array that
contains
the parameters to be passed to the report. This array is assigned as a
property of the Preview form and that form passes it along to the
report.
The report needs to check for this array and use the values it
contains.
When using the dUFLPs Preview form, that check is done when the report
is rendered. The following is the example from the header of the
Preview
form.
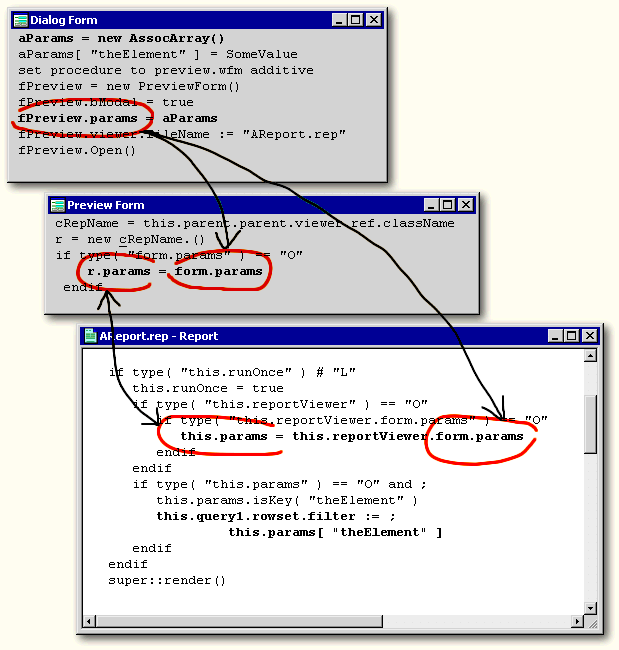
| // this is an overridden render event -- the idea // being that in order to use a params array // for a report, we need to check to see if it // exists ... either here or in a reportViewer // (i.e., PREVIEW.WFM) // The 'runonce' property checks to make sure // that the render event code based on the params // array is only called once -- when the report is // first loaded ... reportViewers call this when // rendering each page, which could cause problems, // depending on your code. if type( "this.runOnce" ) # "L" this.runOnce = true if type( "this.reportViewer" ) == "O" // we are being called from a reportViewer // check to see if the reportViewer's form has // a params array: if type( "this.reportViewer.form.params" ) == "O" // set params array: this.params = this.reportViewer.form.params endif endif // if we have a params array, we need to set the // filter for the report: if type( "this.params" ) == "O" and ; this.params.isKey( "Filter" ) // assign the filter property of the // rowset being used for the report: this.address1.rowset.filter := this.params[ "Filter" ] endif endif // this.runOnce super::render() // call
the overridden
render code don't |
|
For more detail on passing
parameters
to a report via the Preview form see Example of
Preview.wfm and Report Parameters by Steve Hawkins.
| A slightly different
approach
to using the Preview form is to use a custom report and put the
render() event in
that
class. However, instead of setting the filter or whatever, call a
method
named setParams().
In your report include a method named
setParams() and set
whatever
parameters are specific to the given report.
For an example of this type of report, see the custom reports in the dUFLP. These files already contain the overridden render method and the call to a setParams() method. For some working examples of this approach see Reporting with dBASE Plus: Using Temporary Tables by Michael Nuwer
|
||
In our example reports, a filter is not needed because the data has already been selected. Remember the report is using an existing table, albeit a temporary table, it is not creating its own TmpQuery. But we need to be sure that the report is using the temporary table, which can be a bit tricky because the file name is randomly generated. The problem is that the reports query object opens a table when the report is instanced but before it is rendered (and therefore before the render() event fires). In other words the query is included in the reports Constructor code.
The easiest way to handle this problem is to deactivate the query and then reactive it in the render() method. This should be done after the parameters[] array is assigned to the report so that when the query opens the second time, the canOpen() method can use the parameters.
The following is the
render() event used
in
the GetDates report. I have stripped the comments and the added coded
is
indicated in bold print.
| Function form_render if type( "this.runOnce" ) # "L" this.runOnce = true if type( "this.reportViewer" ) == "O" if type( "this.reportViewer.form.params" ) == "O" this.params = this.reportViewer.form.params endif endif if type( "this.params" ) == "O" and ; this.params.isKey( "temptable" ) form.tmpGetDates1.active := false form.tmpGetDates1.active := true form.tmpGetDates1.rowset.indexName := "index1" endif endif return GETDATESREPORT::render() |
|
When the query is activated a
second
time, the params[] array
is attached to the report and the
canOpen()
event
fires. The canOpen() event
handler can now be used to determine which table to open. The code
looks
like the following:
| Function tmpitemmover1_canOpen if type( "this.parent.params" ) == "O" this.sql = 'select * from "' + ; this.parent.params['temptable'] + '.dbf"' else this.sql = 'select * from "TmpGetDates.dbf"' endif return true |
|
The last thing that we need to
do is to run the preview form and open the report. Return to the GetDates
dialog
form and locate the pbPrint_onClick()
method.
The code in that method creates a TmpQuery object and populates the
tables
with data. After those procedures are complete the Preview form must be
opened. The following code is the standard way to call the Preview form.
| aParams = new AssocArray() aParams[ "temptable" ] = form.qTmp.fullPath set procedure to preview.wfm additive fPreview = new PreviewForm() fPreview.bModal = true // these next two commands must be in this sequence fPreview.params = aParams fPreview.viewer.fileName := "GetDates.rep" fPreview.Open() |
|
The one point to note with
respect
to using temporary tables is that the table name must be passed to the
Preview form in the parameter array. This is indicated above in bold
type.
| The metamorphous of
the parameter
array: It might be worthwhile to take a brief detour and examine
how
the parameter array gets from the dialog form to the report.
In the Dialog form the
parameters
array is created and it is assigned as a property of the Preview form
just
before that form is opened.
In the Preview form a
report is
either displayed in a reportViewer object or it is sent to the printer.
When the report is rendered in the reportViewer, the Preview form does
nothing with the parameter array. However, when the report is rendered
to a printer, the Preview form assigns the array as a property of the
report
object:
When the report is called
from
the reportViewer the render method assigns the parameter array as a
property
of the report object.
Now the parameter array
can be
accessed as a property of the report and the actual parameters can be
used to configure the report according to whichever element has
been passed.
The following schematic highlights the path of the parameter array.
|
||||||||||||||||||
If all of the pieces are configured correctly the GetDates reporting system should work. Run the GetDates form, enter a date range and choose a sort order; then click the Print button. The preview form should open and the report should be displayed in the reportViewer object. Verify that the dates in the report are within the selected date range. One source of error in this system is that the report is using the tmpGetDates.dbf rather than the actual TmpQuery created table.
There is one last issue that we need to discuss before moving on to the next section. Before the foregoing report is deployed to a users machine, the query object needs to be deactivated in the Constructor code. Currently, the tmpGetDates table is opened when an instance of the report is created, then it is closed and the temporary table is opened when the render() method runs. The tmpGetDates table is needed only while designing the report and we dont want to deploy it to all the client computers. The easiest way to deal with this is to set the querys active property false. This way when the report is instanced, the query will not attempt to open tmpGetDates.
If you open the report in the Source
Code Editor the query object will look similar to the following.
| this.TMPGETDATES1 = new QUERY() this.TMPGETDATES1.parent = this with (this.TMPGETDATES1) canOpen = class::TMPGETDATES1_CANOPEN left = 810 top = 375 sql = 'select * from "TmpGetDates.dbf"' requestLive = false active = false endwith |
|
Edit this code and change the active=true line to active=false. Now when this report is called from the dialog form (via the Preview form), the render() event will set the active property true and the temporary table will be opened.
The dUFLPs Preview form is quit useful and many developers include it with their applications. Some developers, however, prefer to preview a report in the same form that selects the report parameters. One example of this type of form is dQuery. The Current Report tab in the lower pane contains a reportViewer object, which displays the selected report.
In this section we discuss a form that combines the functions of the GetDates dialog form and of the Preview form into a single interface. My intention is to focus on the functional elements that make this form work. It is neither to provide a full array of features nor to offer a professional looking form. The hope is that when you understand the functional elements, you can add them to your full-featured form. (And when you do this, you will want to study the various methods in the Preview form.)
The example combo form looks something like the follow image.
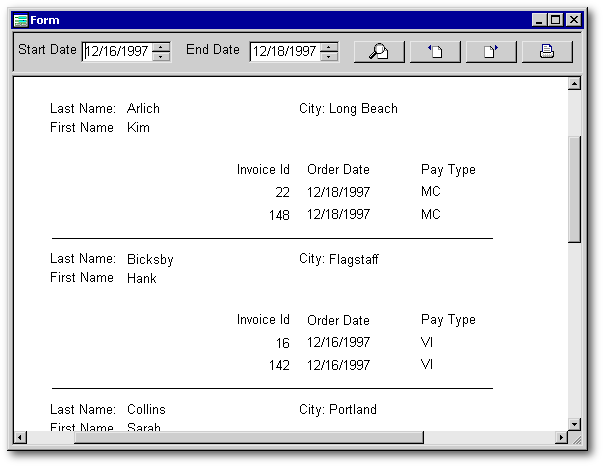
The interface controls on this form include a container at the top and a reportViewer underneath. In the container there are two spinboxes for entering the start date and the end date for the report. There are also four pushbuttons that are used to preview the report, move from page to page, and print the report.
The TmpQuery object in this form is created in the forms Constructor code. In this regard we are following the structure of the ItemMover form. However, the TmpQuery object could alternatively be created in the pushbuttons onClick() method like we did in the GetDates form.
The TmpQuerys canOpen() method is the same as its corresponding method in the previous two examples. It adds the field names and field types to an array and then creates the temporary table.
The Preview button in
this form
is similar to the Print button in the ItemMover form.
| Function PBPREVIEW_onClick if form.tmpQuery1.rowset.first() form.reportViewer1.filename = "" form.tmpQuery1.emptyTable() endif local dStatDate,dStopDate,oForm oForm = this.parent.parent.parent dStartDate = this.parent.parent.spinboxStart.value dStopDate = this.parent.parent.spinboxStop.value oForm.invoice1.rowset.setRange(dStartDate,dStopDate) oForm.invoice1.rowset.first() do oForm.appendRow() until not oForm.invoice1.rowset.next() form.reportViewer1.params[ "temptable" ] =
; |
|
Like the previous dialog form, this form begins by emptying the temporary table if it already contains data. Notice that in this form we must remove the report from the reportViewer (i.e. assign an empty string to the filename property) before calling the emptyTable() method. This is necessary so that the table is closed when the method runs. Otherwise we will get an error message claiming that the table is in use by another.
After the temporary table is empty the above code restricts the data to the user defined date range and then loops through the rows appending each one to the table.
The final part of the code opens the report in the reportViewer object. This part is different from the code used in the ItemMover form. In that example we had to create a parameter array and pass it to the Preview form. In the current form, however, we need only set two properties of the reportViewer object. First, since the reportViewer object has a built-in params array, we add the temptable element to that array. And second we assign the report file to the filename property. This immediately renders the report into the reportViewer object.
The report used in this example is slightly different than the report used with the Preview form examples. The main difference is where the report looks for the parameter array. When using the Preview form, the parameter array is assigned to the form object like this: fPreview.params=params. Then the reports render() event looks for this array attached to the parent form and assigns it to the report object (this.params=this.reportViewer.form.params).
In the current form our render
event can be simplified a bit. This is because the ReportViewer class
has
a ref property
that stores a reference to the report object and the report class has a
reportViewer property
that stores a reference back to the reportViewer object. Thus any
property
of the reportViewer can be seen by the report
| form.reportViewer1.params <=> report.reportViewer.params |
|
and any property of the report
can be read or set by the reportViewer.
| form.reportViewer1.ref.startPage <=> report.startPage |
|
This mutual relationship make
is
possible to simplify the render() method
used in the report. The following code example shows the
render() event used
in
the GetDates report with a strike through type for the lines that can
be
eliminated and bold face type for the additions.
| Function form_render if type( "this.runOnce" ) # "L" this.runOnce = true if type( "this.reportViewer.params" ) == "O" and ; this.reportViewer.params.isKey( "temptable" ) form.tmpGetDates1.active := false form.tmpGetDates1.active := true form.tmpGetDates1.rowset.indexName := "index1" endif endif return SUPER::render() |
|
A similar modification must be
made to the TmpQuery objects
canOpen()
method. Again rather
than
looking for the parameter array as a property of the report, we look
for
it as a property of the reports
reportViewer
reference.
| Function tmpgetdates1_canOpen if type( "this.parent.reportViewer.params" ) == "O" this.sql = 'select * from "' + ; this.parent.reportViewer.params['temptable'] + '.dbf"' else this.sql = 'select * from "TmpGetDates.dbf"' endif return true |
|
This form should now work.
The TmpQuery class works very well with reports and this task is undoubtedly its most common use. However, a TmpQuery object can also be used with a form. The final section of this article will consider two forms that use a TmpQuery object. The first is a data entry form where the user appends data into a temporary table and, once they are confident that the data is correct, posts it to the permanent table. The second form is a type of lookup form. It loads a list of files from a folder into a grid for display to the user.
The following image is a representation of the sample data entry form. The concept for this example is taken from a form in one of my applications, which runs at a home health-care agency. Nurses spend their day visiting homebound patients who require skilled nursing care. Each nurse keeps track of their visits on a day sheet and a data-entry operator must enter these after theyre submitted. Before posting a day sheet, the data-entry operator must check the validity of the Nurses claims and verify that the total number of entries equals the number of visits on the day sheet.
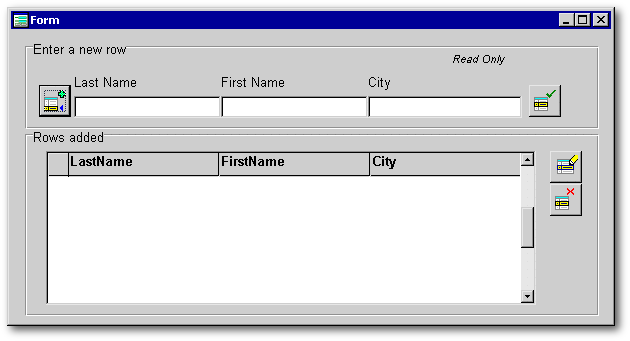
This sample form does not have the complexity of the original. It does, however, include the primary elements for using a TmpQuery object. In this case the TmpQuery object is created in the forms Constructor code. Once constructed, the rowset works like any normal rowset on a form.
When the form is instanced, the
TmpQuery objects canOpen() method is used to define the fields and
create
the table.
| Function tmpquery1_canOpen with(this.fields) add("Last Name C20") add("First Name C20") add("City C30") endwith with(this) useTempPath = false // dropOnClose = false createTable() createIndex("Last Name") endwith return TMPQuery::canOpen() |
|
dBASE executes the query after
the canOpen() method is finished. At this point the
temporary table is created
and the rowset is active. We now can set any of the rowset properties.
These are done in the querys onOpen()
event handler. For the
example form
this is were the indexName is set.
| Function tmpquery1_onOpen this.rowset.indexName := "Last Name" return |
|
When the user is satisfied that the data is correct, it can then be moved to the permanent table. This might be done with a pushbutton, which would move the data and empty the temporary table or it can be done in the forms onClose() event handler. The sample form uses the latter event.
In the onClose() event handler a
query object is created for the permanent table. Then we loop through
each
row in TmpQuery1 and append each field whose names match
in both tables.
The very last task is to deactivate
TmpQuery1, which
deletes the temporary
table.
| Function form_onClose |
|
Another type of form where a
TmpQuery
object can be useful is when theres a need to display the content of
an
array in a grid. The dBASE grid object can not be datalinked to an
array,
but, with a TmpQuery object, the array can be stored in a temporary
table
and the grid can be datalinked. The next example is a form with a grid
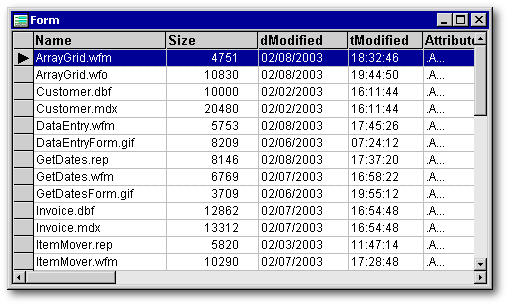
that displays the result of the array classs dir() method. This method
fills the array with five characteristics of specified files in a
folder
(i.e. file name, size, modified date, modified time, and file
attributes).
The grid in the following image displays those characteristics.
The TmpQuery object that is contained in this sample form is created in the Constructor code. The querys canOpen() event handler defines the fields, creates the temporary table, and creates three indexes. These indexes can be used to sort the contents of the grid by file name, file size or last modified date.
The TmpQuery class does not create index tags in decending order. This is a minor issue and easy to address. My method is to create a subclass of the TmpQuery class called TmpQuery2 and add a new method named CreateIndexDecending(). This new method is identical to the CreateIndex() method except for one additional property. It is used in the canOpen() event handler to index the size field in descending order.
The querys onOpen()
event handler
is used to read the file characteristics into the array and store them
in the temporary table. Thus, by the time the grid is instanced in the
constructor code, a table is created and populated. The grid can
therefore
be datalinked to the TmpQuery object.
The techniques used to create
and
populate a temporary table should be rather familiar by this point. We
have repeated them, with only slight variations, in each of the
foregoing
example. But, as its been said, repetition is helpful for learning how
to apply specific concepts. The concept in this article is how to use
temporary
tables in your reports and forms. Although temporary tables are not
always
required, in those situations where they are needed, the TmpQuery class
provides some very useful tools for working with them.