The FormFactory
by
Marc Van den Berghen (VdBSoft@web.de)
Prologue
(or what has a vacation in Denmark to do with dBASE ?)
In the summer of 2002, a friend of mine — lets
call him
Delphicus for simplicity — asked me for the Nth time: “What is so
special about dBASE that you use it for any kind of work ?” And for the
Nth time, I gave him my standard answer: “dBASE is a full-featured
object-oriented language with, as a bonus, an easy object-oriented
access to databases. What more could one ask for?” As usual,
he was not satisfied with my reply and, this time, brought a new argument. He told
me that he saw a Delphi application that had some nice-looking elliptic
buttons. He added that it would be advantageous to be able to draw such
a fancy user-interface. Of course, he wanted to bother me. However, I
already had an idea about how to simulate this behaviour under dBASE.
Without thinking further, I replied: “Pfff! dBASE can do that too!”
If only I had kept my mouth shut, this article would not exist today <g>.
But I spoke up and, of course, I had to put facts
behind the words.
The idea that I had was first to draw a bitmap (with an onMouseDown
event
handler) on the form — of course it had to be a rectangular one — with
an
inner elliptic area looking like a button. Secondly,
I
was
to
adjust
the
background
of
the form to fit the colour of the outer shape of the bitmap. It was
clear that this illusion would fail miserably if it were looked into closely
— not speaking of the source code which Delphicus would never look at — because
even a click on the remaining rectangular part of the fake button
would trigger the mouse event.
However I hoped that Delphicus would just take a short glance at it
and then admit that dBASE was indeed capable of doing it.
So I sent him an email with an attachment consisting of a small .EXE and Delphicus.wfo (the
form with
the
fake button). The runtime was already installed on his system. Then I expected
from him a
response similar to: “Ok, Ok,
I see that dBASE can do it. However have you seen this C++ program: it has
this great feature…”
Well, imagine my surprise as he laughed at me on the phone and asked if
I was serious… I planned to visit him the next day to see what he
was talking about. I was pretty sure that it was impossible to
dismantle the little illusion in such a short time.
At the door he awaited me with an ironic grin. We went immediately to
his computer and as soon as he run my demo form I could see why it was
so easy for him to reveal the secret. Here was my little “button”;
a
nice oval shape but with an ugly rectangular frame that was not at all
in the same colour as the background. He didn’t even have to click on
it or to move the mouse pointer over it. It was obvious that the
button was a fake one and that it was a rectangular image with an
oval shape on it.
Very embarrassing… Up to now,
it is still a mystery to me why the button and the form showed up in a
different color — perhaps because of different color depths on the two computers
—
although
their
RGB
values
were
the
same.
I felt humiliated by his ironic grin and told him that after my
holiday I would show him a new form with real elliptic buttons. I knew
that Delphi wasn’t doing anything miraculous. I just had to find the
underlying API-functions and to reproduce the result in dBASE. I knew that there
are
very
few things that can’t be done with dBASE since about 99% of the GDI
stuff can be adapted easily.
That’s why I took my laptop with me on a vacation to Denmark. We had
rented a small house directly on the beach and I was confident that I could
find
some spare time to search in the Windows on-line help for clues. As it turned
out,
I didn’t even have to search: someone else had found it already.
Perhaps because of the dull decoration in our
little lodge, the landlord felt it necessary to inform us the presence
of
a
nearby
Internet
café.
One evening, I decided to drink a cold Carlsberg there
and read the latest posts in the NGs.
Well, it wasn’t really an Internet café; more like a small pub with a
small separate room. It reminded me of those smoky poker rooms seen
in old gangster films. However, it served its purpose very well. On
a round table there were six
computers connected to the Internet, forming a small LAN. Five of them
were occupied by Danish teenagers playing a Quake tournament or
something similar, judging by the martial noise that filled the room.
It was a pleasant evening, sitting there with a cold beer, reading
through the messages in the NGs and, from time to time, looking amused
at the Danish “warriors”…
Suddently, it was my turn to shout
victory: I had just
found
a message from David Stone entitled “A whole World of fun forms”
in which he presented on a silver
plate, the solution for my “button problem”:
the SetWindowRgn API-Call!
With the help of this function, one can limit the visible area of a
window to a so-called “Windows region”. The
shape of this region is not restricted in any kind (it can even represent
holes).
The
region has to be defined with one or more Windows-based
shapes (rectangles and ovals) and that API-Call assigns the region to a window,
which
then takes the shape of that region.
From the Microsoft On-Line help: “In Microsoft® Windows®, a
region is a rectangle, polygon or ellipse (or a combination of two
or more of
these shapes) that can be filled, painted, inverted, framed and used
to perform hit testing (testing for the cursor location).”
That same evening, I built a small demo form for Delphicus, with a real
elliptic button (Ebutton.wfm).
There was no remaining rectangular part of the button: it was a real
oval button.
Thanks to David Stone, that was exactly what was needed to make
that Denmark vacation fruitful for me.
The dBKon 2002
As you may imagine, Delphicus was not
satisfied. He grumbled about the ragged edges of the button but had to
admit after a closer look at the
Delphi application, that the edges there were more or less the same.
dBASE honour was saved. Moreover, I had a neat little
subject for a speech I was going to hold at the German dBASE Conference
in 2002.
During the conference, Niels Bartels saw the form in triangular-shaped
form that I used as an example (see Triangle.wfm)
and he decided to make something similar for one of his customers:
a form having the shape of
a motorcycle. I told him that it would be a huge undertaking
to try to build a detailed motorcycle out of lines, rectangles and
circles. Nevertheless one year later, he showed us his form at the
dBKon2003:
it looked tremendous!
At that time, Jonny Kwekkeboom and I were working on a dBASE
jukebox, a player in the style of the Windows media player.
After seeing Niels’ work, we wanted to do something similar.
The Windows OLH states that it is possible to combine simple regions to
obtain a result of astonishing complexity (as with the motorcycle).
The drawback is that the shapes from which you have to start are
very primitive. The amount of work to construct a region rises
exponentially with its complexity. Even the shape we had chosen for
the music player took a considerable amount of time. For each little
change to the silhouette, the same time-consuming work to create
a region had to be done anew.
It was clear: we needed an automated solution!
Jonny designed the bitmap that represented the music player. Our idea was to
write a routine that would analyze the bitmap
and create the Windows-Region automatically out of the bitmap.
Out came this article and the FormFactory Class which does exactly
what we had hoped for.
The solution
A possible solution popped
up because Jonny’s bitmap had a small blue
border that shouldn’t be seen. I thought that we could
scan the bitmap, pixel by pixel, and add the pixels delimited with
Jonny’s blue border to the region. This means that the
shape would be constructed out of the smallest
possible
base
shape: one-pixel building blocks (which are merely
rectangles having a one-pixel height and width). To make the class
more user-friendly, we decided that one should be able to
choose the colour of the bitmaps
that don’t belong to the region. I call it the transparency color.
With the help of the API-Function GetPixel( ),
it was a piece of cake to extract the colour of a given pixel and to compare
it to the
transparency colour. The result was the pseudo-code below:
| |
for y = 0 to height_of_bitmap
- 1 |
| |
for x = 0 to width_of_bitmap
-1 |
| |
Pixelcolor = GetPixel( image_Handle, x, y ) |
| |
if
Pixelcolor # transparency_color |
| |
add_to_region(
) |
| |
endif |
| |
endfor |
| |
endfor |
| |
|
The first goal was met: we were able to build a region out of any
image, even the most detailed ones. Just designate the transparency
colour and the class will do the rest.
Unfortunately a new problem arose; Microsoft simply forgot to implement
a way to store an existing region to the disk. Each time the
form was opened, the shape had to be calculated anew. With small bitmaps, the
delay was still acceptable. However, the greater the form — and
so the bitmap — the longer it took to create the region on the fly. The
only chance to reduce the start-up time was to create a simpler representation
of
the
region, store it to the hard disk and load it from there.
The trick was to group an horizontal strip of N adjacent pixels to a “rectangle” (as
you remember, a rectangle is one of the possible base shades), to add
a few escape codes to mark the beginning of a new line and the starting
position of the new horizontal “rectangle” (atually a new line).
The outgoing sequence of numbers is then stored in a .RGN file.
Of course we need an algorithm that reads the numbers out of
the file
and transforms them back into a number of rectangles having a
one-pixel height that, finally, have to be combined to represent the
wanted shape.
After some tests, it was clear that even with large and complicated
bitmaps, the delay during start-up was minimal. The final goal
was achieved. The design of our player could be adapted
easily to Jonny’s
bitmap.
The Code
Before creating a non-rectangular
form, I want to take a deeper (coding) look at the class behind the scene.
If you want to see the
form-building class in action, you can jump directly to
the next section.
There is a special characteristic of the image on the form: it is
sizeable!
Usually, controls on a form are fixed; they keep their width
and length. However, from time to time, it could be handy for the controls
to behave
otherwise; more precisely, that they have a border (like that of a sizeable
window) which enables the
user to shrink or expand that control with the mouse. Since
every control on a form is nothing but a window (technically speaking), most of the API possibilities for a form also exist
for the controls:
you just have to make them available. In this case, the
following lines tell the OS to make the image control sizeable.
| |
local zw |
| |
zw = getwindowlonga( this.image1.hwnd, -16 ) //
GWL_STYLE |
| |
zw = bitor(zw,0x00040000) //
WS_THICKFRAME |
| |
setwindowlonga( this.image1.hwnd, -16, zw ) |
| |
|
Beside the two constants — GWL_STYLE and WS_THICKFRAME
— we only need the handle of the control that we
want to make resizeable. If you try the same
code with other controls, you will see that it works with
all visual objects that have an hwnd property
(almost all dBASE controls). One possible application for this could be a
custom editor, allowing the user to size it at will (see Editor_Resize.wfm).
Let’s have a closer look at the code behind the
region-creation process and give life to the pseudo-code
above.
The first step is to get rid of the unnecessary
color information. The only thing we need to know is
whether a pixel should be transparent or not. So we create
a two-dimensional array that has the same size as the image
in our form. Next, we fill this array with zeros and ones,
the value for a particular pixel determined by whether it should be transparent
or not (the
returned value
of the GetPixel() API-Function).
In a certain way, the array is a monochrome representation of our image,
where the positions we want to be transparent are black
and everything else is white.
The next step is to improve the speed of the form-opening process.
Also, we must find a way to easily store that data
to the harddisk. As we’ve seen, our solution was to build
rectangles with an height of 1 pixel. Each of these
rectangles can be represented with two numeric values: its
leftmost x-position and
its width. Imagine the following sequence of numbers
in our monochrome array:
| |
00000111111100111111110000000011 |
| |
|
If this is the first line in our image,
we can translate it to the
following sequence of numbers: 6,7,15,8,31,2,1,0.
These numbers mean
that the first line begins at position 6 with a 7-pixel-long rectangle, followed
at position 15 with an 8-pixel rectangle, followed
at position 31 with a 2-pixel rectangle. The last two
numbers at the end of the sequence (here in red) represent
an escape sequence that tells us that the line is terminated
and that everything
that
comes next
belongs
to the next line of our region.
In this way, we have
changed the representation of our region from 32 individual pixels
to
3 rectangles, reducing the necessary work to
build the region
by a factor of about ten. At the same time we found
a way to store the region since the above numbers can be saved into a file.
How do we read that file? Give a look at WinRgn.cc:
it defines a custom class called Windowrgn() to
which the name of the file is passed as a parameter. The clip() method
of that class reads
the values stored in the file and
then builds the region.
Finally, there is one more thing that deserves a closer
look: the move() method
in WinRgn.cc. In
order to be moveable, a normal form must have a caption
bar. If a region doesn’t show at least
a part of the caption bar of the form,
we lose the ability to drag that form
around. We also lose the
minimize and close buttons.
To overcome these shortcomings, we could write a combination
of mouseDown and mouseMove event handlers. However,
a much
more
elegant way is to let the OS do all the work.
If you look at the move() method,
you will find a line with a SendMessage() API-Call.
This API-Call simulates a click of the mouse
in the caption bar: the OS thinks that we
want to drag the form and does just that for
us. The interesting thing
is that the function needs only
a valid window handle: it isn’t
even necessary that the window has a caption
bar. This gives us the ability to
move all controls in a form
without further programming work. If a user wants
to arrange controls individually, this can be
achieved with
just this
API-Call (see MoveCtrl.wfm)
See
the FormFactory in Action
The FormFactory code
package (available through a link at the end of this article)
consists of two parts. One is responsible for the creation
of the region, the other is responsible
for hiding everything but that region on a form.
- The RegionBuilder Form
This simple form extracts a region from a picture which has been previously
modified in such a way that the area that should disappear
in your application should have been painted with a uniform color not found
in the area that should remain visible.
Use the Load Image toolButton to search for a picture file on your
disk. Once that’s done, this picture is displayed in RegionBuilder.wfm at
its true size. If it will be displayed at a different
size in your application, you can
drag
the border of the image control to change the
size of the viewing area. This action will
not zoom in — or zoom out — unless
you first click
on the Stretch toolButton: the latter
toggles between the True Size mode
and the Stretch mode.
Keep in mind that
if you want to use the picture later as background
for a form or a pushbutton,
you shouldn’t
create the region in the Stretch mode
because the region and its image
will not fit.
However,
if you just want a geometrical shape for your
form or your button without using a corresponding
background,
the Stretch mode
can be very handy.
Now let’s create
the region. If you move the mouse cursor over
the picture, you will see
that it will change
into a
cross: that
indicates that you can now select any
transparency colour just by clicking
on a pixel that has that colour. For example,
if you
click on a blue
area,
that will set blue as the transparency
colour.
When the Create Region toolButton is clicked, the algorithm that
defines the region is automatically started: every
pixel whose colour is not the
transparency colour will be included in the region. The latter is saved
to disk in a file of
the same name as the picture file, except that
the file extension .rgn is used.
This .rgn file
is used later to rebuild the region on the
fly.
-
The WinRgn Class
This class contains the code
to apply a given region to a window. When you instantiate an object
of the WinRgn class,
you must pass two parameters. The first parameter is the name
of the .rgn file
you want to
be used for
the clipping. The second parameter
is a reference to the control that has to be clipped.
In the onOpen event handler
of your testform, you would write:
| |
Form.rgn1 = new WindowRgn("YourImage.rgn",
Form) |
| |
|
or:
| |
Form.rgn2 = new WindowRgn("AnotherOne.rgn",
Form.pushbutton1) |
| |
|
In the first example,
the region “YourImage” will be applied
on the form, while in the second example, the
region called “AnotherOne” will
be used on a
pushbutton. In both cases, the shape of the object
(Form or pushbutton or whatever window) will
no longer be rectangular,
but will fit the
shape of the region that was used.
To do
the clipping, you simply call the clip() method:
If
you want not only the shape but also the content of your
region image, you’ll have to assign
the original .rgn file
to the background property
of the form.
When the form is closed, you should properly release the regions.
This is done with the cleanup() method.
There is one supplemental method that is handy
if you clip a form. Restricting the client-area
to your
shape
of choice
means
that you
don’t have a caption bar anymore: so you
can’t move the form around. To solve this
problem, use the move() method.
Just assign
it to the
onLeftMouseDown event handler of the form to
be able to move the form around without caption
bar:
| |
Form.onLeftMouseDown = {; form.rgn1.move() } |
| |
|
Now let’s do a simple exercise.
Download and unzip the code available at the end of this article. Under
dBASE, run the form RegionBuilder.wfm.
Click the Load Image toolButton
and select dBCon2004.jpg
— that’s the image on the mouse pad that was given by Ronnie
MacGregor to every attendee at dBCon2004 in Montréal. Resize
the Image Viewer (and the form, if needed) until it’s exactly
the same size as the image. Click on the Create Region toolButton
and select a white pixel around the maple leaf. Wait
until a messageBox tells you that the region has been created. Close
the form. Load dBCon2004.wfm and
move it around. Finally, push the Close button near the top right corner
of the form. Voilà.
Only Forms ?
In Windows, every visual
object is a window. The FormFactory class only needs a valid
handle to
act
on any given control.
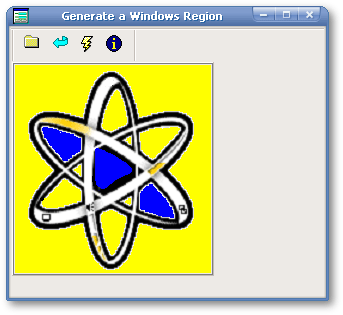
For example, if you load Toolbar.wfm,
you’ll see a rather non-conformist
toolBar that has the shape of a stylised
atom.
With the mouse, it can be dragged around like a floating
toolbar: you can even
place it on top of the grid. So you might
create wild objects like a grid with
a hole in it, a pushbutton that looks like
a spider for a SpiderMan-fan among your friends. The
outcome of your graphic interfaces is thus only limited by your imagination
;-)
|
Download the FormFactory
code here
|
 |
I want to thank David Stone
for his discovery of the underlying API-Calls and Jonny Kwekkeboom for forcing
me to find a way to automate the region creation. Finally, I would like to thank David Stone again,
this time as a proofreader, knowing that the original text was not really good English.