
Developing a Database Application:
The dBASE SE Tutorial
Ken Mayer, Senior SQA Engineer, dBASE Inc.
Michael Nuwer, dBASE user
|
Developing a Database Application:
|
|
Creating The Reports |
The goals and objectives of Phase VI of this tutorial are:
Required Reading. There are a lot of things to learn about the report engine, and we could not possibly cover then well in this tutorial. Instead you really need to read "Beginning Reports" from beginning to end. There is a lot of very useful information there.
Be Prepared. The report design surface is the most touchy of the surfaces in dBASE SE. Stick with it and be patient. Both authors use the report engine a lot, and except for some really dumb mistakes on our part, we seldom have problems. This comes from having worked with the designer for awhile now, however.The hardest part of working with the report designer is laying out the controls on the report -- getting them where you need them and getting them to stay there. You may find you have to move something several times, because as you place other controls onto the design surface the placement of those controls causes the first ones to shift.
One of the reasons we set the height of the bands to a good size while working in them in the tutorial instructions, is to help alleviate these problems. If you avoid having your controls overlap (keep the edges of the controls from being on top of another control), you will avoid a lot of these problems. (The easiest way to do this is to first drop a new control well under (lower on the band so that there is no overlap) the current controls in a band, and then move it to where you need it to be.)
The other thing is that you should save your work a lot. This part is easy -- use <Ctrl>+S every so often, so that if something happens you haven't lost all your work.
Nervous yet? Don't be -- as stated, have some patience, take a deep breath, and dive in.
A report is, in the case of many database applications, the whole purpose of the application. In "Introduction to Computer Science" type classes one of the many terms that a student learns is "Meaningful Output". While you can get meaningful output on the screen, you really need to be able to generate reports (even if they don't make it to paper).
The report engine in dBASE SE is unlike any report engine you have probably worked with. This is because the same concepts as have been in dBASE from the beginning (of the Windows product) now exist in the report engine and report designer. The primary part of this is "two-way-tools". What this means is that the designer generates dBL code, which you can modify yourself, and have the designer recognize it.
The report engine in dBASE SE is a bit daunting to someone starting out. So, before we get into the mechanics and details, let's take a look at things from a "higher level".
The report engine in dBASE SE is what is called a "banded report" engine, in that the processing of your data occurs through "bands". The bands are processed (when the report is rendered) in a specific sequence, as are the other controls of the report.
In addition, this engine is also what is called a "Single-Pass" report engine -- this means that in order to process the report it makes one pass through all objects (and in the process, through the table), rather than making multiple passes through the data and controls (which is what would be needed to, say, generate a "Page 1 of x" type output -- this can be done, but is more complex than what is covered here). Very few report engines do a "multiple pass" automatically, as the amount of processing involved is horrendous (and time consuming!).
We are going to start from the "inside" and work our way back out to the big picture.
The Bands
There are three primary "bands" in a report -- the detailBand, and attached to a group
there are the headerBand and the footerBand.
The detailBand is where the details of your report will go. For a simple report, this is where all of the data from each row of a table is actually rendered (generated or printed). Your details are shown by placing what this document calls "Visible Controls" (Text, Image, etc.) onto the detailBand (used to display fields and so on).
The group object is designed to help you group your data in a way that makes sense. A very simple example is perhaps with a customer table -- you might want all the customers in each state grouped together. The group is how you do that. At the beginning of each group, you might want to note which state is being currently displayed -- this would be done with the group's headerBand. If you wanted to display a count of all the detail records that were displayed for that state, you might (probably) do that in the group's footerBand. (If you need to do a parent/child table report, the group's headerBand and/or footerBand would normally be used to display data from the parent table's rows, and the detailBand would be used to display the child table's rows.) In order to show the fields, you would also use "Visible Controls".
The report engine will automatically handle a lot of the processing for you -- if you have only a detailBand in the report, it will loop through your rowset and generate one detailBand for each row or record.
If you have a group or groups on the report, the report engine will examine each row in the detailBand and determine if it belongs in the current group, or if it belongs to the next group. It handles the necessary processing to do the group "break".
Stepping Up A Level - streamFrame and streamSource
In order to accomplish the above, the detailBand and group's headerBand and footerBands must be controlled in some
fashion. There are two objects involved here -- the first is the visible one -- this is called a streamFrame.
The streamFrame appears as a container on the report, and is used to control the layout of the report. Your detailBand
and other bands are placed on a streamFrame (which is placed on a pageTemplate -- see below).
However, more importantly, in the background there is a streamSource object, which is linked to your query. The streamSource is what actually controls the output -- this is what looks at the data, and loops through it row by row, and tells the report engine what to print.
Stepping Up Yet Another Level - pageTemplate
When we step back a bit, and look at the larger picture, there is the pageTemplate -- which is used to lay
out the report's page design. By this, I mean that you can set your report's margins, you can determine what you
wish to print on each page of the report (commonly called headers and footers, although there are no such objects
directly in this engine -- this is done using the "Visual Controls"), and so on.
The pageTemplate is exactly what it sounds like -- it is a template. When we get to examining the properties of the pageTemplate later in this document, we will see more.
The pageTemplate is also the object that visibly holds (or contains) the streamFrame, which in turn visibly holds (or contains) the detailBand and group header and footerBands.
Up To The Top Level - report
Finally, stepping all the way back and looking at the big picture, we have the report object itself. This object
is what is used to control things like where the report is being sent to, what pages of the report to print, through
the printer object (attached to the report object) whether the report is portrait or landscape, and all of that.
How The Report is Rendered (Generated)
Without getting into all of the details, the following is an explanation
of how a report is rendered. The term "rendered" is really just another
term for "generated", but we are using it here because the method
of the report object that actually does the generation is called "render".
When you render a report, the following things happen:
Reports, just like forms, should be built using custom controls. The array of controls that would be used on a report is more limited than would be used on a form, but the same principles with respect to customization apply.
To create custom controls for a report, we would follow the same procedure as we did with forms. We would open a new report in the designer, place the standard controls we want to use, modify their properties, and finally save them as a custom component. However, to expedite the tutorial, we have provided a ready-made set of custom controls. In the dBASESETuorial folder you should find CustomReportControls.cc. This file contains the custom controls that we will use in the Tutorial reports. The controls are taken from a more robust set of report controls contained in the dUFLP. The file that contains these controls is: REPCNTL.CC.
In addition to these controls, we will use a custom control that is included with dBASE SE. This file is REPORT.CC. To activate these two files, open the configuration program (configure.prg) and add the following lines:
//  Setup custom controls for use the reports
set procedure to :tutorial:CustomReportControls.cc additive
set procedure to :classes:report.cc additive
Save the program file. When you run this program, the report controls will be added to the dBASE SE Component Palette
A custom report works much like a custom form. You define the basics and then the reports that are derived from the custom report inherit any properties and/or code that is defined in the custom report.
To start out we should bring up a custom report on screen so we can start figuring out what we need. In the navigator click the "Reports" tab, and then double-click the yellow "Untitled" icon.
The report design surface looks very different than the other design surfaces we have worked with. If you are new to dBASE SE or just new to using dBASE SE reports, before you proceed with this phase you should read "Beginning Reports" in the dBASE Knowledgebase.
Before doing anything else, if you have not already done this we will set the report designer's "snap to grid" off -- otherwise you will have a LOT of problems positioning controls on the report: Right click on the design surface. Select "Report Designer Properties". In the dialog, find the "Snap to Grid" checkbox, and uncheck it if it is checked ... click "OK" and you have done it. This will save you a lot of grief working in the report designer. Note that you only have to do this once.
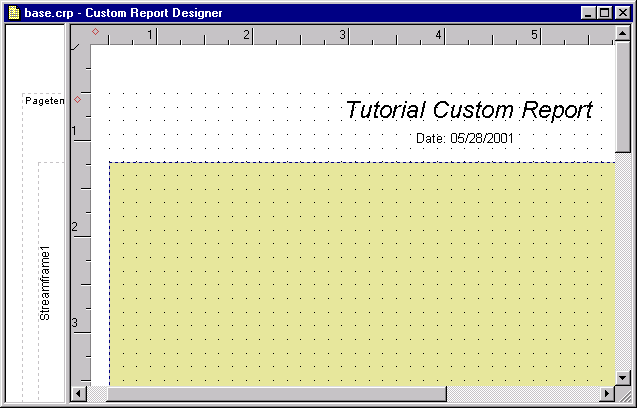
The custom report will look similar to this.
In the designer, note the vertical line with the ruler on the left side? Try dragging it a bit to the right and you will see that the report designer has two panes. You may want to leave the left side opened up.
Note -- if you cannot find the Inspector or the Component Palette, you can get to them in one of several ways. The easiest is to use the "Window" menu in the dBASE SE menu at the top of the screen, and select the one you want. You can also right click on the design surface.
We are going to set some properties for our custom report that are very important to all reports in this application.
First, bring up the inspector (if it is not easy to see [under the design surface, for example], try <F11> -- you may need to press it twice, once to turn it off and the second to turn it back on), and click on the metric property. Set this to "3 - Inches" (if you are European or non-US, you may want to use Centimeters or Millimeters -- if you are really comfortable working with TWIPS, PIXELS or other metrics, that's ok, too).
Click on the autoSort property and set it to false. Click on the title property and set it to "Tutorial Custom Report". (The title property appears in the title bar of the report preview, and when we get the application completed, in the report preview form that is supplied with the tutorial project.)
Next, in the inspector find the firstPageTemplate property and click on the "inspect" button. Set the following -- marginTop, marginLeft, marginRight, marginBottom to 0.5 (1/2" -- for you folk using other metrics, determine a good value ... if you need it, there's a routine in the dUFLP library called METRICS.CC that will convert different report metrics).
Select the STREAMFRAME1 object and click on the "inspect" button. Set the height to 8.94, the left to 0, the width to 7.5, and the top to 0.72. (For those not using inches for metrics, the idea is that the streamFrame is as wide as the pageTemplate, and leaves some room at the top and bottom, but not as much at the bottom.)
We just set a BUNCH of defaults which will be used for all of our reports.
We'll do a couple of other things before we leave the designer, but let's save it: press <Ctrl>+S and enter "Base" as the file name. (This will be saved with .CRP as the extension, for Custom RePort.) The report's class name will be "BaseCReport".
Next we're going to place a set of custom text controls on the pageTemplate. Why on the pageTemplate? So that they will print at the top (and/or bottom) of every page of any report that is generated. Consider the pageTemplate to be the place to put something you want to print on every page (unless you are getting into group headers and such -- we'll get to those later. Don't use report headers or footers -- these print one time only for any given report!).
Select a "kmTitleText1" control from the component palette. Drag it to the top of the pageTemplate (note -- the pageTemplate ends at the grid of dots -- do not try to place the text control above that, or you will get a "negative" value for the top property and will never see this control). Change the text to read "Tutorial Custom Report".
Select a "kmDateText" and place it under the first. Both of these should be above the "streamFrame" which is shown on the surface as a sort of dash-line (and again, keep it on the grid).
Click on both controls, and select the "Layout" menu, select "Align" and "Center Horizontally in Window". This will line both text controls up, and they will be centered on the pageTemplate.
Use the scrollbar on the right and scroll down so you can see the bottom of the pageTemplate. (If you have the form designer surface off the bottom of your screen, you may need to use the scrollbar on the right side of the dBASE SE screen as well -- or you could reduce the height of the designer window.) Click on the "Custom" tab of the Component Palette, and drag a "pagenumber" control onto the surface and make sure it is under the streamFrame. Let's make sure it is centered, by using the "Layout" menu, select "Align" and "Center Horizontally in Window".
Save and exit (<Ctrl>+W) the designer.
In order to use the custom report we created, we need to do something similar to what we did with forms.
Double click the first "Untitled" icon under the reports tab. This will bring up a blank report design surface. We need to make sure we are using the tutorial custom report, so go to the File menu and select "Set Custom Report Class". The dialog should look very much like the one for forms. Select Base.crp for the filename, and click "OK". You should now see the text controls we placed on the custom report's design surface.
Click on the first text control, and change the text to: "Suppliers". In the inspector, change the report's title property to "Suppliers" (Note: the report object appears as "form" in the combobox at the top of the inspector).
Save what you have done with <Ctrl>+S. Type "SUPPLIERS" as the report name.
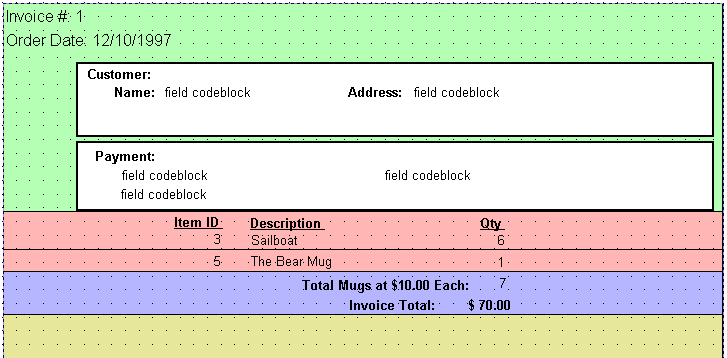
Your report will look something like:

The next graphic will help you place the different controls on the report surface.
Now we need to get the data for this report. Click on the "DataModules" tab on the Navigator, and drag the "Supplier.DMD" onto the report surface. (We talked about the possibility of using the same datamodule in both a form and a report, well ... here we are!)
At this point, just like in the form designer the field palette (if it is on screen) will show all the fields for the supplier table. However, just like when we built our forms we will not use the field palette, because it uses the stock controls. We want to use the custom controls that are available.
Working with the DetailBand
Go to the inspector, and click on the combobox. Under "streamSource1"
you should see "detailBand". Select this. This will bring the detailBand
to the inspector so we can manipulate it.
We're going to temporarily set the height property of the detailBand to 2 (for 2 inches). This is a fairly tall detailBand, and we will end up changing this back to the default of zero (which means it is a "variable height" detailBand) later. Type "2" and press <Enter>.
It doesn't look like anything happened, because we haven't placed anything on the design surface. So, let's place a text control on the design surface that will be a heading for a field. Using the custom tab of the component palette, select a "kmFieldHeadingText" control and place it in the upper left of the streamFrame (the 'dotted line'). Change the text to read: "Company". In the inspector, change the fontBold property to true.
Depending on your window sizes and such, you should see at least two instances of this text control -- this is because the report designer is "live" -- it works with the data from the table directly. If you could see it, you would see that there is one instance of this control for each row in the table.
Next, select "kmFieldText" and place it on the design surface next to (but not overlapping!) the "Company:" text. This is going to be something we do a lot. We want to reference a field in the table, and we need to replace the text that appears now "field codeblock" with the actual codeblock necessary to display the contents of the field. To do this, in the inspector find the text property of the object, and click on the tool button. A new dialog will appear, and we need to enter the following (overwriting what is currently there):
form.streamSource1.rowset.fields["Company"].value
If you look, the "expression" radiobutton is selected (which it should be), which means that rather than display this as literal text (which is obviously not what we want to happen) it will be set as a codeblock -- this will be evaluated each time this text is rendered -- once for each row in the rowset (see "Beginning Reports" in the dBASE Knowlegdebase for more details.).
Click the "OK" button for the dialog. You will see the name of the company appear. You will probably want to widen this. To be sure, scroll down in the designer until you see "Sports Mugs International" -- if the text "wraps" then you want to widen the text control so that it doesn't. (You may also want to check the height of the text control ... sometimes when a text control wraps, even after you have widened it the height remains where it was when it was wrapped.)
An interesting phenomena is that you can only manipulate the first detailBand on a report (unless a control doesn't display any text in that detailBand -- we'll see this in a moment) ... this can be a bit disconcerting at first. We are going to place a variety of text controls on the report surface, using exactly the same steps we did above. When done you should see something like the image below.
Notice that the two controls on the report are using a transparent background. For some people this makes it difficult to see where things are being placed in relation to other items because it is difficult to see the boarders of the text object. There is easy fix. In the custom control file change the property of the text object so that it is easier to see. Here are the steps:Now the text fields that you will place on in the report designer will have a white background and might make it easier to see where the objects are. When you have finished designing all the reports remember to change the transparent property back to true.
- Locate the file CustomReportControls.cc.
- Open this file with the Source Editor.
- In the left panel, select kmStandardText (this is the parent class that kmFieldText and kmFieldHeaderText are inherited from).
- Change the line which has "transparent := true" to "transparent := false".
- Save the change and close the Source Editor.
- Recompile CustomReportControls.cc (in the navigator, right click the mouse and select compile).
      function KMFIELDTEXT9_canRender
         local f
         f = form.streamsource1.rowset.fields
         this.text := ""
         this.text += new string( trim( f["CITY"].value ) )
         this.text += ", "
         this.text += new string( trim( f["STATE ID"].value ) )
         this.text += "  "
         this.text += new string( f["POSTAL"].value )
      return true
Note that this last statement ("return true") is vital.
Now switch back to the Report Designer. Unfortunately, you do not always see the values here in the designer. Widen this up by quite a bit, as this can be fairly lengthy.
What you will see on screen in the designer is "field codeblock". Do not let that worry you. When you run the report the canRender event will fire and the text will be evaluated and created based on the contents of the fields in the table.
Note: The use of "new string()" above is to handle what some people view as a problem in dBASE SE, but it is really an "as designed" issue.If you have an empty field in a dBASE 7 .DBF table, it may contain a "null" value. In dBASE SE, if you add a null value to any other value, you always get a null value.
Passing the fields through the "new string()" command as above causes dBASE SE to convert any nulls to an empty string. This will save problems when you have situations like above where we are concatenating character strings, where some of them might evaluate to null.
Note: Lining up controls can be done by using the <Ctrl> key (holding it down) and selecting the controls you wish to line up by clicking on them. Once you do that, use the Layout menu, and select "Align", and then the option you want ... be careful. If you do something you didn't mean to, press <Ctrl>+Z (Undo).
As noted above, the second street address is not always filled in for some rows. The problem is, as you can see, the area reserved for that text control is still "there". We need to suppress this blank row. To do that, we need to do the following:
Problem: if we reduce the height of the detailBand, we will see the details all running together. One good way to break things up is to place a "line" control across the top of the detailBand. Drag a "kmLine" from the component palette to the surface and place it at the top of the detailBand, above the text controls. This will take a bit of adjustment to get it "just right" (and may, unfortunately, affect some of the text control positions, meaning you will have to line them back up again). Set the width property (this appears under the Visual grouping in the inspector, and has nothing to do with the size of the line from left to right) of the line to '2' (pixels) in the inspector. If necessary, change the top and bottom properties to the same values (in the inspector), so that the line is horizontal, rather than diagonal. Stretch the line (either by using the tools on the designer, or by using the right property) so it is as wide as makes sense based on the text on the designer surface.
Finally, the detailBand is taking a lot of room. Let's reduce the height by setting the height property back to zero.
There are a lot of options we have not explored here -- we could set colors (but unless you have a color printer, they won't print), we could place images and other controls on the surface of the report, and so on. We could make the company name larger than the rest of the text.
Done With This Report
Save this and exit the report design surface (<Ctrl>+W). To see
the report, simply double-click on it in the Navigator. This will preview
the report ... when done close the preview with the 'x' button in the titlebar.
This report will list the inventory by supplier showing the quantity on hand for each item in the inventory, and totalling the quantity on hand for each supplier. In order to do the totals we will be using an aggregate function and group header and footerBands. We will also be using two tables, the supplier (as a 'master' table) and the inventory (as a 'detail' table).
Before we get into creating the report we need a new datamodule, because the Inventory datamodule we created earlier doesn't have the correct layout for our needs. So, we need to go back and create a new datamodule for this report.
Creating the Datamodule
The datamodule that we are going to create for this report is subclassed from
a datamodule we have already built and are using in one of our forms. The Supplier.dmd
datamodule contains a query object for the supplier table. We will use this
datamodule as the super class for our Inventory Report datamodule. This will
save us from needing to reconstruct the Supplier query object and it's lookupSQL
fields.
Create a new standard datamodule. Then select File -> Inherit New -> Datamodule. In the Select Custom Datamodule dialog, enter "*.dmd" in the file name field (or select "datamodule from the "files of type" combobox). One of the datamodule files in the listview is "suppler.dmd". Select this file and click the open button (be sure you select the dmd file, and not the dmo file).
You will notice that the dBASESEtutorial1 database object and supplier1 query object are now contained in this new datamodule. This is because both objects (and all their properties) are inherited from the super class.
All we need to do in order to complete this new datamodule is to add the inventory table and to set the relations between the two query objects.
Drag the "Inventory" table to the design surface.
The rowset property of this datamodule should be "Supplier1". Be sure it is set as the controlling rowset.
Finally, we need to set the relationship between the two tables. Set the indexName property for the Inventory1 rowset to "SUPPLIER ID". Then in the Supplier1 query object, click the "Supplier ID" field. Drag this field onto the Inventory1 query object.
Now that we have this datamodule, save is as "InventoryRep.dmd" and exit.
Back to the Report
We need to create a new report (double-click the 'Untitled' report
icon), which should automatically inherit the custom report we set up earlier.
Change the title property of the report to "Inventory by Supplier" and then change the first text control to the same text.
Press <Ctrl>+S and enter "Inventory" as the report name.
Drag the "InventoryRep.dmd" to the surface from the navigator (from the "Datamodules" tab of the navigator).
The Inventory Report will look similar to the following graphic when it is completed.
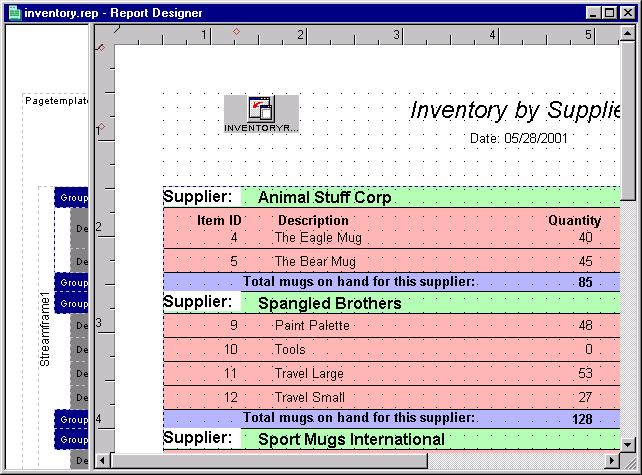
You can use the following graphic to help with the placement of controls on the report surface.

Work on the detailBand
First let's get some info for the detailBand in here. Without it it
will be difficult to do much else. The detailBand is going to contain some
headings and we're going to lay the data out in columns.
Note: At this point the design surface is a gold-ish color which represents the "StreamFrame1" object. The detailBand, which will have a pink-ish color, is not yet visible. After you place a control on the StreamFrame, the detailBand will automatically become visible.
Drag a "kmFieldHeadingText" control onto the design surface. Notice that you get one for each row in the Inventory table. We want to have a bit of room, since we want to place controls under the heading we just placed here, so after setting the fontBold property to true, and changing the text to "Item ID", set the height of the detailBand to 1 (1 inch). We'll come back and change that to zero again later.
BUG: The report designer forgets or ignores the fact that the custom control "kmFieldHeadingText" already has the fontBold property set to true in the CustomReportControls.cc file while placing the control onto the design surface. This is a minor bug, but rather annoying.Oddly enough, if you were to NOT set the property as mentioned above, save the report and exit the designer, and then bring the report back into the designer without doing anything else, the property would be evaluated properly.
It's easier to just set the fontBold property while in the designer. If you don't do that, you may set the width property incorrectly and when you test the report you will find your heading control either being truncated or wrapping on the report.
Place two more "kmFieldHeadingText" controls on the design surface, each next to the other. Set the fontBold property to true for both, and the text of the first one to "Description" and the text of the third one to "Quantity". (Note that you can get these to all line up by holding the <Ctrl> key and clicking the mouse on each so that they're all selected, and using either the toolbar alignment tools or the menu options.)
Place a "kmFieldText" under the "Item ID" text. Change the codeblock to (Note: enter this without the semicolon (;) and the break -- it should be one line):
   this.form.inventoryrepdatamodule1.inventory1.;
             rowset.fields["Item ID"].value
Because we're using a datamodule, we need to use syntax as shown above which is different from the previous report.
Now let's get the Description and QTY fields in there in a similar fashion. You will want to widen the Description field a bit, and this may mean moving the text controls around to make things "fit" and look good.
This is all we want for the detailBand. Problem is, do we really want the column headings to print for each row? Probably not. To solve this what we will do is use the canRender event for each of these, and check to see if the detailBand is the "first on the streamframe" -- there is a property of the detailBand that is "read only" that can be evaluated for this.
Click on the "Item ID" (heading) text control, and in the inspector click on the "Events" tab. In the canRender event, enter the following:
{||this.parent.firstOnFrame}
Repeat this process for the "Description" and "Quantity" heading controls.
Note: If you accidently clicked on the tool button here, rather than entering the codeblock shown above, you will be placed in the source editor. You have two choices, either of which is perfectly acceptable.The simple one is to enter the codeblock shown above differently -- place the text "this.parent.firstOnFrame" after the word "return", replacing the word "true".
The other is to go to the "Method" menu, and select "Delete Method", and then in the inspector enter the codeblock as shown.
If you enter the codeblock in the source editor, this will not evaluate properly, so you should use one of the fixes shown above.
Note also that if you use the first fix given above, that you will not see the results until you run the report ... the report designer will not evaluate it during design mode. This may be a bit disconcerting.
The "firstOnFrame" property is a read-only value that is either true or false. It is true the first time the parent (i.e. the detailBand) is rendered in this streamFrame. This can be useful to print something only once on a page. For when the firstOnFrame is false, canRender is also false and the control will not be printed.
In addition set the suppressIfBlank property to true for this control. Do the same for the other two headings.
Set the detailBand's height property to zero.
Now we're ready for the fun part ... the group.
The Group
This is how we will break the data out by supplier, and in addition
it is how we will set the aggregate calculation used to get the total quantity
of mugs for that supplier.
On the "Report" tab of the component palette is a "group" object. Drag this to the streamFrame. All you should see to start with is "Header Text for Group1". We'll get to that. Go to the inspector, and select "group1". Select the groupBy property and in the combobox select "Company".
Click on the text control on the headerBand. Change the text to read "Supplier:", set the fontBold property to true, and the fontSize property to 12.
In the inspector, notice the width of this ... there's a bug in the report designer that does not convert the metrics for this text control properly. If the metrics are set to inches, you may see some value like 3000. Change it to 2, and then resize the text control a bit more on screen using the regular handles to do it ... (This may happen with some other controls ... if it does, just change the value back to something that makes sense.)
Next, drag a "kmFieldText" control to the headerBand next to the one we just modified. Set the text codeblock to read:
form.streamsource1.rowset.fields["Company"].value
Note that in the detailBand we had to reference the datamodule object, here we are referencing the streamSource -- this is because the supplier table is the controlling table for the report, and there is a reference in the report's constructor code setting that table as the default rowset.
Change the fontBold property to true, the fontSize property to 12, and resize this control so that it fits. (You may want to use the alignment tools here.)
The report is starting to shape up nicely at this point.
The Group footerBand
Next we want to add an aggregate function in the footerBand of this
group. The footerBand itself is not visible as it has a height of zero,
and no controls on it. So the first step is to make the footerBand taller
than the default height of '0', so we can deal with it. In the inspector,
you will find "group1" (use the combobox at the top), and you should see
footerBand
right underneath it. Select this in the combobox, and set the height
property to 1 (1 inch).
Grab a "kmFieldHeadingText" control and place it in the footerBand, under the description. Change the text to read "Total mugs on hand for this supplier:". Widen the text control so there is room. Set the fontBold property to true. You may want to re-set the height to approx. 0.18 (of an inch) for this control.
Next comes the hard part -- well, not really ... we need to set the aggregate total for the group here. This sounds like it ought to be difficult, but it's not. Drag a "kmFieldText" control onto the footerBand (make sure you place it there and not in the detailband), and place it under the Quantity field. Set the text codeblock to read (Note: enter this without the semicolon (;) and the break -- it should be one line):
  this.parent.parent.agSum( ;
       {||this.parent.rowset.parent.parent.inventory1.rowset.fields[ "qty"].value})
Note: If you accidentally enter this directly into the field in the inspector, rather than using the tool button to change the codeblock, this may not work -- the Inspector may assume you are entering text. If that happens, click on the tool button, and in the dialog, click the "Expression" radiobutton (the "Command" radiobutton will be set), and then click "OK". This will convert it to a codeblock.
Note: The above is a bit complex, and it helps to understand what it is doing. So, let's break it down:this.parent.parent.agSum()
"this" -- is the text object -- which is the item whose codeblock is being executed.
"parent" -- the first parent refers to the footerBand.
"parent" -- the second parent refers to the group.
"agSum()" -- is the actual "aggregate Sum" function we are asking dBASE to evaluate.The part in parenthesis is what we want the function to work on and evaluate.
The next part is a bit more tricky:
{||this.parent.rowset.parent.parent.inventory1.rowset.fields[ "qty"].value}
Note that this is a codeblock
"this" at this point is the group (at the time the codeblock is being evaluated, not at the time we enter it)
"parent" at this point is the streamSource (which is a container for the group)
"rowset" is the rowset we are working with (Supplier is the controlling rowset)
"parent" (of the rowset) refers to the query
"parent" (of the query) refers to the datamodule
"inventory1" refers to the query "inventory1" (also contained in the datamodule)
"rowset" is the rowset of the "inventory" query
"fields["qty"].value" is the field's value we want the sum function to function on.Confused? It does take some figuring out (in order to explain it to you here I had to spend some time tracing it back through the object hierarchy), but if you follow it through it should start to make sense.
Set the text's fontBold property to true, and you may want to tinker with the picture property (for the working example, I set this to "999", but then had to set the alignHorizontal to the right, and tinker with the size of the control). And finally, reduce the detailBand height by setting the height property back to zero.
Save and exit (<Ctrl>+W) and run the report by double-clicking on it ... this will preview it, which is handy. It should look like it did in the designer!
Note: For the purposes of the tutorial, the amount of work necessary to insert a report total (or "grand total") for the inventory is too much. The problem is that the detail rowset is constrained by the master/child table relationship. In order to get the total necessary you would need to either have a second instance of the child table open and total on that, or create a running total -- this is covered in excruciating detail in "Tricks With Reports and Labels" which is in the dBASE Knowledgebase, but it is not attempted for the tutorial. If you wish to pursue this avenue, you could do it -- recommend using the onRender event of the group to accumulate the totals you need.
The Customer Invoice report will be generated only from the invoice form (Invoice.wfm) (there is a print button on that form that we didn't actually add any code to -- now it's time). We are not going to be using the original "Invoice" datamodule due to the fact that the design of the report is a bit different than the design of the form. So, we are going to have to create a new datamodule for this report as well as the one we created for the previous report.
To make this work, we are going to get some information by passing it through the dBASE SE application object (_app). This information will be used to find the appropriate data.
Modify the PrintInvoice Button For the Invoice Form
We need to know which invoice id we are going to print (which is also
the Invoice Number). So, we are going to first go back to the invoice form,
and modify it a bit. The part we will modify is the onClick event for the
"PrintInvoice" button. In the navigator, click on the "forms" tab and right
click on the "Invoice" form, and bring it back into the designer. Click
on the "PrintInvoice" button, and in the inspector, select the "onClick"
event. Click the toolbutton, and enter the following code:
   function PRINTINVOICE_onClick
      // check to see if we're at the endOfSet (i.e.,
      // no invoices), otherwise we'll do the print
      // routine:
      r = form.INVOICEDATAMODULE1.invoice1.rowset
      if not r.endOfSet
         // store the primary key field needed
         // in the _app object as custom property
         _app.InvoiceID  = r.fields["Invoice ID"].value
         // Call the report with the preview form ...
         do preview.wfm with "Invoice.rep", true // modal!!
         _app.InvoiceID  = NULL // cleanup
      else
         msgbox( "There is nothing to Print!", "Can't do that!", 16 )
      endif
   return
Save and exit the form designer (<Ctrl>+W).
Now that we have done that, we should be able to find the data we need when we actually generate the report. So, it's time to start creating the report.
Create the DataModule
Yes, we're going to create another datamodule. The reason we are not
using the one used for the Invoice form is that the layout is different.
We are going to use four different tables here (if we do a
lookupSQL we only need three).
Start by creating a new datamodule and use the Inherit New menu item to subclass this from the Base.cdm custom datamodule.
Now, drag the Invoice table onto to the design surface.
Click on the datamodule design surface, and set the rowset property to "invoice1".
Click back on the Invoice query object, and set the indexName to "Invoice ID".
Save the datamodule (<Ctrl>+S) as "InvoiceRep.dmd".
Next we need to drag the Customer table onto the designer surface.
Set the indexName property to "Customer ID". And set a relation between Invoice1."Customer ID" and the Customer1 query. We are creating a one-to-one match here. There is only one Customer ID that will match this Invoice.
Set the lookupSQL property for the "State ID" and "Country ID" fields as we have done in other datamodules. (Click on the fields array and drill down to the fields, select the "State ID" field and drill down to it, select the lookupSQL property and enter "SELECT * FROM STATE ORDER BY STATE" -- repeat for "Country ID" but for the COUNTRY table.)
Finally, we need to drag the LineItem table to the designer, and set it up. Set the indexName property to "Invoice ID". Set a relationship between Invoice1."Invoice ID" and the LineItem1 query.
Finally, set the lookupSQL property for the "Item ID" field to:
select inventory.'item id', inventory.'description' from inventory
Now that we have the datamodule designed, save it and exit the designer.
Create the Invoice Report
This report is going to take a bit more work than the previous ones,
but it shouldn't be too bad.
To do this particular report we are going to have to work on it in three sections -- one for the customer data, one for the payment information, and the last for the detail data.
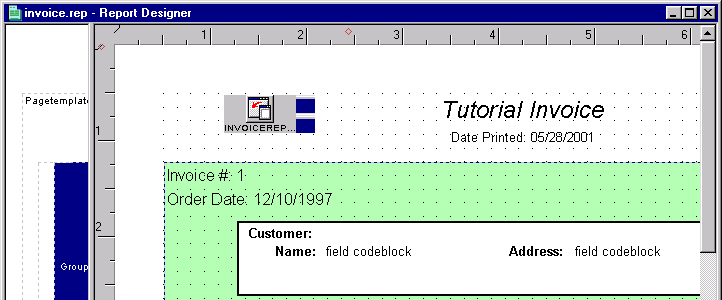
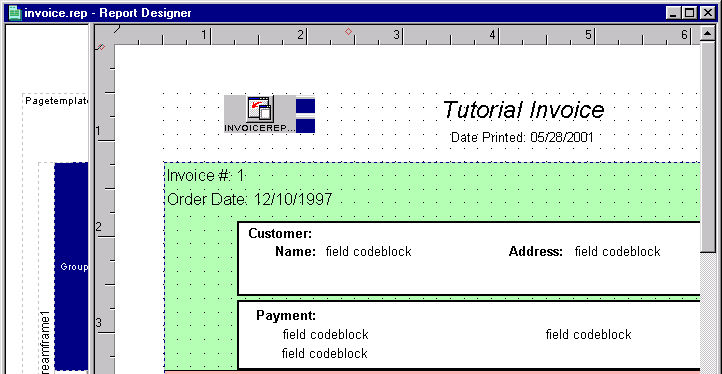
Click on the "Reports" tab of the Navigator. Double-click on the "Untitled" icon in the Navigator, to start a new report. This new report should be subclassed from the base.crp custom report and therefore it should have a title and a date. Change the title of the report and the text at the top to "Tutorial Invoice".
Save the report now, so we have a name and don't have to worry about it later. Press <Ctrl>+S and name the report "Invoice".
The report should look like the following when done:
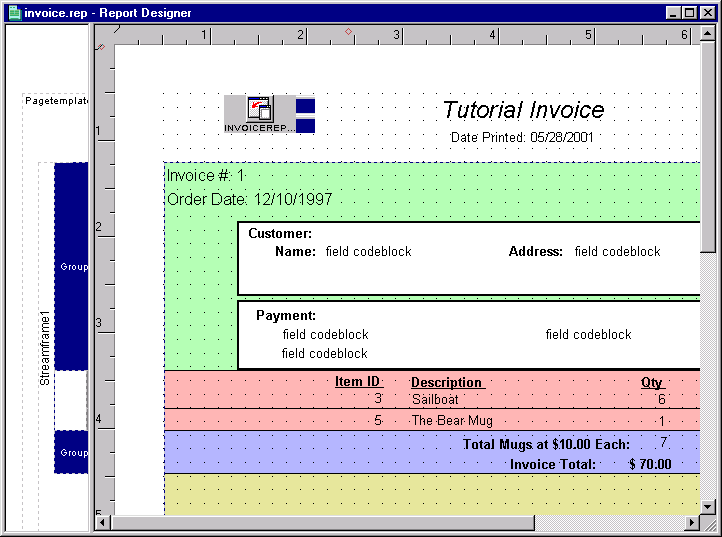
And the next graphic will help with placing the controls.
Drag the new "InvoiceRep" datamodule over to the design surface.
The field palette should show three tabs with all three tables represented in the datamodule here. Once again we're not actually going to use the field palette, but we're using it for a reference.
Next, click on the date text, and change the text to be displayed by clicking on the tool button by the text property. All we want to do is change the word "Date:" to "Date Printed:". When you do this, and click the "OK" button, you will need to widen the text control a bit, so that the whole thing appears on the report (you may want to select the "Layout" menu and "Center Horizontally in Window" while this text control has focus, to make sure it is centered). (Why did we do this? Because we will also be printing an "Invoice Date" momentarily, and we do not wish the invoice to be confusing to the customer, or employees of the company reading it.)
Select the "group" object from the component palette (on the Report Tab), and drag it to the streamFrame. Set the groupBy property to "Invoice Id". Drill down to the headerBand object, and set the height to 2.5 (2.5 inches). To make it easier to see how this will look when we print it, set the beginNewFrame property to true. (This ensures that each time the group changes, we start a new streamFrame, which in most reports means a new page.)
Do nothing with the default text control yet (the one that appears in the group header with text: "Header Text for Group1"). We will delete it momentarily, but it's easier to put something on the surface first ... drag a "kmFieldText" control onto the design surface, and place it under the text control that is placed there automatically. Now click on the one put there for you by the designer, and delete it (this will have a name like "Text1"). (Seems silly? Sure, but ... that way the control we work with has the properties defined in the custom control file.)
Move the new text control up to the top of the headerBand, and change the text codeblock to:
"Invoice #: "+form.streamsource1.rowset.fields["Invoice ID"].value
Click the 'OK' button, and you should see the text in quotes followed by an invoice number. ("Invoice #: 1" is what should appear.)
Set the fontSize property to 12, to make this stand out a bit. You may need to widen the text control a touch.
Let's drag another "kmFieldText" control and put it under the first one (don't overlap them!). Change the text codeblock to:
"Order Date: "+form.streamsource1.rowset.fields["Order Date"].value
You will need to widen the control, and then set the fontSize to 12 (which may mean further adjustments).
Customer Data
The next part of the report we need to put in is the customer information.
This will also go in the group headerBand.
(We're only printing one
customer per invoice, right?)
Some developers like to uses rectangles in their reports to group some of the data. Experience has shown that rectangles, while looking great, cause some problems when actually printing (they often print offset from the text that is placed on them to the left and up, so that they do not look correct -- this is a known BUG). Instead, we will be using a shape object set to a rectangle.
Drag a "kmRectangleShape" from the custom tab of the component palette into the group headerBand under the text controls that are already there. Resize the rectangle a bit (we'll resize it again later).
Note: The reason we are doing this in the sequence given has to do with the "rendering sequence" of controls (in forms this is called "Z-Order") -- if this shape control were placed on the design surface after the text controls, and then moved on top of them, you would not actually see the text controls when the report was rendered, only the shape. By putting the shape on the design surface first, and then the controls that will appear to be on "top" of it, the shape is rendered first, then the text controls and it appears the way we need it to.We could, of course, place the shape control on the report later, and then in the source code move the constructor code for the shape control so that it is before the constructor code for the text, but it's easier to not have to do that.
One problem is that working with shape controls is that they don't like having text controls placed on them. Move the rectangle (shape) down a bit for now, and we'll move it back later. (This is a problem/bug with the report designer that I seriously hope gets fixed someday.)
To show that the next part of the report deals with customer data, drag a "kmFieldHeadingText" control onto the surface, and set the text to "Customer", and set the fontBold property to true.
Next we're going to place text controls on the group headerband for the customer data. This is simply going to be the customer name and address, and in order to get the data to look right, we will use the canRender event to do so (it could be done using a codeblock, but I find codeblocks can get rather unwieldy).
First, put a "kmFieldHeadingText" control on the surface, and change the text to "Name:".
Next, put a "kmFieldText" control on the surface (to the right of the heading), and set the canRender event as follows:
   function KMFIELDTEXT3_canRender
      local f
      f = form.InvoiceRepDataModule1.customer1.rowset.fields
      this.text := new string( trim( f["first name"].value ) )
      this.text += " "
      this.text += new string( f["last name"].value )
   return true
Because this code is in the canRender event, it will not be evaluated at the moment. Widen it a bit as the chances are most combined first and last names will be wider than the text control defaults to. To the right of it, place a "kmFieldHeadingText" control and change the text to "Address:".
And to the right of that, place another "kmFieldText" control, and set the canRender event to:
   function KMFIELDTEXT4_canRender
      // This one's going to be a bit more complicated,
      // but it will solve some issues in getting
      // everything to "lay out" properly:
      local f
      f = form.InvoiceRepDataModule1.customer1.rowset.fields
      this.text := new string( f["street1"].value )
      if not empty( f["street2"].value )
         this.text += "<BR> " + new string( f["street2"].value )
      endif
      if not empty( f["city"].value )
         this.text += "<BR> " + ;
                      new string( trim( f["city"].value ) ) + ", " +;
                      f["state id"].value.rightTrim()  + "  " + ;
                      new string( f["postal"].value )
         if not f["country id"].value.rightTrim() == "United States"
            this.text := this.text.rightTrim()
            this.text += "   <B>"+f["country id"].value+"</B>"
         endif
      endif
   return true
(Note that using the "new string()" construct on fields that have a lookupSQL property will generate blank values -- not sure why this is, but don't use it in those circumstances!)
This is more complex than we've done before, but it is a useful way of dealing with fields that may be empty (rather than using the suppressIfBlank property for multiple text controls), and getting everything to line up properly (and may actually be a better way of doing it). The "<BR>" characters are HTML "breaks". There must be a space after them for them to work properly (this is a very minor bug in the HTML interpreter in dBASE SE). You will want to widen this quite a bit ... it may not look necessary, but trust me.
Next, move the shape object back up so that it is "over" the other controls, and size it accordingly ... make sure you leave room for the width of the address field, and room for up to three "lines" to be displayed.
Save and exit, and let's run it to see what it looks like in the report viewer. You may decide you need to change the width of the controls if you have a name or address that wraps funny.
Once you've examined it, close the reportView down and bring the report back into the designer.
Note: A quicker way of switching back and forth between the report designer and the view mode is to use the toolbar -- the "Lightning" button is "Run" -- it will run the report. When it does this it will automatically save the report. The button next to it with some engineering tools is the "Design" button. This will take the report back into design mode. This can be useful if you need to do a lot of small changes.
Payment Data
The payment part of this report is going to get a bit tricky, so follow
carefully. We will need to determine what we are going to render based
on several things.
As we did above, place a "kmRectangleShape" on the group headerBand and then move it out of the way ... we'll put it back in a moment.
Place a "kmFieldHeadingText" control on the report, change the text to "Payment", and set the fontBold property to true.
Under that, place a "kmFieldText" control. We're going to spend a lot of time doing canRender events from this point on (some of this is for field morphing, and some of it is because we simply need to display or not display the control based on specific values) ... go to the canRender event, and set the following code:
   function KMFIELDTEXT5_canRender
      local f
      f = form.streamSource1.rowset.fields
      do case
         case f["pay type"].value == "CH"
              this.text := "Check: "
              this.text += f["check number"].value
         case f["pay type"].value == "VI"
              this.text := "Visa: "
              this.text += f["card number"].value
         case f["pay type"].value == "MC"
              this.text := "MasterCard: "
              this.text += f["card number"].value
         case f["pay type"].value == "DN"
              this.text := "Discover/Nova: "
              this.text += f["card number"].value
         otherwise
              this.text := "Unknown payment type"
      endcase
   return true
You will need to widen the field (not obvious when examining it on the design surface) as you will need to be able to display a fairly lengthy amount of text, including the text "Discover/Nova" and the credit card number ...
Next we need to display the card's expiration date and then the name that appears on the credit card. These will have simpler code because we only need to check to see if the customer paid by credit card, and if not, we won't display them (if the canRender event returns a value of 'false', then this text control will not be rendered, and therefore will not display on the report at all).
The first of these two text controls (kmFieldText) should be on the same "line" as the one we just set, but to the right, and the canRender event would look like:
   function KMFIELDTEXT6_canRender
      local f
      f = form.streamSource1.rowset.fields
      if f["pay type"].value == "CH"
         return false
      else
         this.text := "Expiration: " +;
                     new string( f["Card Exp"].value )
      endif
   return true
The next text control (name on card) would go under the other two, and have a canRender event like:
   function KMFIELDTEXT7_canRender
      local f
      f = form.streamSource1.rowset.fields
      if f["pay type"].value == "CH"
         return false
      else
         this.text := "Name on card: " +;
                     new string( f["Card Name"].value )
      endif
   return true
You will need to widen this up as well to give room for the "name on the card" as well as the text.
Move the "kmRectangleShape" back up so that it is on top of these controls and resize it so it "looks good".
Set the group headerBand's height property to '0' (zero), so that it resizes itself appropriately.
This looks sort of non-sensical, as the text controls are displaying "field codeblock", but when we run this, we should see good information ... let's try it. Save and exit, and then run the report (from the Navigator), so we can see what it looks like so far.
You may need to widen some of the text controls, so be prepared to bring it back into the designer, change the controls, and run it again.
When done viewing it, bring it back into the designer so we can complete it.
The Line Items
We will not use a rectangle around the line items as the number of
line items for any order is effectively unlimited. We will use a layout
similar to what we did in the inventory report.
First, find the detailBand object in the inspector, and set the height to 1 (1 inch) so we have some room to maneuver.
Next place three "kmFieldHeadingText" controls on the design surface (in the detailBand) next to each other, and change the text to "Item ID", "Description" and "Qty" (you will want to move the "Qty" text over to the right a bit). Set the fontUnderline and fontBold properties to true for all three controls.
The canRender event will be set like it was in the Inventory report, for each of these controls.
{||this.parent.firstOnFrame}
Next, for each of these controls set the suppressIfBlank property to true (otherwise the space reserved for these to print will still be reserved in succeeding detailBands, which is not necessarily what we want).
We want to place three "kmFieldText" controls under these and set the text codeblocks properly. However, these are going to be placed on the report in a different sequence than you might expect -- this is because we are using the lookupRowset for the Item ID field in two places.
We need to place the "Description" text first because this will force the lookupSQL to evaluate properly, moving the rowset pointer to where it needs to be. If we do not put this one first, we will have the Item ID (the first column of this part of the report) actually showing the previous row's Item ID (for the first line item we would see the correct value, but for an invoice with multiple line items we would see an incorrect Item ID for all but the first).
Place a "kmFieldText" control under the "Description" heading, and set the codeblock to:
form.InvoiceRepDataModule1.lineitem1.rowset.fields["Item ID"].value
Remember we are using a lookupSQL, so the value that will actually display is the value of the description field in the Inventory table that matches the "Item ID".
Next, set a "kmFieldText" control under the "Item ID" heading (to the left of the description), and set the codeblock to the following. This is more complicated than the previous, because of the lookupSQL we defined in the datamodule. We need to actually display the Item ID, which we will not get unless we do the following (which backs up to the lookupRowset and gets the first field in the rowset, which is the Item ID, rather than the description). This looks like (remove the semicolon, break and spaces so it is one line in the codeblock!):
    form.InvoiceRepDataModule1.lineitem1.rowset.fields["Item ID"].;
       lookupRowset.fields[1].value
The last text control is easier. Place one more "kmFieldText" control under the "Qty" heading, and set the codeblock to:
form.InvoiceRepDataModule1.lineitem1.rowset.fields["Qty"].value
Once you have all three of these set up play with the widths and alignments so that they line up in a nice clean way.
Set the detailBand's height property to zero.
Totals
In order to get the totals to work we need to use the group's
footerBand.
In the inspector find 'group1' and then the footerBand object. Set
the height property to 1 (1 inch).
Place a "kmFieldHeadingText" control at the top of the footerBand, and set the text to read: "Total Mugs at $10.00 Each:". (You will need to widen it a bit.)
Next, place a "kmFieldText" control under the QTY field in the detailBand. The text codeblock for this will be using the aggregate SUM function (again remove the semicolon, break and spaces so that this is entered as one line):
this.parent.parent.agSum( ;
  {||this.parent.rowset.parent.parent.lineitem1.rowset.fields["qty"].value})
(An explanation of this syntax is given in the Inventory report we did earlier, if you need a breakdown.)
When you click the "OK" button you will see that this returns a value with decimals -- let's set the picture property to display up to three digits (we might have a customer who wants over a hundred mugs for something). This is done by going to the picture property for this text control and setting the picture to "999". Notice that the value is left aligned now -- it's looks better for numeric values to be right aligned. Find the alignHorizontal property and set it to "2 - Right".
Finally we need an invoice total. Place a "kmFieldHeadingText" control under the "Total Mugs ..." control, set the text to "Invoice Total:" and set the fontBold property to true. Play with the width and position a bit until it's where you feel it belongs.
Next, place a "kmFieldText" control under the previous total. Set the text codeblock to the following:
  "$ "+(this.parent.parent.agSum( ;
     {||this.parent.rowset.parent.parent.lineitem1.;
	                      rowset.fields[ "qty"].value}))*10
This will place a dollar sign and a space at the beginning, take the aggregate sum and multiply it by the cost of the item (we will use 10.00) times the number of items ordered. (If you need more explanation of the "this.parent.rowset ..." part of the above, see the previous report where we did the same thing but for the "inventory" table).
Set the fontBold to true, alignHorizontal to "2 - Right", and tinker with the width and how it lines up with the other controls.
In a "real world" application, you would probably need to deal with sales tax (at least for most states), with shipping cost, perhaps store the price-per-unit in the inventory table, and so on. We'll leave that to you to figure out based on what we've done so far.
Set the footerBand's height property back to zero, and we're done with the layout portion of this report!
Save the report and exit the designer. Let's run it one last time to make sure it looks ok. When done looking at it, close it down.
One Last Thing -- Code To Find the Correct Invoice ...
The problem with this particular report is that the data is not limited
to a specific invoice number.
What we need to be able to do is find just the one invoice and limit the report to just that invoice, or we will have a bit of a problem -- since the purpose is to only print one invoice from the Invoice form.
We are going to need to set up some code, but not in the report -- we need this code in the dataModule.
Bring the InvoiceRep datamodule up in the designer.
Click on the Invoice query object in the datamodule, and in the inspector, click on the onOpen event, and the tool button. We are going to execute some code after the query opens to limit the range, so that we are dealing with only the invoice number requested. This is going to be done by checking to see if the _app.InvoiceID property exists and if it contains a valid value. If so, we will set a "range" using the rowset's setRange() method to limit the report to just that invoice. Otherwise, we want to just ignore all this.
Note: the reason we are setting the indexName property in this code is that the query's onOpen fires before setting the indexName in the normal sequence of events in a datamodule (or query) -- the "active=true" setting is what causes this. Without an active index the setRange() method will not work. So we have to make sure that the indexName is set properly for the setRange() method to function (see online help for information on setRange()).
The code should look like:
   function invoice1_onOpen
      if type( "_app.InvoiceID" ) # "U" and ;
         type( "_app.InvoiceID" ) # NULL

         this.rowset.indexName := "Invoice ID"
         this.rowset.setRange( _app.InvoiceID )
      endif
   return
One way to test this is to run the Invoice form (which is how the user will be actually running the report), which will set the value of the _app.InvoiceID property. Run the INVOICE form, and make sure you have a customer with an invoice ... click on the "print invoice" button, and the preview form will appear. You can print it from here, or not. Notice that selecting the next/previous page buttons have no effect -- the report is limited to this invoice.
The next report we will create is going to generate a customer account statement for a specified range of dates. This report will need to get data from the Customer, Invoice, and Lineitem tables. In addition we need to group the report by Customer and, within each customer, by invoice date. The report will be called from a dialog form in which the user enters a range of dates for the output.
For this report, we will use one query object that is created from an sql command joining the three needed tables.
The Datamodule
Like before, we need to create a new datamodule that inherits from Base.cdm
Save this as Statements.dmd.
Next, right click the mouse on the empty design surface and select "Add Query Object from .SQL File" from the popup menu. We need to create a new SQL file, so in the "Create Query Object" dialog, be sure the "Create new .SQL query file" option button is true and click "OK".
The SQL designer will open, and the "Add Table" dialog will have focus. If the dBASESEtutorial database is not in the "Look in:" entryfield, select it now so that the tables are available.
You can double click Customer.dbf, then Invoice.dbf, then Lineitem.dbf, which will add these tables to the query, then close the dialog.
The SQL designer looks similar to dQuery, however, it's purpose is much more limited. With the SQL designer we will be able to set specific options and the designer will write the SQL statement. This is very useful if your knowledge of SQL (not to mention the time you have to learn it) is limited.
We will use the SQL designer to select the fields included in the query, to set the relationships (or joins in SQL) among the tables, and to sort the data.
To select the fields that are needed for our query (and that will be available for the report) we can place a check in the field's checkbox. However, in this case we will select all the fields in each table, so we only need to place a check in the table's checkbox (the checkbox at the very top of each table object).
The second step in creating the SQL statement is to set the joins between the tables. In the lower half of the SQL designer, select the "Joins" tab.
There is an empty combobox just under the tabs. Click on it's dropdown button and select "<Create a new join>".
Below the combobox is a grid with the column headers "Field", "Operator", "Field". In it we must select the table and field that will form the SQL join. In the left "Field" column, select "Customer.Customer ID". And in the right "Field" column select "Invoice.Customer ID". The Operator is "=" in this join.
Next we need to create a join between the invoice table and the lineitem table. Be careful with this next step, however, as it can be a bit confusing.
Find the Joins combobox again (it should say Customer <--> Invoice), and click the dropdown arrow. Here you must select the "<Create a new join>" option again. The grid will go blank (that's okay, nothing has be erased). You need to set in the grid a second join between "Invoice.Invoice ID" on the left and "Lineitem.Invoice ID" on the right.
After you have set this second join, look in the Joins combobox. You should see three items:
<Create a new join>
Customer <--> Invoice
Invoice <--> Lineitem
The last step in creating the SQL for our report is to set the sort order of the rowset. Select the "Sorting" tab in the lower pane of the SQL designer. In the left listbox select "Customer.Last Name" and click the add button. The primary sort order of the report will be alphabetical by last name.
Next select "Customer.Customer ID". This secondary sort order is needed in case there are duplicate last names. Finally, select "Invoice.Order Date". This way the invoices for each customer will print in date order.
Save this file as Statements.sql and close the SQL designer. You will notice that a new query object is added to the dQuery surface.
This single query object contains the fields from all three tables. But otherwise it is a rowset like any other rowset that we have already worked with.
Before we move on to create the report, we will create a few lookupSQL fields and two calculated fields. We will start by creating a few lookupSQL properties for the rowset. In the Inspector add a lookupSQL for "State ID", "Country ID", and "Item ID". The SQL statements that you need for these fields are the same as we used in Phase III and can be found in Customer.dmd and Inventory.dmd.
The next thing we must do is create the calculated fields, one for the price of each line item and the other for the Item ID.
Why do we want a calculated field that duplicates the Item ID field? In the report we want to display the both the "Item ID" and the "Item Description". But the "Item ID" field will be attached to a lookupSQL. In this report we are going to create a calculated field that contains the Item ID and display that field on the report.
You may notice that this approach is different than that taken in the Invoice Report. This is being done so that you can see some alternatives.
In the dQuery design surface, select the statements1 query object. Right click the mouse and select Inspect Query from the popup. We need to create an onOpen event for the query and enter the code for our calculated field.
Recall that the BASE.cdm datamodule already has a method for creating a calculated field. To use this method enter the following in the Query's onOpen event:
class::calcField("ItemPrice",10)
class::calcField("ItemID2",5)
The first line will create the calculated field for the item price and the second will create the field for the duplicated Item ID. Save this datamodule, close dQuery, and then reopen the datamodule (this will activate the new fields).
Bug: Be sure that the field names do not contain spaces. If they do, you will have problems creating the beforeGetValue event.
Next bring up the Inspector and drill down to the properties sheet for the new ItemPrice field. We need to add a beforeGetValue event for field. The code for this event will look like:
   function ItemPrice_beforeGetValue
      return (this.parent['Qty'].value * 10)
Do the same for the field ItemID2 and enter this code:
   function ItemID2_beforeGetValue
      return (this.parent['Item ID'].lookuprowset.fields[1].value)
Save the datamodule.
If you open this datamodule in dQuery and preview the data in the lower pane, you may notice that the column for ItemID2 does not contain the correct data. This is a display problem related to the dQuery interface. Have faith in the code, the data will print correctly on the report.
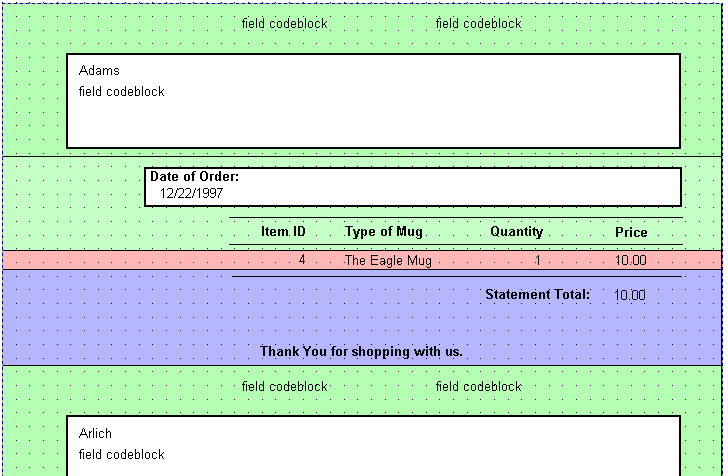
The Report
The customer statements report will have some similarities to the Customer Invoice Report, but it will also offer a glimpse of some additional techniques. To begin, create a new report that is derived from the custom report in BASE.CRP.
Then drag the Statements.dmd datamodule from the Navigator onto the report design surface.

The controls for this report can be layed out similar to the following graphic
We will build this report starting from the "inside" and working our way out, so we will place the detailBand objects first, then the group bands, and finally the group objects.
Place four kmFieldText objects in the detailBand of the report. The first kmFieldText object will display the Item ID, but, since we are using a lookupSQL with that field, we will use the "ItemID2" calculated field. The next kmFieldText object will display the Item Description so you must use the "Item ID" here. This field's data comes from a lookupSQL. The third object displays the the quantity of mugs ordered and the fourth kmFieldText object displays the purchase price of the item. This is the calculated field ItemPrice. (Do not place any heading object at this point as they are going to be put in the group header band.)
Next we will place two group bands on the report surface.
Set the groupby property for the first group band to "Customer ID" and for the second group to "Order Date". (Remember to set the height to something large enough to work in.) You can delete the text objects that says "Heading Text for Group1" and "Heading Text for Group2".
Next place two kmRectangleShapes, one in each of the two group headers. This is done to ensure that text objects will follow the Rectangle objects in the Z-order.
In the Group2 header you should place a kmHeadingFieldText and a kmFieldText object inside the Rectangle. These objects will display the "Order Date" and a label that reads "Date of Order".
The next thing we need to do with this headerBand is to create the column headings of the four detail columns. Place four kmHeadingFieldText objects and two kmLine objects in the header band. The text properties will be "Item ID", "Type of Mug", "Quantity", and "Price". You can also change the alignHorizontal properties as needed.
Now we will move to the group1 header. In the rectangle, place two kmFeildText objects. The first will contain the customer's name and the second will contain the customer's address. The code for constructing these controls should be placed in the canRender event of the Text objects. In fact, we have already written the code for these objects in the Invoice report. You may wish to copy and paste the code for these two objects. Note that you will need to change the names of the datamodule and query objects. That is, change this line:
f = form.InvoiceRepDataModule1.customer1.rowset.fields
to this:
f = form.statementsDataModule1.statements1.rowset.fields
The group1 header will also display the date range for the orders contained in the report. Place two more kmFieldText above the rectangle in the group1 header objects. We are going to place these object now, but their text will be taken from the user's input. This means that we can not finish this element until we create the dialog form that will call this report.
The final band that we need to place visual controls into is the group1 footer. To do this you must switch to the Inspector, and in the combobox at the top find the following object (you can not see this object on the design surface so you can not select it with the mouse):
form.streamsource1.group1.footerband.
Set the height property to 1.00. You should now see the footerband on the design surface.
In this footerband we will place two kmHeadingFieldText objects (one says "Statement Total:" and the other "Thank You for shopping with us."), a kmLine object (near the very top of the band), and one kmFieldText object. We want the latter object to displays the sum total for all the customer's orders. The code block for this object is:
this.parent.parent.agSum({||this.parent.rowset.fields["ItemPrice"].value})
We are not subtotaling each order in this report, however, if you want a subtotal for the order you should use the group2 footerband.
One last element we need to add to the report is a forced page break. We want each customer's statement to print on a new page. This is done in the footerBand's onRender event:
   function FOOTERBAND_onRender
      this.parent.parent.beginNewFrame()
      return
That should do it for the report layout.
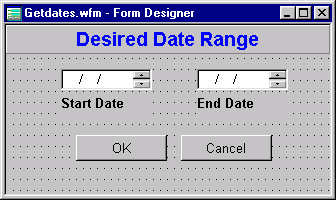
The GetDates Form
The next thing we need is a form that can be used to set a date range for the report. Currently the report will print all the records in the statements1 rowset, however, we normally want to set a range of dates for which to print the orders.
In the Invoice Report we stored the "Invoice ID" in a custom application property (_app."InvoiceID") just before the report was called (see the method "PRINTINVOICE_onClick" in the Invoice form). Then in the datamodule we used the rowset's setRange() method to "filter" the rowset for that ID. In the current report the setRange() method will not work because we do not have an index. In fact, since we used an SQL join to create our query, we do not have access to any of our indexes. This is one of the drawbacks of using a complex SQL statement in a report.
One thing we could do is use the rowset's filter property in place of the setRange() method. In this case, however, we are going to use the canGetRow event of the rowset.
So, to proceed, we need to create a form that can be used to get a date range from a user. We will then store those dates in an application variable and call the report. When the Statements1 query opens, the canGetRow event will use the application variables to decide whether or not the row will be added to the rowset.
First we need a small dialog form to get the date range of orders that the user wants included in the report. To do this create a new form derived (subclassed) from dialogform.cfm. The getdates form needs two mySpinboxes (and two myTextLabels) in which the user will enter the dates.
Our mySpinbox custom control is rather generic so we need to modify the copies of the control after it is placed on the form. In the Inspector find the mySpinbox value property and click the "Type" button (the icon at the far right of the entryfield). In the dropdown list locate and select "Date". Do this for both spinboxes. Also we need to remove the picture property for the two spinboxes.
Next we will enter code for the pushbuttons. Select "Pbsave" and then click the wrench icon for the onClick event. The custom dialogform that our current form is derived from already has an onClick event for this pushbutton so you will be prompted with a message that tells you this event is "linked to a method outside the form;" and asks whether "you want to override it?". In this case click Yes. We are going to replace the onClick method in the custom form with a new method.
We need to do three things in this event. First we need to store the dates that are entered in the spinboxes to the application variables; second, we need to call the report; and third we need to do some cleanup.
   function PBSAVE_onClick
      //  store dates to app variables
	  _app.Start = form.SpinboxStart.value
      _app.Stop  = form.SpinboxStop.value

      // call report
      set procedure to preview.wfm additive
      set procedure to statements.rep additive
      fPreview = new PreviewForm()
      // to open with ReadModal()
      fPreview.bModal = true
      fPreview.viewer.fileName := "statements.rep"
      fPreview.Open()

	  // cleanup
      form.close()

      return
The no (or cancel) button will simple store empty values to the application variables and close the form:
   function PBCANCEL_onClick
      // override method in super class

      _app.Start = {}
      _app.Stop  = {}
      form.close()

      return
Optional code: You may want to set default values for the two spinboxes when the form is opened. To do that you will need an onOpen event for the form. Normally the defaults would be something like today's date (DATE()). However, the sample data that we are using does not have any dates after 1997. So I would suggest that the defaults be set to 12/01/1997 and 12/31/1997. This is only for testing purposes. The form's onOpen event would then look like this:function form_onOpen form.SpinboxStart.value = ctod('12/01/1997') form.SpinboxStop.value = ctod('12/31/1997') return
Save this form as GetDates.wfm
When your user runs this form, enters some dates, and pushes the OK button, the date values will be stored in two application properties. These properties will then be available or visible to other objects -- including our Statements datamodule. We are going to use this functionality to construct the Statements1 rowset.
Open the Statements.dmd datamodule into dQuery. Select the Statements1 query object. Right-click the mouse and select "Inspect Rowset" from the popup. In the Inspector select the Events tab and click the wrench for the "canGetRow" event. When the Source Editor appears, enter the following code:
   function rowset_canGetRow
      local bYes
      bYes = false
      if type("_app.start") # "U"
         if (this.fields['order date'].value >= _app.start) and ;
            (this.fields['order date'].value <= _app.stop)
            bYes = true
         endif
      else
         // if there is no data range we will print
         // all records.
         bYes = true
      endif
      return bYes
With this code the only rows that will be added to the rowset are the ones that match the condition. This will restrict the orders that print to those within our date range.
One last thing is needed to finish this report. Open the Statements.rep report file in the designer. We need to add the codeblock for the two kmFieldText objects at the top of the group1 headerBand. These text objects will display the start date and the stop date, so for the left text object enter the following in the canRender event:
      if type("_app.start") # "U"
         this.text = "From: " + _app.start
      endif
And for the text object on the right enter:
      if type("_app.stop") # "U"
         this.text = "To: " + _app.stop
      endif
Save the close the report.
To test this report, run the getdates form and enter some dates. The sample data that we are using has order dates covering the range 12/01/1997 to 12/31/1997. You can run your first test with these dates. The next time you should narrow the range so that fewer orders print.
We are now done with the reports we needed to create, but we have one last thing to do.
Normally I recommend against using the wizard to generate reports, but we are going to do mailing labels, and the one thing that the wizard does really well is mailing labels (and it is easier to have the wizard lay it all out than to do it yourself!).
In the command window, type the following:
create label wizard
This ensures that the wizard will be used. Follow along carefully and you will find that the wizard will do all the work for you.
If you find that the labels are not "quite right", you can bring them into the designer, and tinker with the layout.
One thing that is fairly obvious is that there is space between the name and the first address field. You can leave it that way, or you can shift the text controls up in the designer. (We'll leave it that way for now, but.)
Note that the wizard for labels (and reports) does not recognize datamodules, and does not use custom controls. You could bring the source code up in the designer and do a "replace all" on "new TEXT" and change it to "new kmFieldText", but again we won't do this here.
To avoid problems with the custom report class being used in your other projects it's a good idea to clear the references before we proceed. Follow these simple steps:
Last Modified: October 25, 2002
The Legal Stuff: This document is part of the dBASE SE Tutorial created by Ken Mayer and Michael Nuwer. This material is copyright © 2002, by Ken Mayer and Michael Nuwer. dBASE SE is copyrighted, trademarked, etc., by dBASE, Inc., the BDE (Borland Database Engine) and BDE Administrator are copyrighted, trademarked and all that by Borland, International. This document may not be posted elsewhere without the explicit permission of the authors, who retains all rights to the document.