In the 15th and 16th issues of the dBulletin, Jean-Pierre Martel has shown how to improve the built-in abilities of the stock grid control. In the first article in this series, his approach was to replace the generic scrollbar of the grid with a stock scrollbar object, gaining in doing so total control over its behaviour. That was a very clever idea, but nothing compared to the next step, namely designing a scrollbar from scratch in order to circumvent the glitches and shortcomings of the first approach. There is no need to change the design of the latter class, because it gives everything the user wants: more functionality, a good-looking interface, and ease of use.
However, in a short section called Bugs and Shortcomings, the author stated at the end of his article that the Seeker control is not compatible with the MegaGridScrollbar class! A short statement, but very important, because in many applications the seeker/grid combination is a powerful means of locating and displaying data.
Thus, there was an opportunity to enhance the MegaGridScrollbar class by implementing Seeker compatibility. Thats the purpose of this third article in the series, which features a new custom class called for lack of imagination and leaving room for future improvements <g> the GigaGrid class.
The following text is divided into
five sections:
The section called The Technique
about it is not strictly about the correct use of this class, but contains
some seldom-used techniques which could be of interest for those of you
who might want to write the next article in this saga
Features
and Shortcomings of the GigaGrid Class
Features inherited from the MegaGridScrollbar class:
The GigaGrid class is as easy to use as its parent, the MegaGridScrollbar class: open a new form in the Form designer, dragn drop a GigaGrid control from the Component palette to the form, drag a table to the form, datalink the grid to the table and you are set.
Dont be alarmed by the look of
the control in the Form Designer; much of the appearance of the control
is established at runtime (Note: make sure that
VSB.dll
and
WndNew.dll
are in scope.)
Run the form and let yourself be convinced of the advantages it has over
the standard grid: its nice-looking interface (designed by the GUI master
himself<g>) and its special feature: the ability to match the
color of the highlighted row to the color of the elevator.
The
Background and Foreground Colors of the Highlighted Row
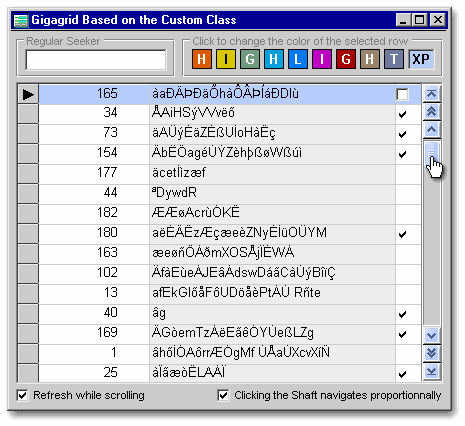
The GigaGrid allows those who are still using dB2K to enjoy some of the improvements brought by dBASE Plus. The ability to change the color of the highlighted row has been on the dBASE wishlist for a very long time. Up to now, by setting the RowSelect property of the grid to true, we had to accept that the color of the highlighted row would be the color (usually dark blue) set on a machine for the active Window titlebar. By contrast, the GigaGrid lets us freely choose a background color and a foreground color to produce a much nicer appearance such as that shown in the first screenshot in this article.
To change the backgound color and
the foreground color of the highlighted row, use something similar to these
three lines of code:
|
form.gigagrid1.selectedBackgroundColor = 0xc7d8 form.gigagrid1.selectedForegroundColor = 0xa8 form.gigagrid1.set_custom_properties() |
|
The first two lines are straightforward,
and the only thing to take note of is that only hexadecimal representations
of the colors are accepted. Interestingly, when we implemented this feature,
it corrected another flaw in dB2Ks grid: the disappearance of the grids
horizontal lines touched by the highlighted row when the
hasColumnHeaders
property
of the grid is set to false
(except when we navigate to the first or to the last row.) Under dB2K,
this behaviour is not seen with the GigaGrid. The third line should always
be used to inform the GigaGrid of a change related to one or more of its
special custom properties.
The
SelfCount
Property
Another property is called selfcount: it has no direct visual effect, but is used to control the performance of the GigaGrid. In order to define a relation between the location of the row pointer and the position of the elevator in its shaft, the Grid must know at any given moment the total number of rows in the datalinked rowset. Of course, this number can change by adding or deleting rows, or by activating/clearing a filter that restricts the number of rows to be displayed. The GigaGrid stores this number in a property called nrows.
To be certain that nrows always contains the correct value, the GigaGrid must do a rowset.count() for every action in the grid. This is feasible for very small rowsets of perhaps 50 records, much larger rowset will dramatically decrease GigaGrid performance. In order to give the developer control over this, he may use the property selfcount. If the developer sets it to true, the class will deal automatically with the nrows value.
However, when larger rowsets are in use, in order to relieve the GigaGrid class of this time-consuming counting, you can set selfcount to the default value of false. In this case the developer becomes responsible for the correct value in nrows and must therefore be sure to increment it if a row is added and decrement it if a row is deleted. The developer must also make sure that nrows contains the result of a fresh rowset.count() when a filter for the rowset has been activated or cleared. Of course, if the user is not allowed to append, delete, or filter the rowset, there is no further programming needed, even when selfcount = false.
If the developer does not properly
manage the nrows property,
the following errors can occur: deleting a row without decrementing
nrows
will result in the
appearance of an empty row at the bottom of the grid when the elevator
is at its bottom position. Moreover, if a record has been appended without
incrementing nrows,
the last row will not be visible when the elevator is at its bottom position.
The
RefreshWhileScrolling
Property
Next is a visual property called refreshWhileScrolling: when this custom property is set to its default of true, the grid will instantly refresh itself as the user drags the elevator. It will scroll such a way as to always show the rows that correspond in the rowset to the actual position of the elevator in the shaft. If this property is set to false, the Gigagrid will not update its display until after the user has left the elevator at a particular position by releasing the mouse button.
The advantage of the GigaGrid over
the standard grid is that the latter gives you no control over its refresh
behaviour. If the rowset has no active index, a movement of the standard
grids elevator will instantly update the rows shown in the grid. On the
contrary, if the rowset has an active index, the standard grid is not updated
until the elevator is released, and unless you are either at the top or
bottom of the rowset, the position of the elevator in the shaft has no
relationship to the position of the pointer in the rowset. With the GigaGrid,
you can specify how the data should be refreshed whether the rowset is
indexed or not. If your application is running on a slow machine or uses
a large rowset about 1000 or more records dynamically refreshing the
GigaGrid will result in a somewhat jumpy appearance and I would then recommend
setting the refreshWhileScrolling property
to false.
The
Proportional
Property
The last custom property is called proportional. It is used to add functionality to the shaft. When it is set to false, a mouse click on the shaft above the elevator has the same effect as a click on the PageUp button: the grid will scroll up one page. Likewise, a click on the shaft below the elevator will result in a page-down scroll. The default setting for the proportional property is true. Heres how it works: the shaft will calculate the relative position where the user clicked, and will scroll to the relative position in the rowset and update the grid accordingly. For example, lets assume the shaft has a height of about 300 pixels, and the user clicks at pixel 200 from the top of the shaft: the grid will then refresh itself to show the row which is located two-thirds of the way through the rowset. Thus, if there are 1000 rows in the rowset, the top row shown in the grid will be the 600th row in the current order, natural or indexed. In order to make it even more user-friendly, you dont need to release the mouse button but can continue dragging the elevator from the position you clicked in the shaft.
In short, the custom properties of the GigaGrid are:
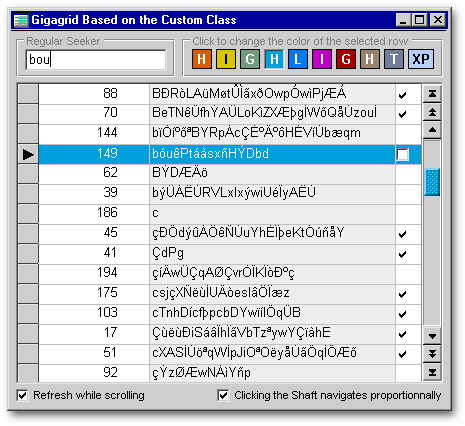
Now lets talk about the most important
feature of the GigGrid: its compatibility with the Seeker control. As with
the stock grid, there is nothing special that needs doing when a GigaGrid
is accompanied by a Seeker object except when the rowset datalinked to
the GigaGrid is not the same as the form.rowset.
In the latter case you have to connect the Seeker to the same rowset that
is displayed in the grid:
|
Function SEEKER1_onOpen this.rowset = form.clients1.rowset return |
|
When the Seeker and the GigaGrid are datalinked to the same rowset, entering a value in the seeker will automatically force the grid to show the first row that corresponds to this value and at the same time update the position of the scrollbars elevator. And thats all there is to it!
Three special techniques are used
to implement the functionality of the Gigagrid: one to display data in
the grid, one to set the position of the elevator, and one to display the
highlighted row.
The
Scrolling of the Grid
Jean-Pierre Martel took advantage of the fact that the grid refreshes on navigation in the datalinked rowset. His code was based on this behaviour of the grid. Unfortunately, this is also the reason that a seeker cannot work with his MegaGridScrollbar. Another way of gridscrolling had to be found in order to make it seeker-compatible. The most generic approach seemed to be the use of Windows API-calls and luckily, the internal design of the stock grid is so well-founded that there was no big problem to achieve the desired results.
Every Windows scrollbar is responsive
to messages of the type WM_VSCROLL.
These messages also accept a parameter which can be used to specify the
direction and extent of scrolling via the following constants:
SB_LINEUP,
SB_LINEDOWN,
SB_PAGEUP, and
SB_PAGEDOWN. A quick test
showed that this message was able to force the corresponding reaction of
the grid. This is not surprising, since the standard grid has its own scrollbars
and is thus built to receive scrollbar-related messages. We can thus use
the following simple code in the onClick()
event
of the NextRow button:
|
SendMessage(grid.hwnd,WM_VSCROLL,SB_LINEDOWN,0) |
|
The SendMessage() API-call does exactly what its name says: it sends a message to the control in this case, the grid using the handle of the control (grid.hwnd) as the first parameter. The second parameter is the constant which specifies the action the control will have to do (vertical scrolling). The third parameter specifies what amount and direction of scrolling should be done. The fourth parameter of the API-call allows additional message-specific information if needed.
Executing the code pictured above forces the grid to scroll one line, i.e., one row. It is important to note that this scrolling is done without moving the row pointer and thus without moving the highlighted cursor of the grid: we have to deal with that separately. The onClick() events of the other scroll-related buttons are programmed similarly. For example, the PageUp button uses the SB_PAGEUP constant, the PageDn button uses the SB_PAGEDOWN constant, etc. If you consult the Windows API Help file under the word WM_VSCROLL, you will find that it has additional constants such as SB_TOP and SB_BOTTOM, but the grid doesnt react to these. These parameters would be useful to scroll in an editor object, but are useless in our case since the first parameter scrolls to the upper left of the control, while the other parameter scrolls to the lower right of the control.
The grid has the ability to correctly react to the SB_PAGEUP and SB_PAGEDOWN messages without needing to know the number of displayed rows this is handled by the grid automatically. This is why the number of rows is not passed as a parameter by the SB_PAGEUP and SB_PAGEDOWN messages.
When the value of the proportional property is set to true, grid scrolling produced by a click on the shaft is quite different from the results produced by a click on the shaft of a standard grid. The trick is to change, on the fly, the number of rows displayed in order to control the amplitude of the scrolling with the SB_PAGEUP and SB_PAGEDOWN messages. For example, lets say that rows 1 to 15 of a 400-row rowset are displayed in a grid. If we click on the exact middle of the shaft, getting a proportional response in the grid means we then have to somehow induce the grid to display rows 201-215. One approach would be to send 200 SB_LINEDOWN messages to the grid, but that would be extremely slow. Instead, we use LockWindowUpdate() to temporarily freeze the display, and while it is frozen we increase the height of the grid such that it can now display half (in this case, 200 rows) of its rowset. Thus, though invisible to the user, the grid is now displaying records 1-200. We then send one single SB_PAGEDOWN message to cause the grid to move the 201st row to the top of the display, i.e., one page of rows when the display contains 200 rows. We then resize the grid to its previous 15 rows and update it. The 201st row stays at the top and the grid now displays rows 201-215. This is equivalent to 200 SB_LINEDOWN messages, but 200 times faster!
The above means of accomplishing proportional scrolling is what limits the size of the GigaGrids datalinked rowset. There is a limit (intrinsic to either dBASE or Windows) of 32768 pixels for the height of any window, and a grid, like any control, is considered by Windows to be a specialized window. Setting the grids height to a greater value has the same effect as setting it to the maximum value of 32768. Since an average row in a grid has a height of 22 pixels, not more than 32768/22 = 1489 rows can be made visible in the grid at a time and thus be safely used in the above page-scrolling. If a larger rowset is used, a desynchronization between the data displayed in the GigaGrid and the position of the elevator position will result.
If a larger rowset must be used,
one must always apply a filter to reduce the number of rows displayed to
1489 or fewer when the added values of the
cellHeight and the
gridLineWidth properties
of the GigaGrid make a total of 22 pixels. Since the GigaGrid is fully
compatible with filters, this is a feasible work-around. If the rowset
cannot be filtered to fewer than 1489 records, the
proportional setting
must be set to false.
Setting
the Position of the Elevator after Using the Seeker (with an indexed rowset)
When the Seeker has just been used to locate a record, the grid will have updated itself as it should (its datalinked to the rowset), but the elevator will not have moved at all because the rowset is not linked in any way to the elevator.
In order to proportionally re-position of the elevator in relation to the new pointer position in the rowset, we have to know the location (analogous to recno( ) in an unindexed table) of the row pointer within the indexed rowset. With Paradox tables, the Borland Database Engine provides what is called the sequence number which always shows the distance of the current row from the beginning of the rowset (in effect, a recno( )) whether the latter is indexed or not. If we had such a sequence number, we would know exactly where in the indexed sequence we are and thus could accurately and proportionally re-position the elevator. Unfortunately, this sequence number is not provided for .dbf or any table format other than Paradox. We must therfore calculate the position of the current row ourselves, and we do it by taking advantage of the active index while performing a binary-tree search as described below.
We first bookmark the current record and set notifyControls to false because we will navigate during the search and dont want the grid to reflect it. We then jump to the middle of the rowset (if we have 100 records, that means starting at number 50), check to see if the current bookmark is greater or smaller than the bookmark we are looking for, and jump to the middle of the resulting part of the set (either 75 or 25). We repeat this process in a loop until our bookmarks are equal, and the number we get is the relative position of the row in the indexed rowset. We can then use this number for the proper calculation of the position of the elevator! Code for the above is found in the Paintbox_onLeftMouseUp() method of GigaGrid.cc.
Of course this means a lot of calculation
and navigation, and is the reason why the GigaGrid datalinked to an indexed
rowset is slower than a normal grid without an indexed rowset. On the other
hand it is the only way to reflect the position of the row. A normal grid
cannot do that with an indexed rowset; it only knows when the row cursor
is at the first row, the last row or somewhere in-between (represented
by the elevator sitting in the middle of the shaft).
The
Display of the Highlighted Row
This technique requires
WndNew.dll as well as
GigaGrid.cc. In fact,
it is one of the very rare occasions on which the programmability of dBASE
falls short. We need a Windows technique called subClassing which
replaces a standard Windows procedure with a custom procedure which, in
this case, processes all incoming Windows messages: this is referred as
a callback function. A call-back function cannot be done with dBASE.
The included dll was created with Delphi and it has only four lines of
code. The pseudo-code looks similar to this:
|
Start of a callback function related to the indicator-bar at the left of the grid (thats why the hasIndicator property of the grid has to be true) Is the received message a WM_PAINT? If so, send a leftMouseUp message to the invisible paintbox in the GigaGrid control and continue normal execution If not, continue normal execution without doing anything particular |
|
In the GigaGrid control, the invisible paintbox is only there to make dBASE aware of a specific API call normally done without its knowledge. The indicator-bar always gets a WM_PAINT message when the little pointer has to move because of row navigation. Since we have no way of controlling this indicator, we use the callback function, transforming a WM_PAINT message sent to the indicator into a pseudo mouse event of the paintbox which can, of course, be easily handled by the dBASE language.
Every time the paintbox
onLeftMouseUp() event
is fired, we know that the grid has been scrolled and that the highlighted
region needs to be repositioned. In the GigaGrid, that highlighted region
is nothing but a colored container containing entryfields to show the
data whose top property
is changed to reflect the new location of the highlighted region. If the
current row is not visible in the grid and there is thus no highlighted
row to be seen, the container is simply made invisible! Thanks to the
colorNormal
property of
its entryfields, it is easy to use any color to display the pseudo-highlighted
row.
Summary
The GigaGrid class is the next step in the evolution of the MegaGridScrollbar class. About 99.5 percent of it is written in dBL. In my eyes, it is clear proof of the power of this language. Although there is a lot of calculation to be done in order to work around bugs or to implement new features, the speed of the resulting control is still amazing. Ok, it is not a Ferrari, but it is much more flexible than a Ferrari; a sort of SUV of the data-displaying controls <G>. Its open architecture makes it easy to adapt or to improve.
The GigaGrid has the shortcoming of rowset size-limitation, but this should not be a major concern in the context of a properly-designed application. Nevertheless, there are situations where it cannot be used and that is a pity, but there is no way around it for now.
Some of the improvements built into the GigaGrid were duplicated by dBASE Plus. Thus, it is users of dB2K who will benefit most by using the GigaGrid. Still, there are several other improvements that continue to be unique to the GigaGrid so even Plus developers will find it pleasing to use. Moreover, having been built before the release of dBASE Plus, a re-write of the class that accounts for the new Plus features will likely eliminate some code and thus improve performance.
I hope that this class will be useful to many people reading this article, because then it will have fulfilled its purpose.